Disclaimer: This blog is for general informational and inspirational purposes only, based on publicly available information and personal insights. Images—whether of models, screenshots, or products—are for illustrative purposes only and do not depict actual subjects, scenarios, or views described. We do not intend to offend or conflict with any societal, cultural, religious, or political values.
Let’s know about the Changing Skin Color In Photoshop, The camera acts as the save switch of the mind eye to preserve memory with a photo. An awful picture will not make you interested in looking back more than once, whereas an outstanding image will make you remember the memory all of your life. Due to light and exposure issues, sometimes the picture color changes and demolishes the beauty of the picture. For that reason, frequently, we take possession of shots with imperfect color, especially the skin tone of the people in the photo.
For example, you have captured a group picture. After clicking, you found the environment and posed great, but all of your skin colors changed to orange, straw, darken, or red. Does it look okay to go? Doesn’t it look like you all are from another planet?
Don’t worry. If you face such an issue, it’s good news that you can fix the skin tone from alien to human using photoshop. So let’s jump into details on changing skin color in Photoshop.
What is skin color?
Skin color defines the tone of the external layer of skin varies from person to person based on skin pigment. The 4 Major Kinds Of Skin shades are Light, Fair, Medium, and Deep.

Changing Skin Color in Photoshop
Photoshop allows measuring the actual color shade in a picture and restoring the color to a standard skin tone. So let’s learn in detail.
Technique-1: Changing with an Adjustment Layer
Most professionals prefer this approach to change skin color easily. However, this technique can get the best result if the image is ready apart from the skin color.
Step-1: Open the photo from the ‘File’ option on the menu bar. You can do it in a shortcut by pressing Ctrl+O on the keyboard.
Step-2: After opening the image, if you notice, you will see a small thumbnail on the right side at the bottom of the tools. Click on the thumbnail to create a duplicate layer. You can press Ctrl+J on the keyboard to duplicate as a shortcut. It will create a layer with a default name of ‘Layer 1’. 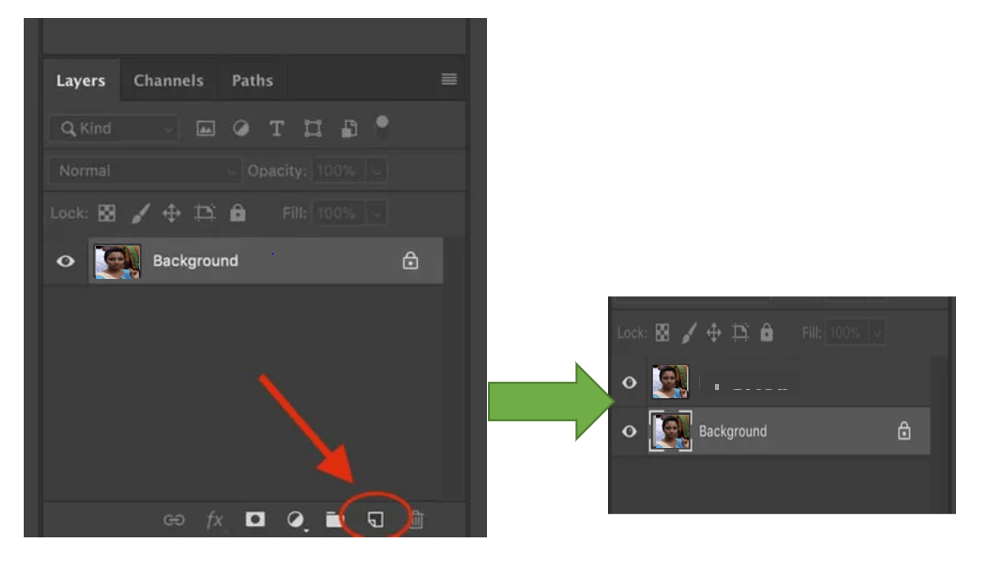 This image is for illustrative purposes only. No offense or conflict with any cultural, religious, or social values is intended. All trademarks, logos, & content remain the property of their owners.
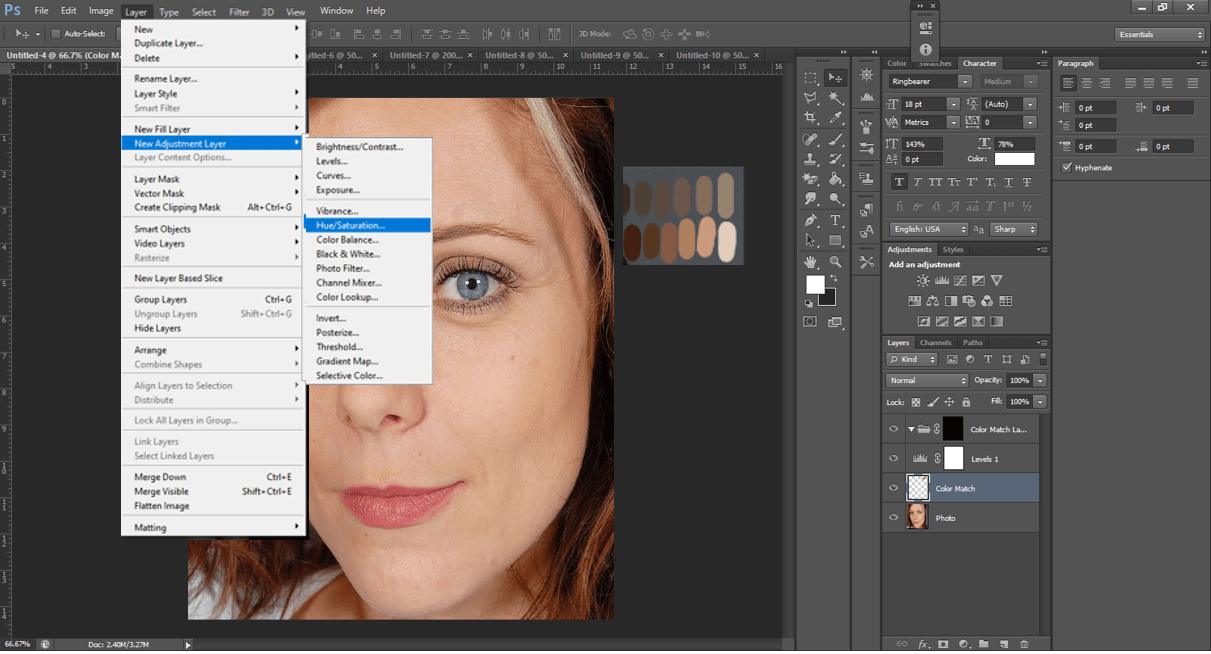
Step-3: Pick the adjustment tool (circular icon) from the bottom-left corner of the panel. A menu with various choices will appear. For example, you will get a color adjustment pallet by clicking on the Hue/Saturation, where you can adjust the color by moving the pointers left and right. This image is for illustrative purposes only. No offense or conflict with any cultural, religious, or social values is intended. All trademarks, logos, & content remain the property of their owners.
Step-4: If you have noticed, you might have seen that the entire layer was refilled with coloring as you have adjusted hues. But we are here to change the skin color only. That’s why we have to alter the background color to ‘black and white’ by selecting the ‘Paint Bucket Tool. We usually find the white color on the top, but we need the black one on the top for this time.  This image is for illustrative purposes only. No offense or conflict with any cultural, religious, or social values is intended. All trademarks, logos, & content remain the property of their owners.
Step-5: From the toolbox, choose the ‘Brush Tool’ and acclimate the length of the brush.
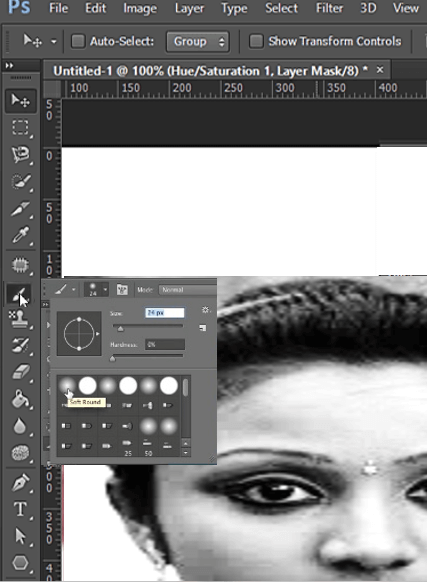 This image is for illustrative purposes only. No offense or conflict with any cultural, religious, or social values is intended. All trademarks, logos, & content remain the property of their owners.
Step-6: Now, you are in the central part of our journey of changing skin color in photoshop. Before you jump to change the color, you have to know where the image trace is in photoshop. Then, make sure you switch back the black and white layer to its original condition.
After that, start coloring by placing the mouse cursor on the part you want to change. While painting, you can zoom in to get a more suitable view. Don’t hurry since it’s a vital part of the total editing journey. Take your time with patience to color the skin areas perfectly.
Step-7: The new painting part may seem abnormal to look at. Modify the painted color to give a true-to-life shade by adjusting the opacity of hue/saturation.
Step-8: Don’t forget about the lips that shouldn’t be skin color. So, return to ‘Layer 1’ and follow the steps you performed to change the skin color. After filling the lips color, again accommodate the opacity of the saturation.
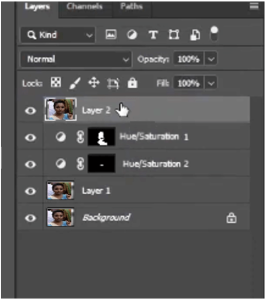
Step-9: So far, we have worked on two layers wherein 1st layer, we have changed the skin color, and another one we changed the lips color. We have to merge these two layers to get the expected result as a complete photo.
For this, we need to add a layer mask by selecting the ‘Layer Mask’ symbol from the bottom-right part of the panel. Now push Shift+Ctrl+Alt+E on the keyboard to merge all layers.
 This image is for illustrative purposes only. No offense or conflict with any cultural, religious, or social values is intended. All trademarks, logos, & content remain the property of their owners.
Step-10: If you notice correctly with the naked eye, you can see that the hair and eyebrows become washed out. As a result, they do not fit the skin color. To match the skin, you have to darken them utilizing the burn tool.
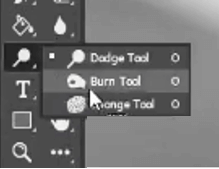 This image is for illustrative purposes only. No offense or conflict with any cultural, religious, or social values is intended. All trademarks, logos, & content remain the property of their owners.
Step-11: What is the value of going through all the ten steps mentioned above if you don’t save it? All your effort will go in vain. So, click on “Save As,” from the file menu or press Ctrl+S on the keyboard as a shortcut. On a plus note, don’t forget to select the file type you prefer when saving the file.
Don’t fear making a mistake. Here is the solution:
- If you have painted any area mistakenly, you can restore it by painting the portion with black color. Apply the color code #000000 for black.
- When you are ready to recolor, switch to white paint again and follow the earlier steps.
Technique-2: Brush Tool- Changing Skin Color in Photoshop
You can paint the layer quickly by this method. It is easy but ineffective since it offers very few options to modify. The steps are as below:
Step-1: Open the photo in photoshop.
Step-2: Duplicate the layer of the image.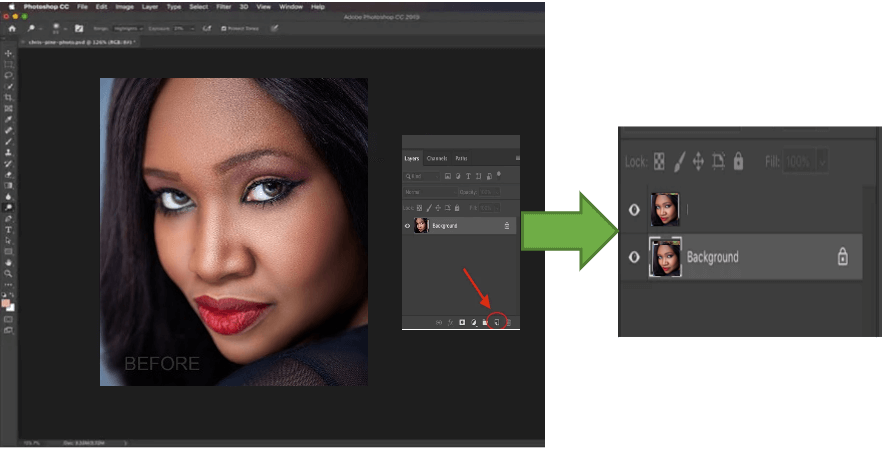 This image is used solely for illustrative purposes. We do not intend to offend or conflict with any societal, cultural, religious, or political values. Image Source: Pixabay
Step-3: Go to Layer>Layer Style>Blending option. Then mark unchecks to the box of Color Overlay.
Step-4: Pick the color you want and carefully paint over the skin area using a soft brush.
Step-5: Adjust the brightness by increasing or decreasing hue, saturation.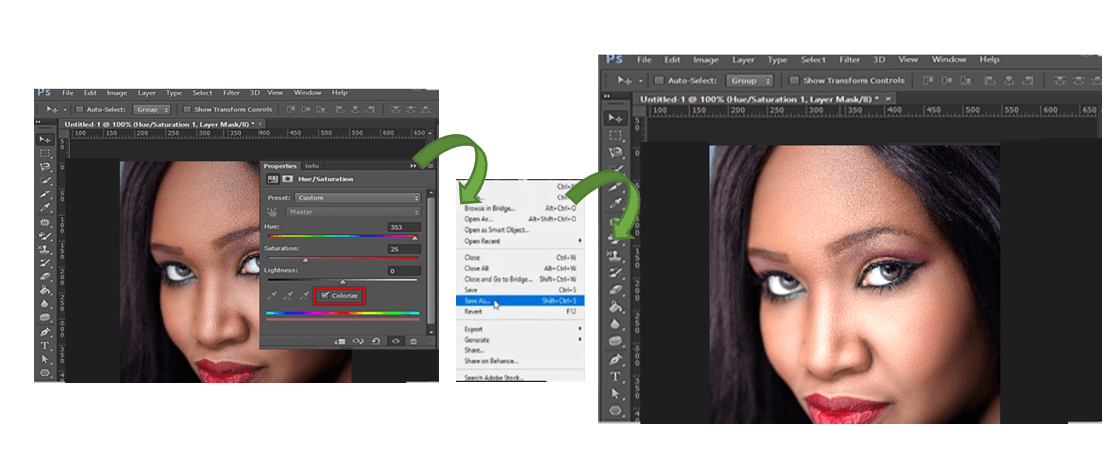
This image is used solely for illustrative purposes. We do not intend to offend or conflict with any societal, cultural, religious, or political values. Image Source: Pixabay
The process may result in changing the color of the whole image, but it will allow you the chance to test out different colors on the skin. Finally, save the result.
Technique-3: Eyedropper tool
It is the most effortless method to acquire rich and good-looking skin tones in Photoshop, where you will use the advanced Photoshop masking tools to adjust only the skin tones in the image.
Step-1:Open the image in Photoshop and duplicate layer 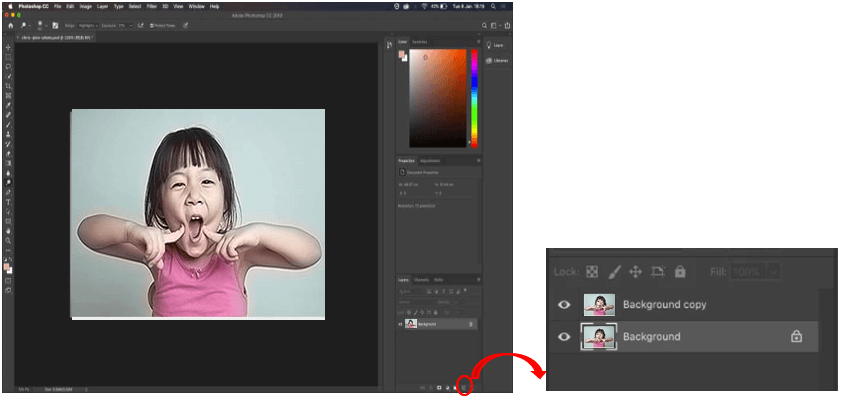 This image is used solely for illustrative purposes. We do not intend to offend or conflict with any societal, cultural, religious, or political values. Image Source: Shutterstock
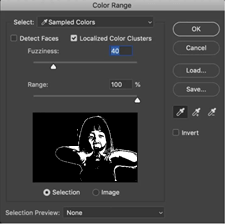
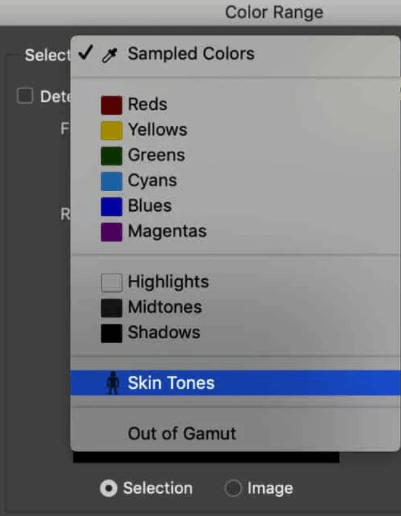
Step-2: Go to Menu to select the color range as below:
Menu>Select>Color Range
 This image is used solely for illustrative purposes. We do not intend to offend or conflict with any societal, cultural, religious, or political values. Image Source: Shutterstock
Step-3: Select the ‘Sample Colors’ to adjust the skin properly.
Step-4: Decrease the Fuzziness and pick the Eyedropper tool to click on any part of the skin.
 This image is used solely for illustrative purposes. We do not intend to offend or conflict with any societal, cultural, religious, or political values. Image Source: Shutterstock
Step-5: checkmark the Selection option in the color spectrum window.
Step-6: Click on the +sign to add another Eyedropper and drag it over the skin tones to expand the range.
 This image is for illustrative purposes only. No offense or conflict with any cultural, religious, or social values is intended. All trademarks, logos, & content remain the property of their owners.
Step-7: Set the opaqueness to 55 and select OK.
Step-8: Once you get the skin tone, select the Adjustment Layer from the panel and pick Solid Color.
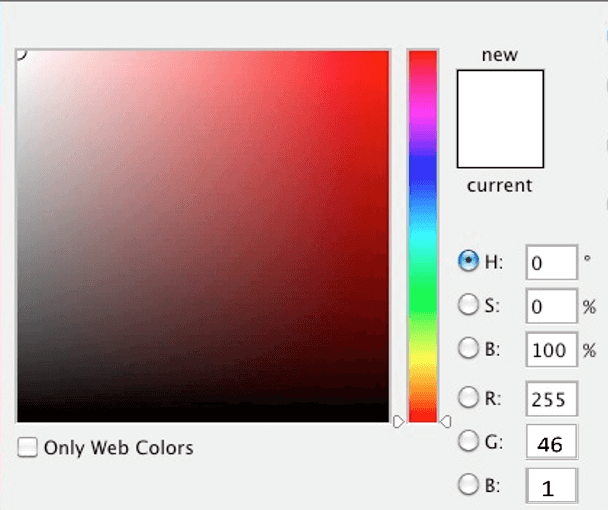
Step-9: In the color palette RGB section, input the value as below and click OK:
Red: 255,
Green: 46,
Blue: 1
Step-10: Switch the Blend Mode “Normal” to “Linear Light.” and lower the opaqueness by 5-10%.
 This image is for illustrative purposes only. No offense or conflict with any cultural, religious, or social values is intended. All trademarks, logos, & content remain the property of their owners.
Step-11: Select mask and paintbrush tool to paint areas that have turned out harsh for blending. After a satisfactory result, save the picture.
This image is used solely for illustrative purposes. We do not intend to offend or conflict with any societal, cultural, religious, or political values. Image Source: Shutterstock
Match Skin Tones for color changing
Human skin shows the most complicated and various spectrum of shades in photography. For that, you need to be tricky to match the skin tone.
Here are some steps to match the skin tone and take your photography to the successive status.
- Open the image in photoshop.
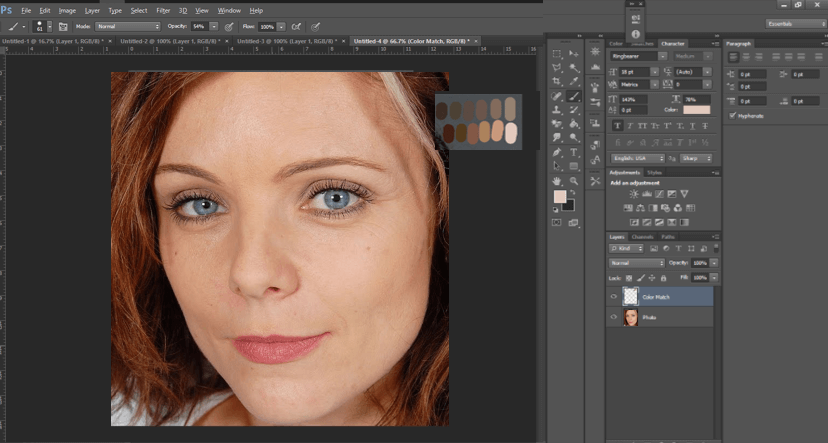
- Create a new layer for adjustment by selecting Layer>New Layer and rename it.
 This image is used solely for illustrative purposes. We do not intend to offend or conflict with any societal, cultural, religious, or political values. Image Source: Pixabay
- Test the skin tone from the sample color by pressing the option key on your keyboard.
 This image is used solely for illustrative purposes. We do not intend to offend or conflict with any societal, cultural, religious, or political values. Image Source: Pixabay
- Choose the paintbrush tool and test each shade by applying it in a small portion on the layer created recently.
 This image is used solely for illustrative purposes. We do not intend to offend or conflict with any societal, cultural, religious, or political values. Image Source: Pixabay
- Go to layer>new adjustment layer to create a new adjustment layer.
- Go to the properties option of the new adjustment layer and swap from RGB to blue.
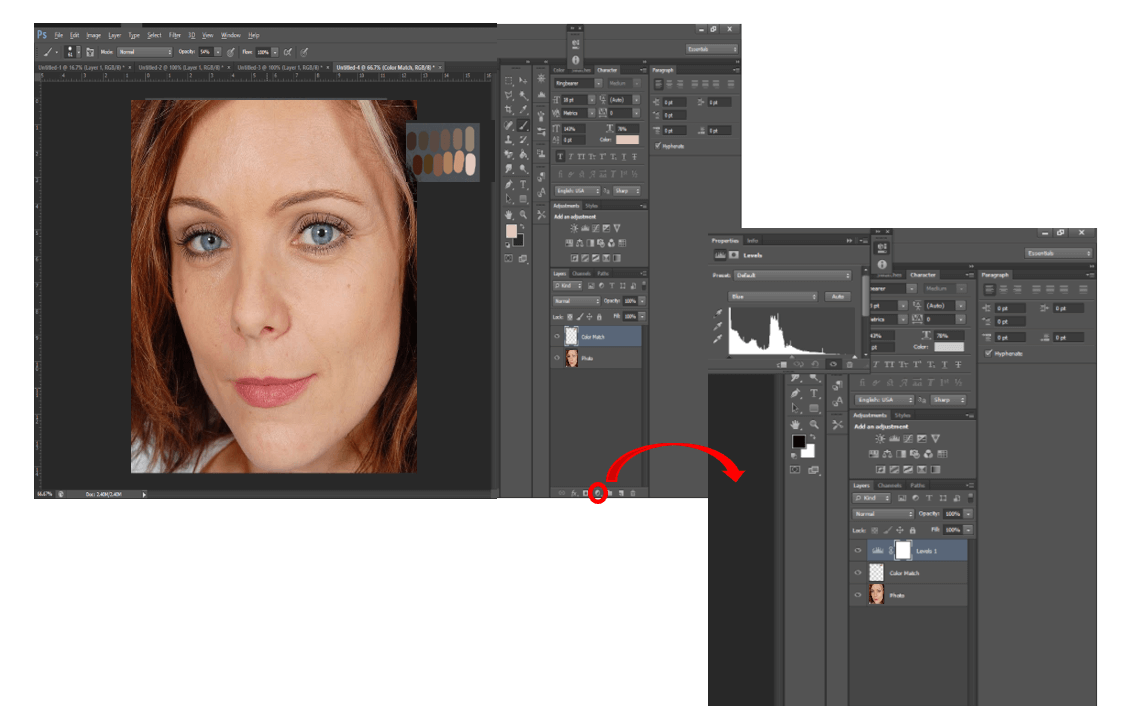 This image is used solely for illustrative purposes. We do not intend to offend or conflict with any societal, cultural, religious, or political values. Image Source: Pixabay
- Darken the image by moving the right-hand slider to the left slowly. Thus, it will add some yellow highlights contrasting the blue color. Continue the step until you get the expected result.
- Now repeat step#7 to adjust the green over the blue.
 This image is used solely for illustrative purposes. We do not intend to offend or conflict with any societal, cultural, religious, or political values. Image Source: Pixabay
- Group your working layers to apply all the actions to all layers. For that, select a layer, go to the lower part of the panel and select the small folder sign.
- Pick a layer to mask and click on the mask sign from the lower panel that looks like a white rectangle holding a black circle inside.
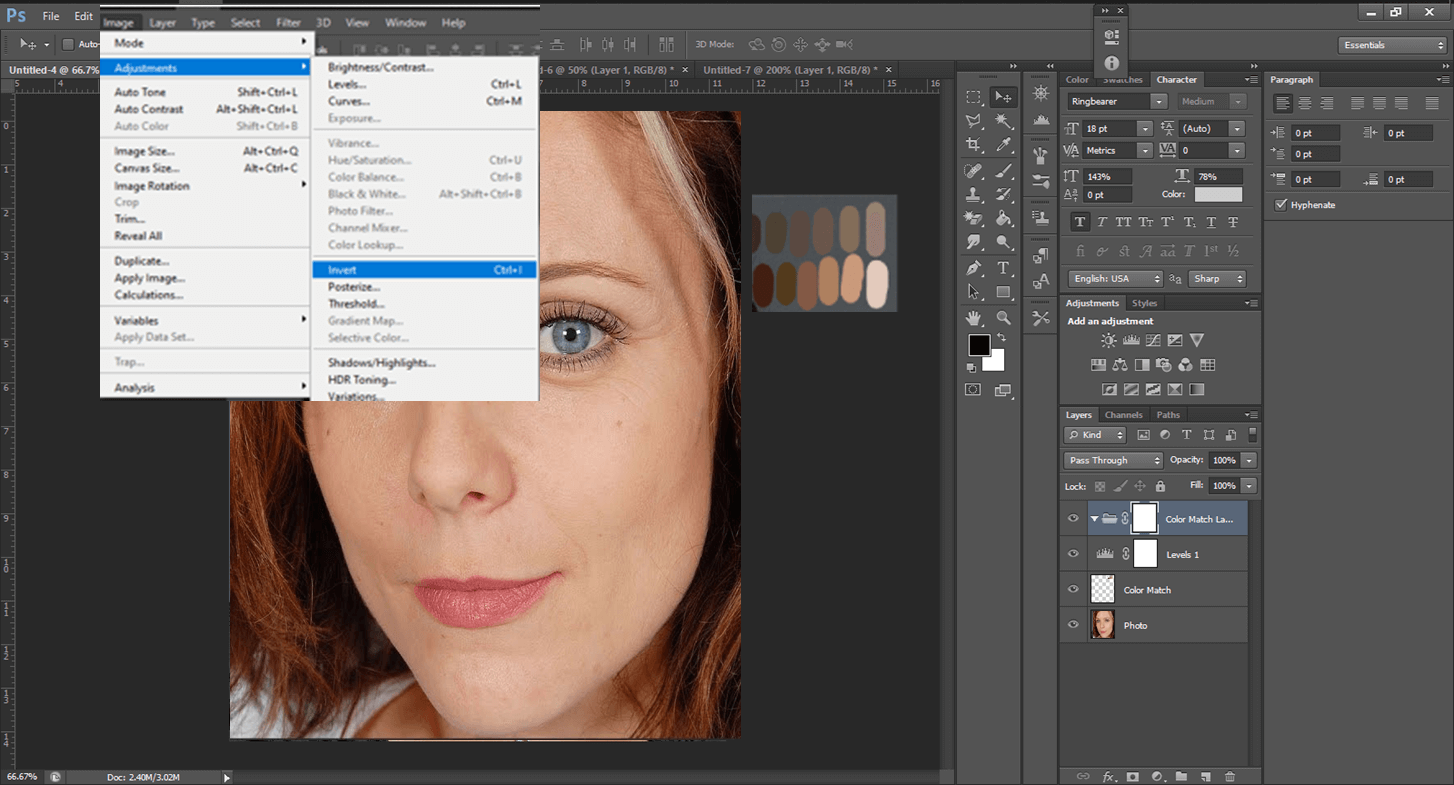
- Go to Image>Adjustment>invert to inverse the layer.
This image is used solely for illustrative purposes. We do not intend to offend or conflict with any societal, cultural, religious, or political values. Image Source: Pixabay
- Utilize the paintbrush tool to paint the area you want to edit. Avoid eyeballs, eyebrows, or lips.
- Again go to Layer>New adjustment layer>Hue/saturation. Drag the slider from the hue/saturation layer until it meets your expectation of creating a natural look.
 This image is used solely for illustrative purposes. We do not intend to offend or conflict with any societal, cultural, religious, or political values. Image Source: Pixabay
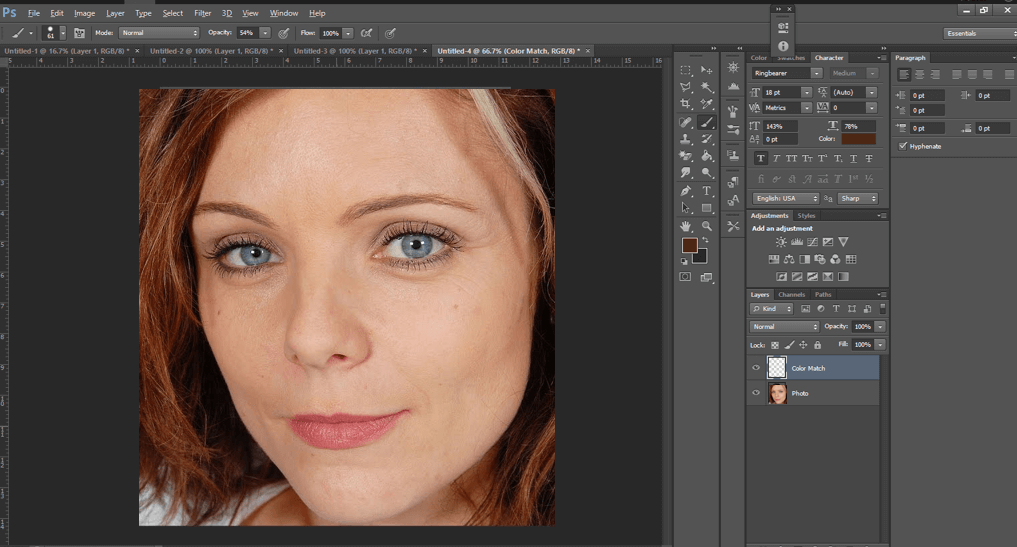
- Now, you can delete the color swatches you made in step#4 and reduce the opacity by 80% to make the photo shiny. The percentage is not fixed. It depends on the actual image.
 This image is used solely for illustrative purposes. We do not intend to offend or conflict with any societal, cultural, religious, or political values. Image Source: Pixabay
Why do you need to change the skin color in the photo?
Every online business, magazine publisher, and professional photographer looks for a skin color change option while using any model apart from personal purpose. Because the skin color automatically changes in the photo from reality due to overexposure or brightness level.
Suppose you are running an online shoe business. You should post your product photos online, and for that, you must know how to take shoe pictures. Sometimes, you may need to utilize a model to showcase your shoes. However, after capturing a photo with a model, you may find that the model’s skin color isn’t perfect to emphasize your product, or the skin color doesn’t match reality. Do you think the photo will be okay to go?
The answer is no, right? But, yes, if the skin color is not perfect, it may demolish the photo showing fakeness.
As a solution to this problem, you must go through the steps mentioned earlier to change the skin color. However, as a non-professional, it may seem challenging to apply Photo Cut Out Service, replace or merge the Image Cut Out portion for color changing, or it will be tough for you to find where the image trace is in photoshop. So, to get an outstanding and eye-catchy outcome, you should outsource experts. Cut Out Image is a photo editing and post-production service provider that can rescue you from this trouble.