Disclaimer: This blog is for general informational and inspirational purposes only, based on publicly available information and personal insights. Images—whether of models, screenshots, or products—are for illustrative purposes only and do not depict actual subjects, scenarios, or views described. We do not intend to offend or conflict with any societal, cultural, religious, or political values.
Once you get the Lightroom presets, the next step is installation. Presets help you in editing the image as per your requirements. Adjust the exposure or the white balance sliders. Let us check out the quick steps for how to install lightroom presets.
Option 1 [ How to Install Lightroom Presets ]
- Download the zip file of the presets to your desktop/laptop/computer.
- Locate the zip file on the computer and extract the files on lightroom presets. On a MAC device, double-click the zip folder to unzip the files. On a PC device, right-click the file and select the option ’Extract all. Do take note of the place of storage of your extracted files, as we require it in the later steps.
- Open Lightroom and click ‘edit’ on the PC device and ‘lightroom’ on the Mac device. Now select ‘preferences’ from the drop-down menu. Now click on the ‘presets’ tab.
 This image is for illustrative purposes only. No offense or conflict with any cultural, religious, or social values is intended. All trademarks, logos, & content remain the property of their owners.
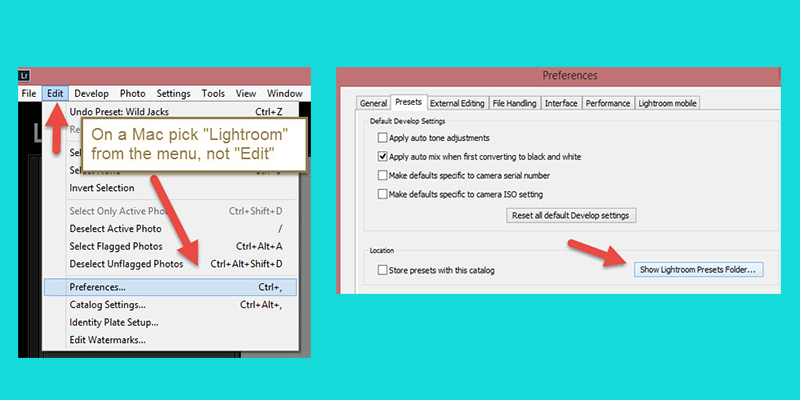
- Ensure that the checkbox ‘store presets with this catalog’ is unchecked
- Click on ‘show lightroom presets folder
- Locate and open the folder ‘lightroom’ by double-clicking on it. Click the ‘develop presets’ folder.
- Copy and paste this extracted folder ( the saved presets folder)from the downloaded presets into the ‘Develop presets’ folder.
- We are almost done. Just close and open ’lightroom’ and the presets get imported and are ready to be used.
 This image is for illustrative purposes only. No offense or conflict with any cultural, religious, or social values is intended. All trademarks, logos, & content remain the property of their owners.
Learn More: Lightroom Advantages For Users
Option 2 [ How to Install Lightroom Presets ]
- Download the presets zip file to your computer.
- Start extracting the files from the zip folder. Double-click the zip folder on a MAC device to unzip the files. On a PC device, right-click the file and select the option ’Extract all. Do take note of the place of storage of your extracted files, as we require it in the later steps.
- In the Lightroom app, open the ‘Develop’ module by clicking on it.
- Create a ‘lightroom’ folder in any of the three ways given below.
Note – Do not right-click’presets’ on the presets panel, or it will not work. Click on any area below the ‘presets’ header.
- Click Control+Alt+N (PC), and Command+Option+N (MAC) to create a new folder.
- Click the “Develop” module in the top left menu, select ‘new preset folder’ from the drop-down menu, and click it. Name the folder.
- Right-click on a preset name/preset folderÞ select “new folder” ÞName the folder.
- Import the presets into the new folder. Right-click on the folder name and click ‘import’.
- Locate the unzipped folder that was extracted from the zip file. Select all the presets in the folder and click ’import’. Note- the preset files should have .lrtemplate as the file name extension.
- The preset files have been imported and installed.
 This image is for illustrative purposes only. No offense or conflict with any cultural, religious, or social values is intended. All trademarks, logos, & content remain the property of their owners.
Learn More: How To Upgrade Lightroom Classic Software
Some troubleshooting tips
- If you cannot see a presets window, check and ensure that you are in the Develop module and not the Library module.
- The ‘store presets in this catalog’ is always unchecked.
- Make sure Lightroom is installed on the computer
- If the ‘presets’ are not visible, recheck that you have copied the downloaded presets into the correct Lightroom folder.
