Disclaimer: This blog is for general informational and inspirational purposes only, based on publicly available information and personal insights. Images—whether of models, screenshots, or products—are for illustrative purposes only and do not depict actual subjects, scenarios, or views described. We do not intend to offend or conflict with any societal, cultural, religious, or political values.
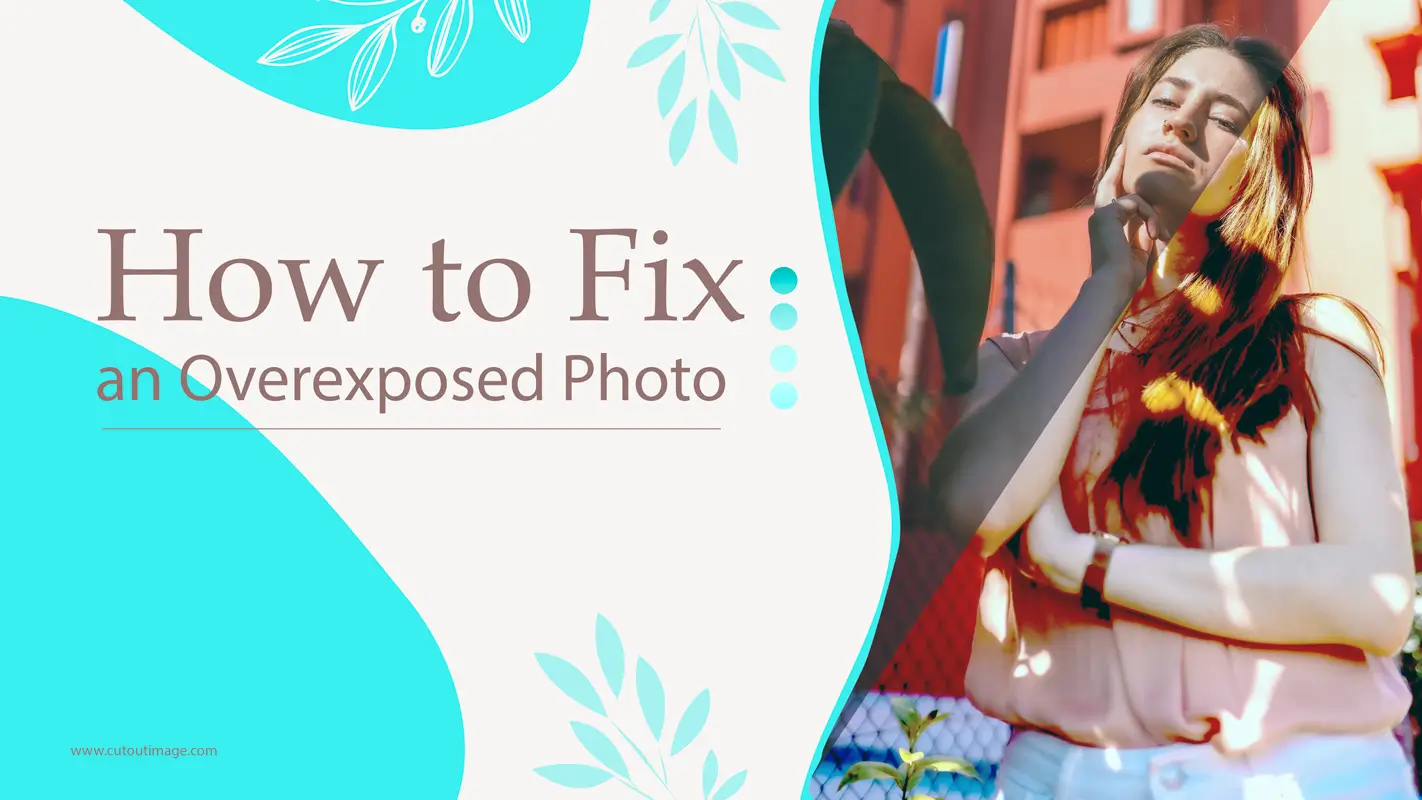
Who doesn’t capture photos in this digital world? Almost everyone holds an iPhone and does iPhone Photography to save good memories. Professional photography is also getting popular, and consequently, demand is rising. After photography, while culling them, what will you do if you find an excellent shot that is washed out? Are you about to trash it? But wait, don’t trash it. Almost every photographer goes under this overexposed issue; luckily, you can fix it. Today’s blog will teach you How to Fix an Overexposed Photo and transform it into a masterpiece.
I will cover the below topics in today’s blog:
What is overexposed in photography?
- What is overexposed in photography?
- How to Fix an Overexposed Photo
- Why Are Photos Overexposed?
- Guidance to Avoid Overexposed Photos
What Is Overexposure in Photography
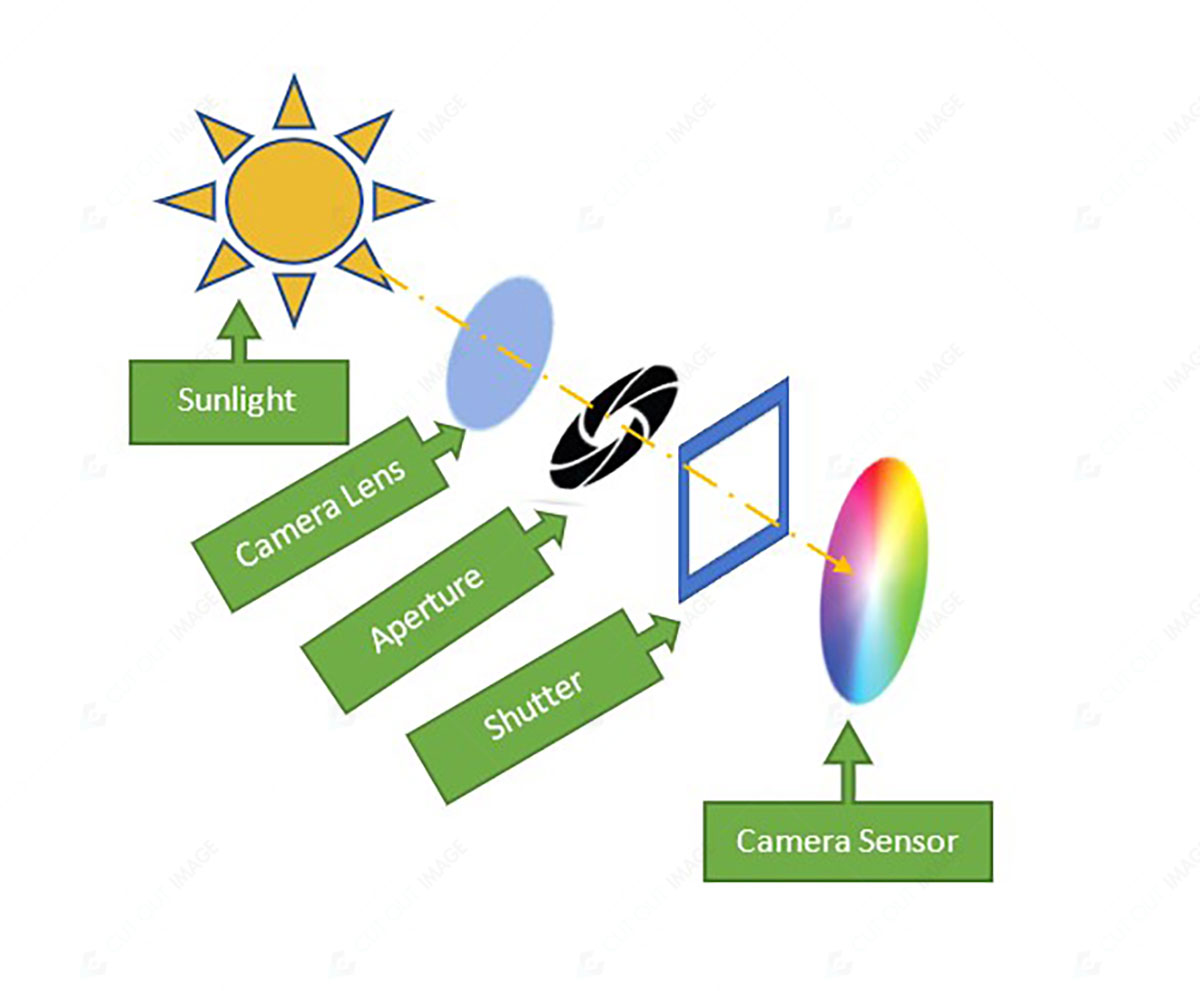
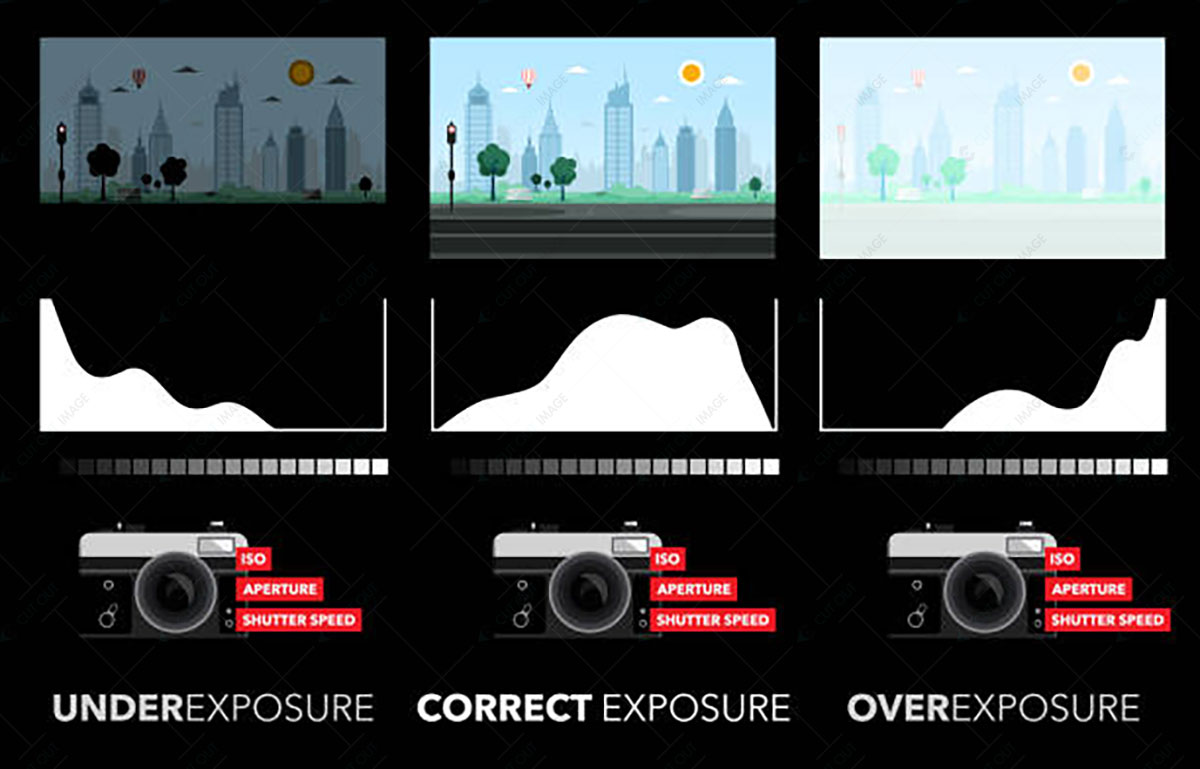
As we know, light is part and parcel of photography. It makes the perfect exposure to visualize all the details. Here exposure acts as the foundation of the photo.
Exposure is the amount of light the camera sensor collects to visualize data.
The picture below illustrates the process of exposure in photography.
 This image is for illustrative purposes only. No offense or conflict with any cultural, religious, or social values is intended. All trademarks, logos, & content remain the property of their owners.
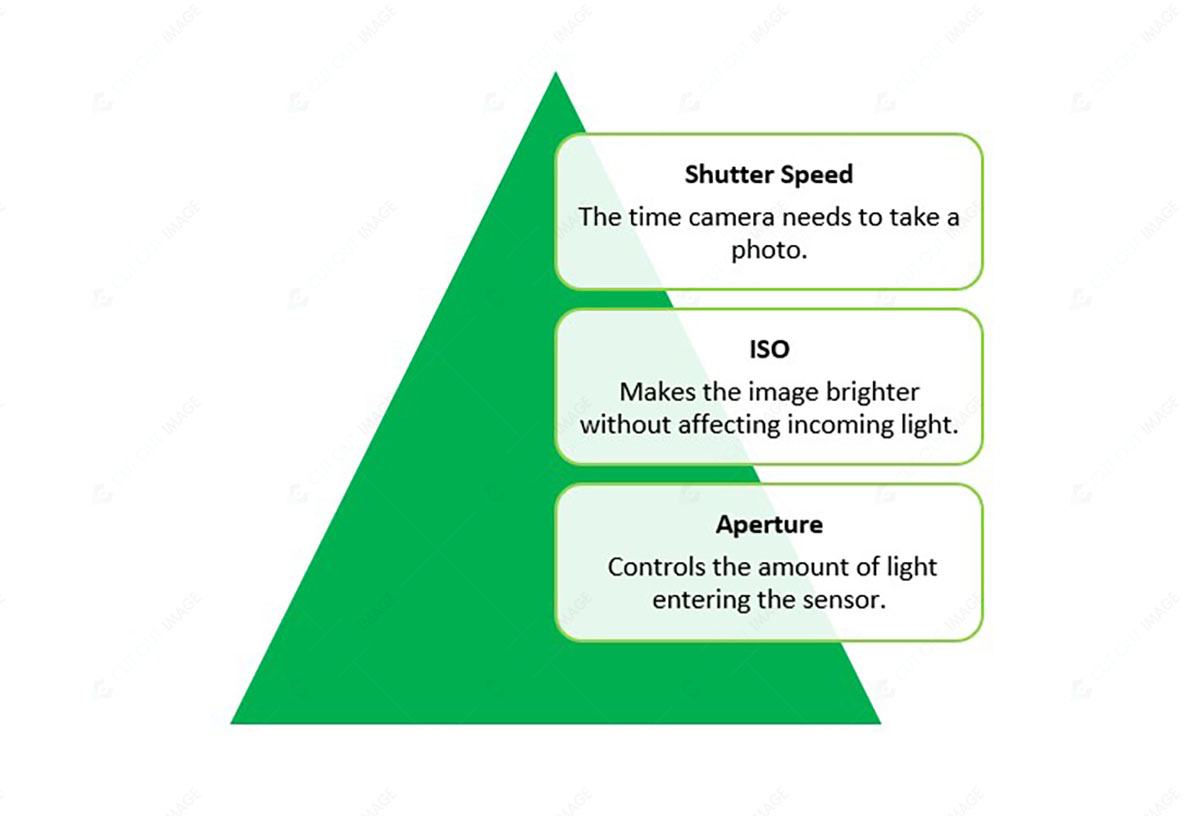
There are 3 main pillars for exposures: aperture, shutter speed, and ISO. These 3 are called the Exposure Triangle, and the perfect balance of these 3 can create a perfectly exposed photo.
This image is for illustrative purposes only. No offense or conflict with any cultural, religious, or social values is intended. All trademarks, logos, & content remain the property of their owners.
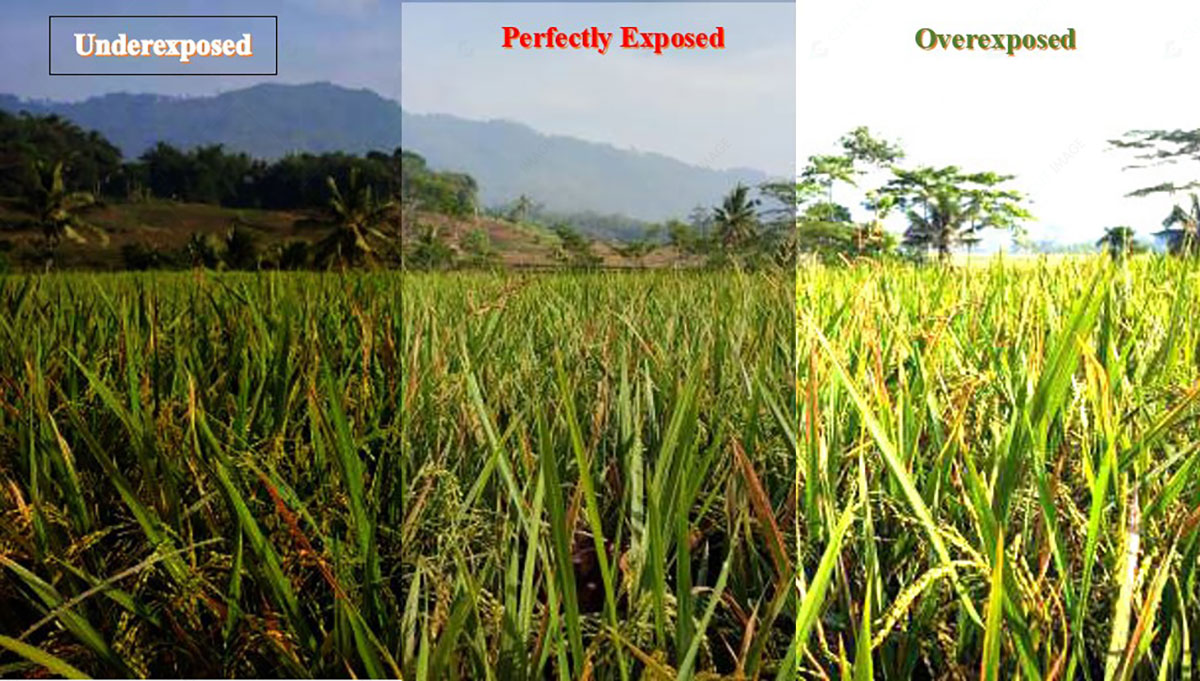
While capturing the photo, we might face 3 types of exposure:
- Overexposure
- Perfect Exposure
- Underexposure
Before we know about overexposure, we should also know about the other two. Here the perfect exposure indicates the proper lighting with ideal contrast between highlights and shadows. Conversely, underexposure indicates improper lighting that is too dark to visualize the details.
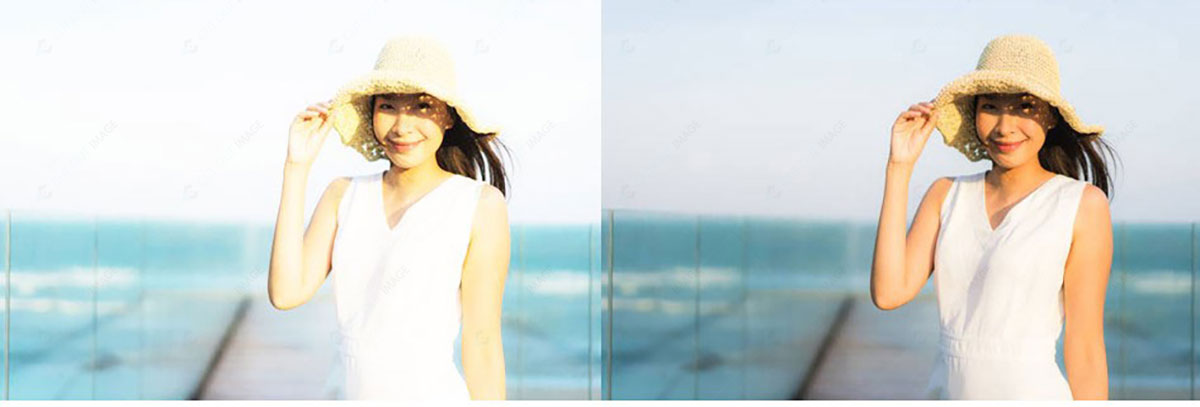
Overexposure contains excessive light that makes the detail lost. The shutter speed, aperture, and ISO are not balanced correctly in an overexposed photo. Consequently, some details get lost, generating a washed-out photo.
 This image is for illustrative purposes only. No offense or conflict with any cultural, religious, or social values is intended. All trademarks, logos, & content remain the property of their owners.
The above picture shows different exposure you can experience for the same picture for different issues. You can identify if your photos are overexposed or exposed correctly by following several ways:
- Checking the histogram
- Looking at the camera’s exposure meter
- Checking the Shadows
How to Fix an Overexposed Photo
Harboring good knowledge of taking correctly exposed photos can reduce the overexposed rate, but that’s not always possible. Therefore, the image post-production process is an alternative solution to fix an overexposed photo.
Fixing overexposed photos is not a hard nut to crack. However, following a few steps and having knowledge of photo editing tools can make the path easy to fix the overexposed photo. There are several tools available to fix photos. Today we will share How to Fix an Overexposed Photo using those tools. So, let’s swoop into the details:
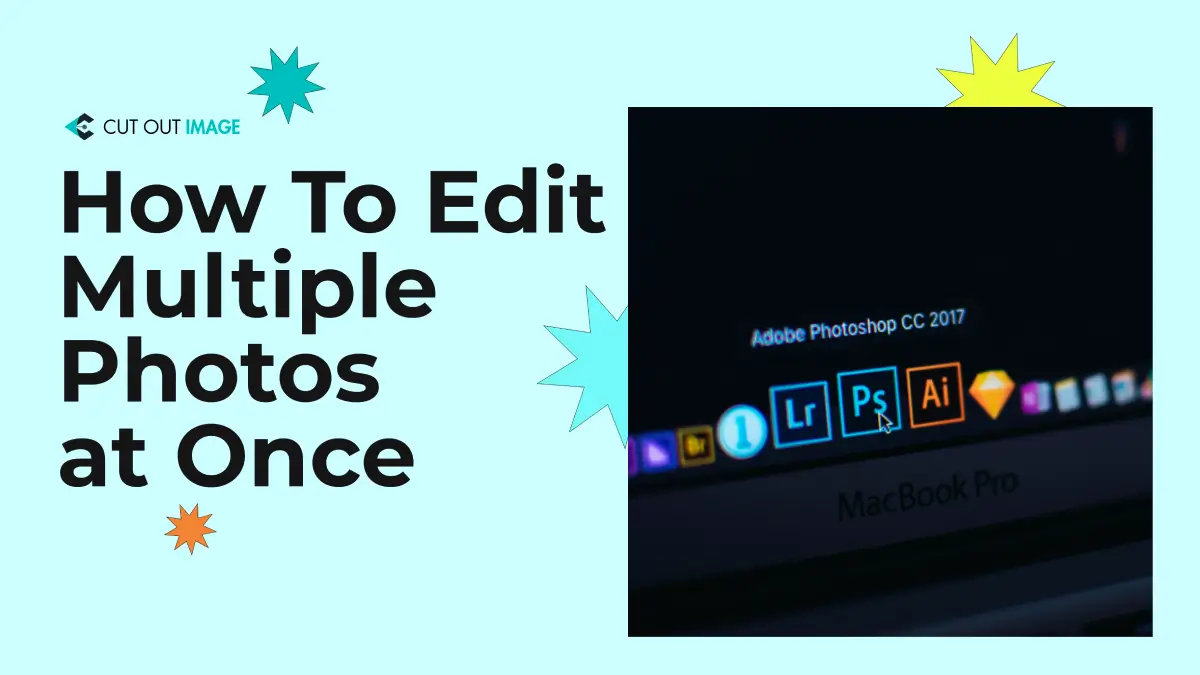
Technique 1: Using Photoshop
Photoshop is widely known as the best photo editing software with many features. To fix issues and retouching, professional photographers use this software for different photography, like Product Photography, Portrait Photography, Landscape Photography, etc.
Let’s learn How to Fix an Overexposed Photo using photoshop:
A) Using Sliders:
Photoshop comes up with various sliders to fix overexposed photos :
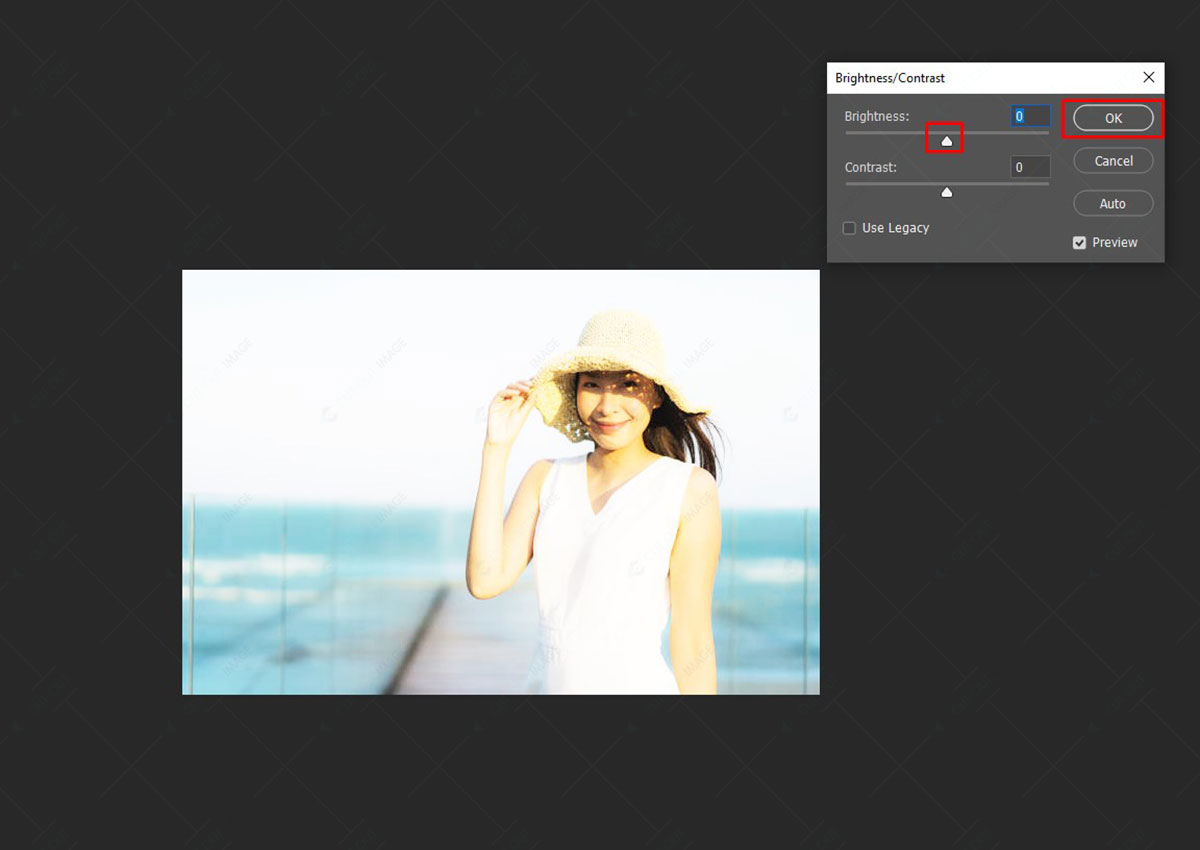
- Brightness/ contrast
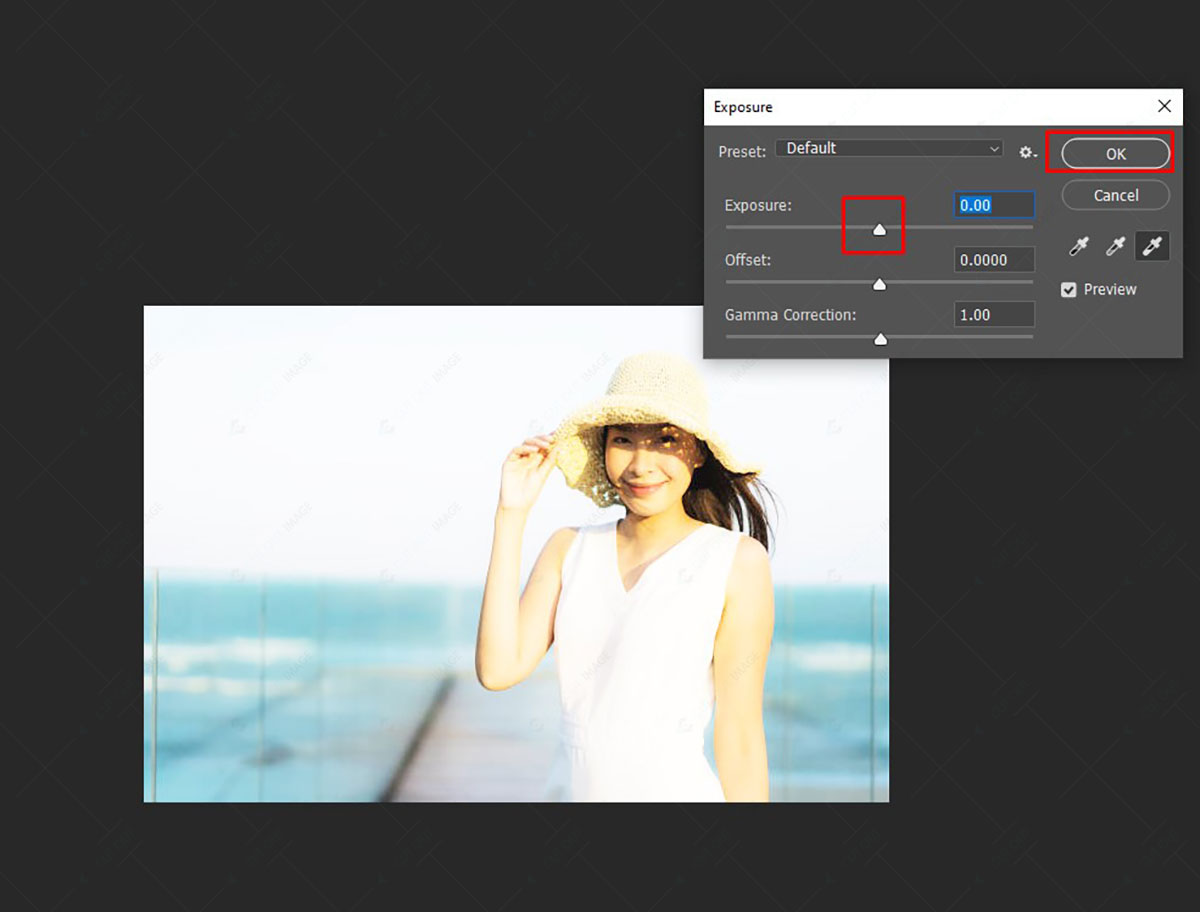
- Exposure
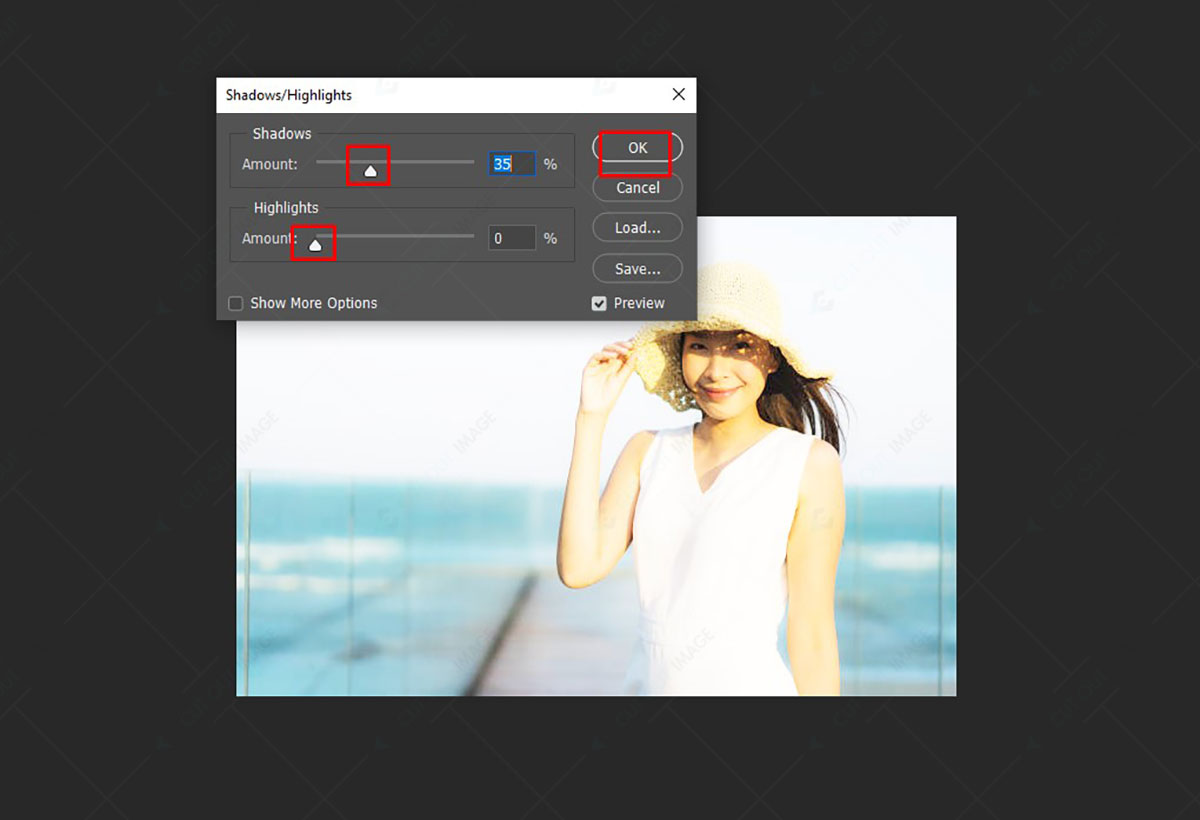
- Highlights/shadows
You can access the above sliders and fix the photo below:
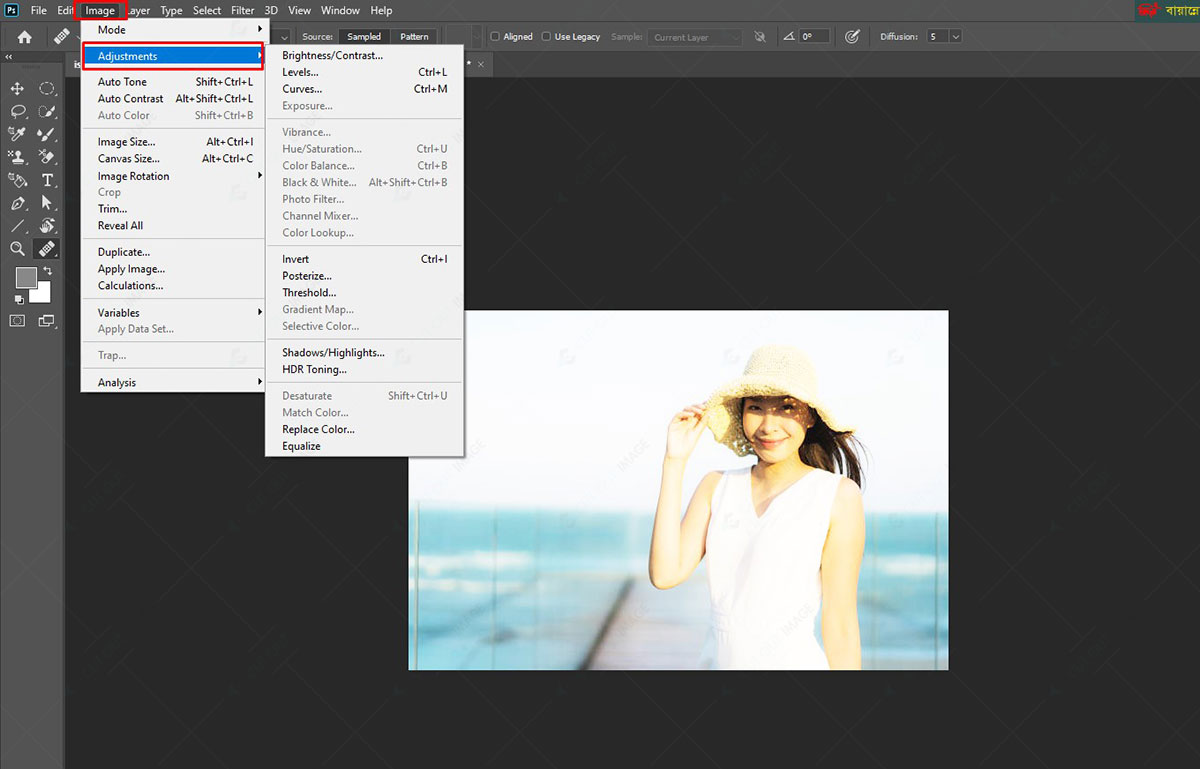
- Open the photo
- Go to the Image tab from the menu bar and select Adjustments.
 This image is for illustrative purposes only. No offense or conflict with any cultural, religious, or social values is intended. All trademarks, logos, & content remain the property of their owners.
3. From the available options, select any of the three.
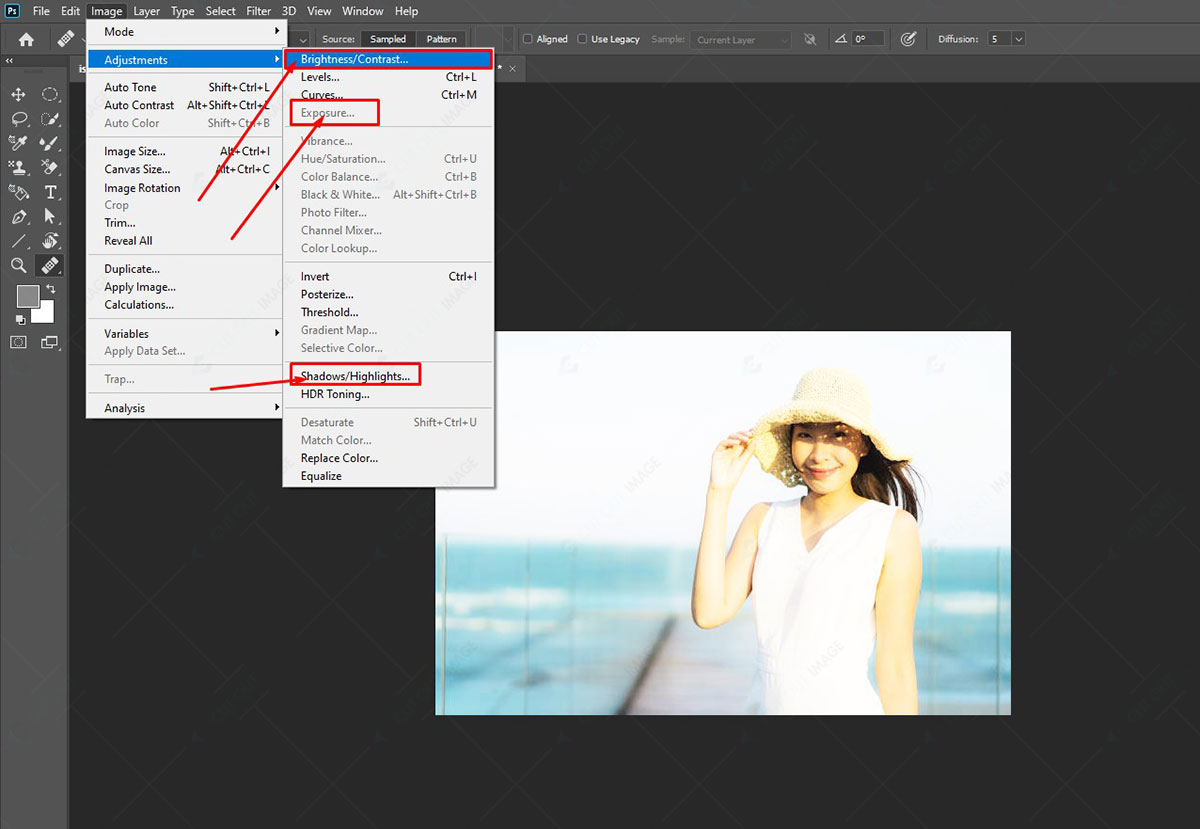 This image is for illustrative purposes only. No offense or conflict with any cultural, religious, or social values is intended. All trademarks, logos, & content remain the property of their owners.
4. Move the slider from left to right to adjust the exposure. Moving left will decrease the exposure while moving right will increase it.
 This image is for illustrative purposes only. No offense or conflict with any cultural, religious, or social values is intended. All trademarks, logos, & content remain the property of their owners.
 This image is for illustrative purposes only. No offense or conflict with any cultural, religious, or social values is intended. All trademarks, logos, & content remain the property of their owners.
 This image is for illustrative purposes only. No offense or conflict with any cultural, religious, or social values is intended. All trademarks, logos, & content remain the property of their owners.
5. Once the exposure is fixed, save it.
 This image is for illustrative purposes only. No offense or conflict with any cultural, religious, or social values is intended. All trademarks, logos, & content remain the property of their owners.
B) Using Blending Mode:
Another feature of photoshop to fix an overexposed photo is the layer blending mode. Let’s know the process of fixing overexposed photos using this feature:
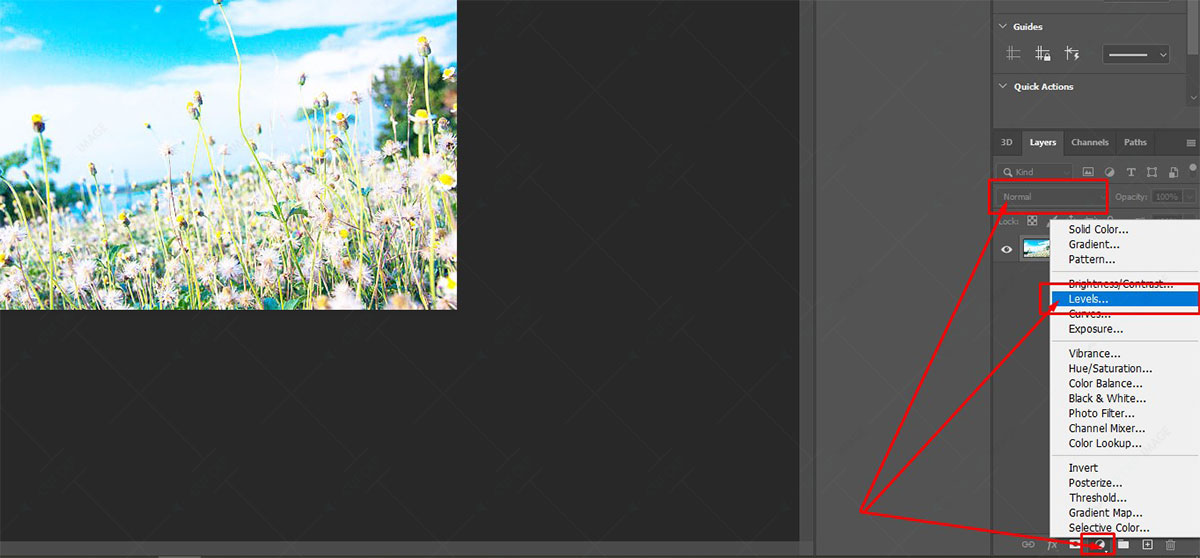
- Open the photo and go to the Layer tab from the menu bar.
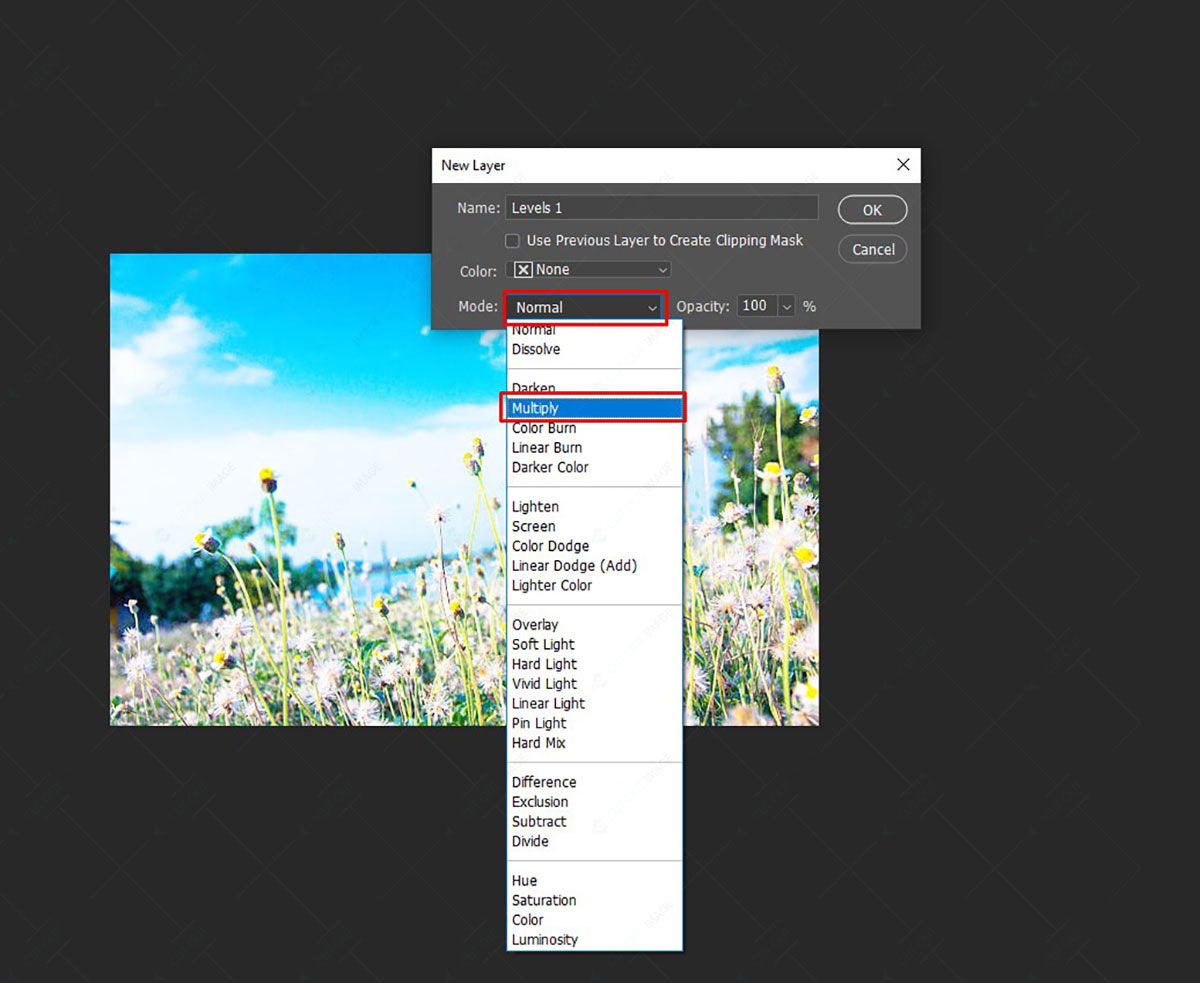
- From the Layer tab select Level under the New Adjustment Layer option.
 This image is for illustrative purposes only. No offense or conflict with any cultural, religious, or social values is intended. All trademarks, logos, & content remain the property of their owners.
3. A pop-up will appear with a few settings. Select the blend mode ‘Multiply’ and press ‘OK.’
 This image is for illustrative purposes only. No offense or conflict with any cultural, religious, or social values is intended. All trademarks, logos, & content remain the property of their owners.
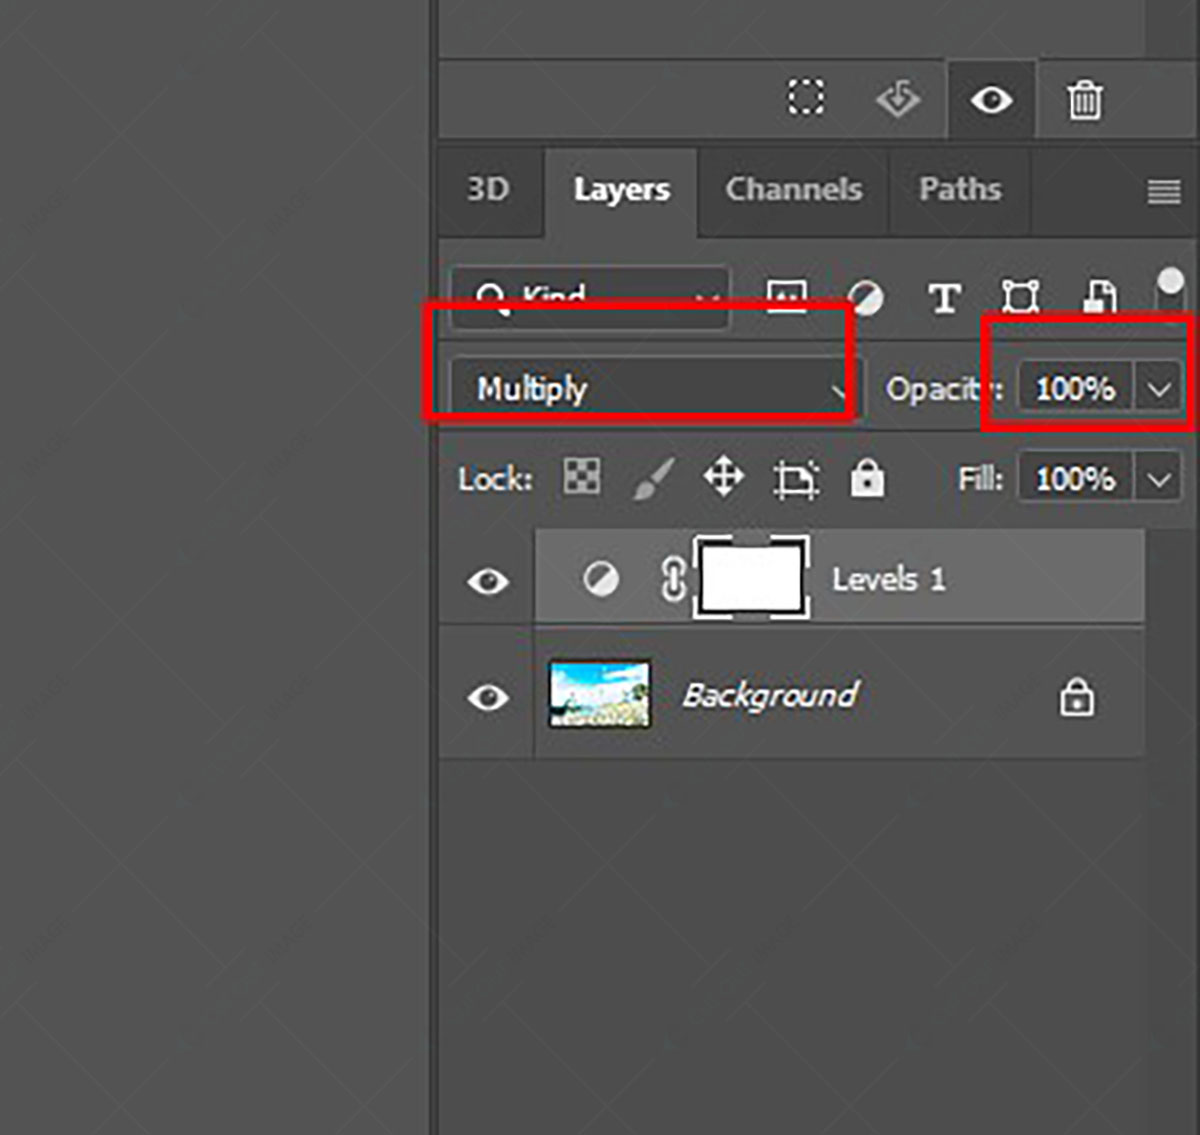
4. You can select it from the ‘Create new fill or Adjustment Layer’ below the layer panel. If you follow this, you will get the blend mode above the layer by default set as “Normal.”
 This image is for illustrative purposes only. No offense or conflict with any cultural, religious, or social values is intended. All trademarks, logos, & content remain the property of their owners.
5. Switch the blend mode ‘Normal’ to ‘Multiply’ and press ‘OK.’ One of the benefits of following this trick is you can see the preview by hovering the cursor on the mode options.
6. Adjust the opacity beside the blend mode if the image becomes darker than desired.
 This image is for illustrative purposes only. No offense or conflict with any cultural, religious, or social values is intended. All trademarks, logos, & content remain the property of their owners.
7. Following the above, we will get a photo with more details than the original one. Save it on your device.
Technique 2: Using Lightroom
A) Histogram Basic Panel:
Using the Histogram, you can determine whether the photos are overexposed. To fix the overexposure, you have to shoot in RAW format, and Lightroom will convert it into JPEG to construct Histogram. To activate the clipping indicator, press ‘J’ on the keyboard as a shortcut.
A histogram represents the amount of light and darkness in the JPEG picture.
 This image is for illustrative purposes only. No offense or conflict with any cultural, religious, or social values is intended. All trademarks, logos, & content remain the property of their owners.
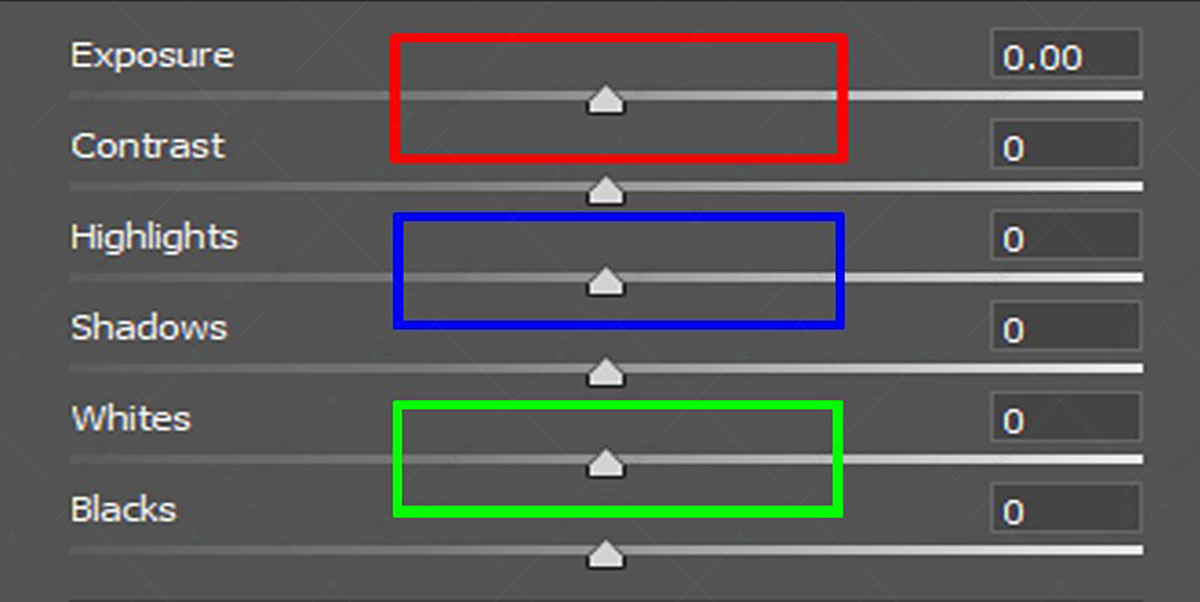
Now, look at the Histogram. If you find the right side of the graph is higher, the photo contains many bright parts and is overexposed. The opposite graph indicates underexposure. The indicator will mark the overexposed areas with a red tone and the darkest area with blue in the picture. If the amount of red shade is like a tiny bulb, then it’s not necessary to fix it because sometimes it’s ok to contain some overexposed area until it distracts the image’s subject.
However, since we will learn How to Fix an Overexposed Photo, we will focus on the red shade portions highlighting the blown-out areas. We can fix the overexposed areas using the exposure, highlights, and whites sliders from the Lightroom Basic panel and then make other adjustments to ensure the picture details are not lost.
 This image is for illustrative purposes only. No offense or conflict with any cultural, religious, or social values is intended. All trademarks, logos, & content remain the property of their owners.
* The Exposure:
The first step of the process is to decrease the exposure value of the photo by moving the exposure slider from right to left to generate darkness. It will reduce the brightness of the entire photo imitating the effect generated by the camera’s exposure settings. As a result, the dark areas will be darker, and it is the only downside of using exposure.
* Highlights:
It helps to recover the lost details in the bright areas. If the photo has 1 stop overexposed, you can fix it using the Highlight slider. Besides, after adjusting the exposure slider, if you still find any part of the photo containing overexposure, you can reduce the brightness by moving the Highlights slider to the left. Here, the Highlights slider changes only the bright part of the photo without affecting the brightest, mid-tones, and shadows. You can play with this slider ranging from -100 to +100. If you can’t get the desired result using highlights and exposure, move to the next option.
* Whites:
The white slider deals with only the brightest portion of the photo reducing the contrast more than the highlights slider. It can’t reconstruct any color information. Therefore, I recommend keeping it in the last option after using the highlights slider.
* Shadow and Contrast:
I have discussed applying the Exposure, Highlights, and White sliders from the above Basic panel. Are you wondering if we can use the Shadows and Contrast sliders to fix the overexposed photos?
You can use the shadow slider to recover any darkest area after passing the above 3 steps. If you need to increase the Contrast after lowering the brightness, then you can use the contrast slider.
B) Other Adjustments:
Still, the overexposure is not fixed? Don’t worry. There are more adjustments in Lightroom to make the picture perfect. The steps for other adjustments are as below:
* Graduated Filter and Luminosity:
Sometimes, it happens in Portrait Photography that the whole picture is not overexposed, and for that, we want to reduce exposure to only one side of the photo. Here the Graduated Filter comes into play to fix the overexposure. You can find the filter icon (Rectangle) below the Histogram and beside the brush adjustment on the top right editing panel.
Selecting the graduated filter, you will find a list of sliders for exposure, contrast, texture, clarity, hue, saturation, and more. As you did in the previous steps, you can move the sliders to reduce the value.
Another feature in Graduated Filter is Luminosity Targeting located at the bottom next, named ‘Range Mask.’ It is usual for Photoshop, but a new addition to Lightroom. You can target specific Luminance values determining the harshness or softness of adjustment using the range mask.
* Brush Adjustment:
It is challenging to handle overexposed faces in Lightroom, and Brush adjustment takes care of it. To use it, ensure the auto masking is turned on, and the feathering is set to 60 or above.
Press ‘O’ on the keyboard to show the overexposed area. Paint on the red marked portion representing the overexposed part. Be careful while painting over a face. This adjustment comes with the Exposure, Highlights, Whites, Shadows, and Contrast sliders.
 This image is for illustrative purposes only. No offense or conflict with any cultural, religious, or social values is intended. All trademarks, logos, & content remain the property of their owners.
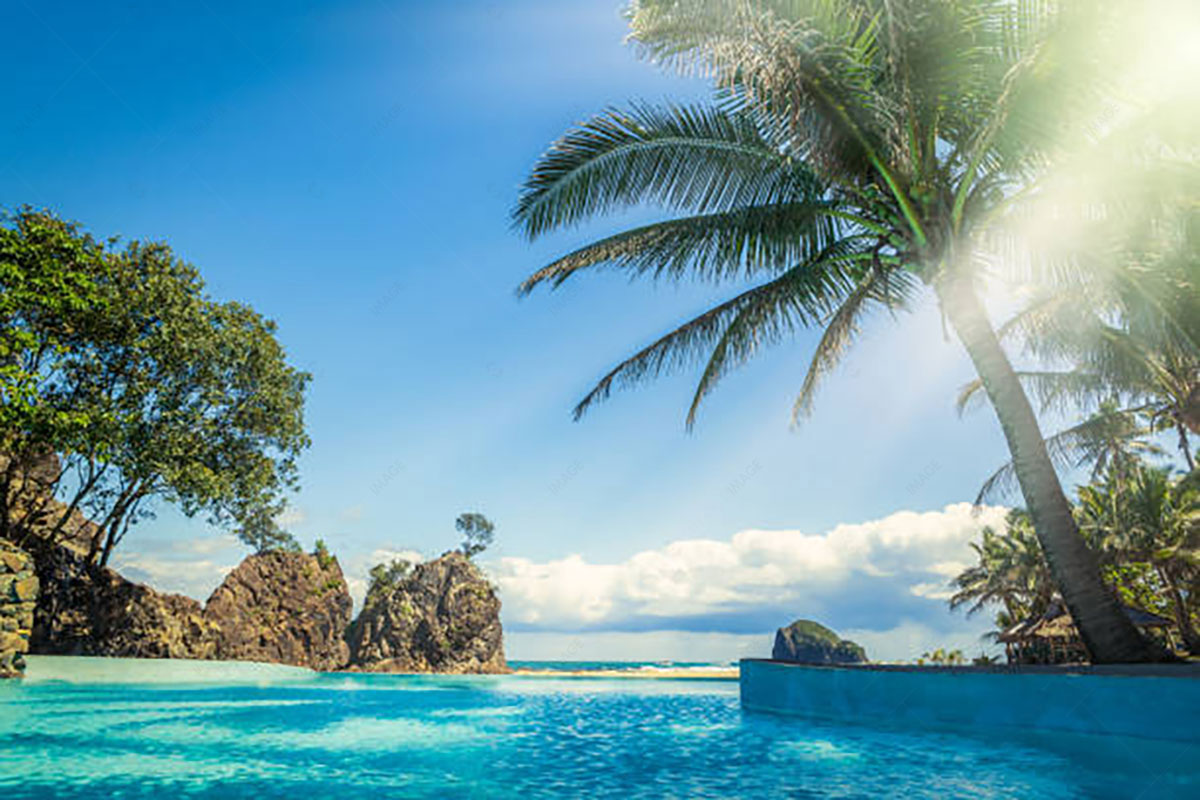
* HSL/Color panel:
A specific color might be blown out in an overexposed photo. In this case, if you adjust the photo using exposure and highlights, the result might make a little difference to the problem but can not restore the missing color. Here the HSL/Color panel comes into play to solve the issue. See the photo below:
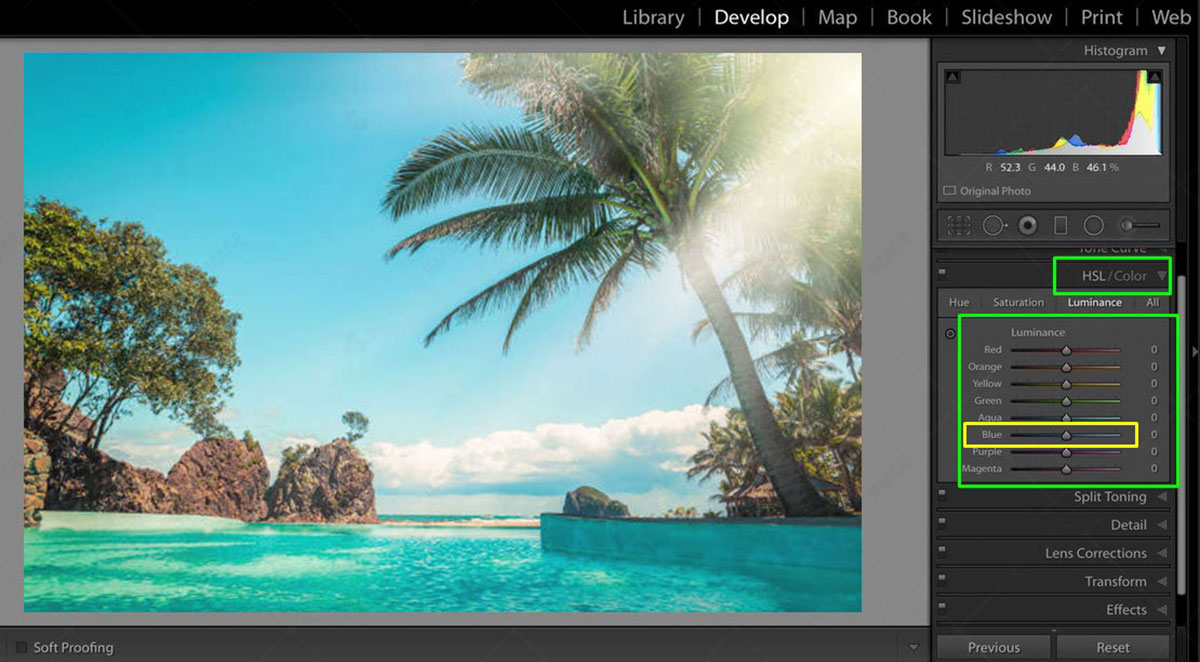 This image is for illustrative purposes only. No offense or conflict with any cultural, religious, or social values is intended. All trademarks, logos, & content remain the property of their owners.
The photo is overexposed, and the particular blue is not in proper value. Adjusting the blue slider in the Saturation and Luminance section can help increase the color value making the photo perfect by balancing the exposure.
 This image is for illustrative purposes only. No offense or conflict with any cultural, religious, or social values is intended. All trademarks, logos, & content remain the property of their owners.
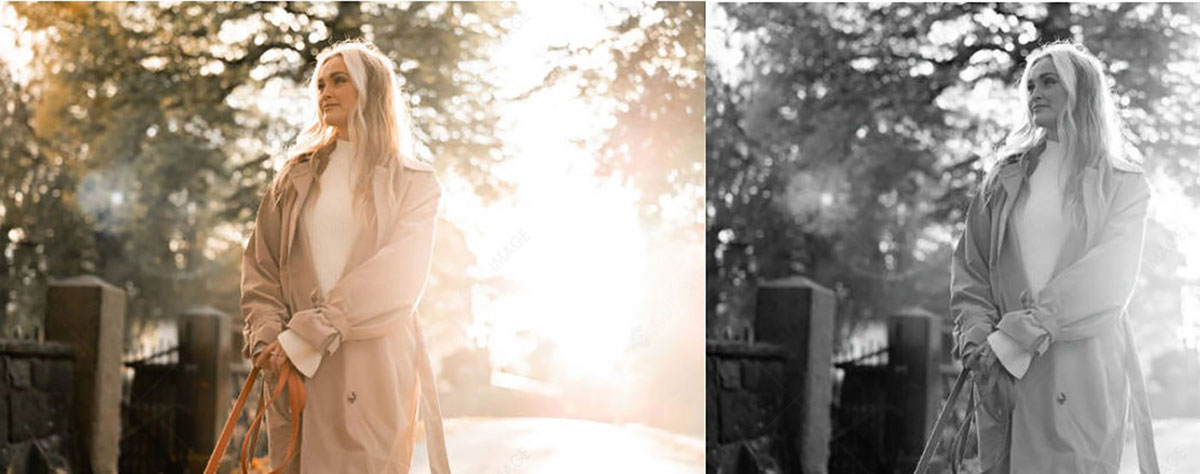
* Crop and Convert to Monochrome:
Some photos are so overexposed that they contain no detail to recover, even after following the techniques mentioned above. Moreover, the photo might look unnatural after applying those techniques. In that case, you can crop it or convert it into monochrome. Check the photo below:
 This image is for illustrative purposes only. No offense or conflict with any cultural, religious, or social values is intended. All trademarks, logos, & content remain the property of their owners.
The photo is so overexposed that a few portion details are still missing after making other adjustments. To make it appealing, we converted it into monochrome and cropped the portion we couldn’t recover.
The benefit of converting into monochrome or black and white is that the photo contains only striking light and shadow that helps avoid focusing on missing details. While cropping the photo, ensure the photo resolution. However, remember that you can apply this technique only if a specific portion cannot recover.
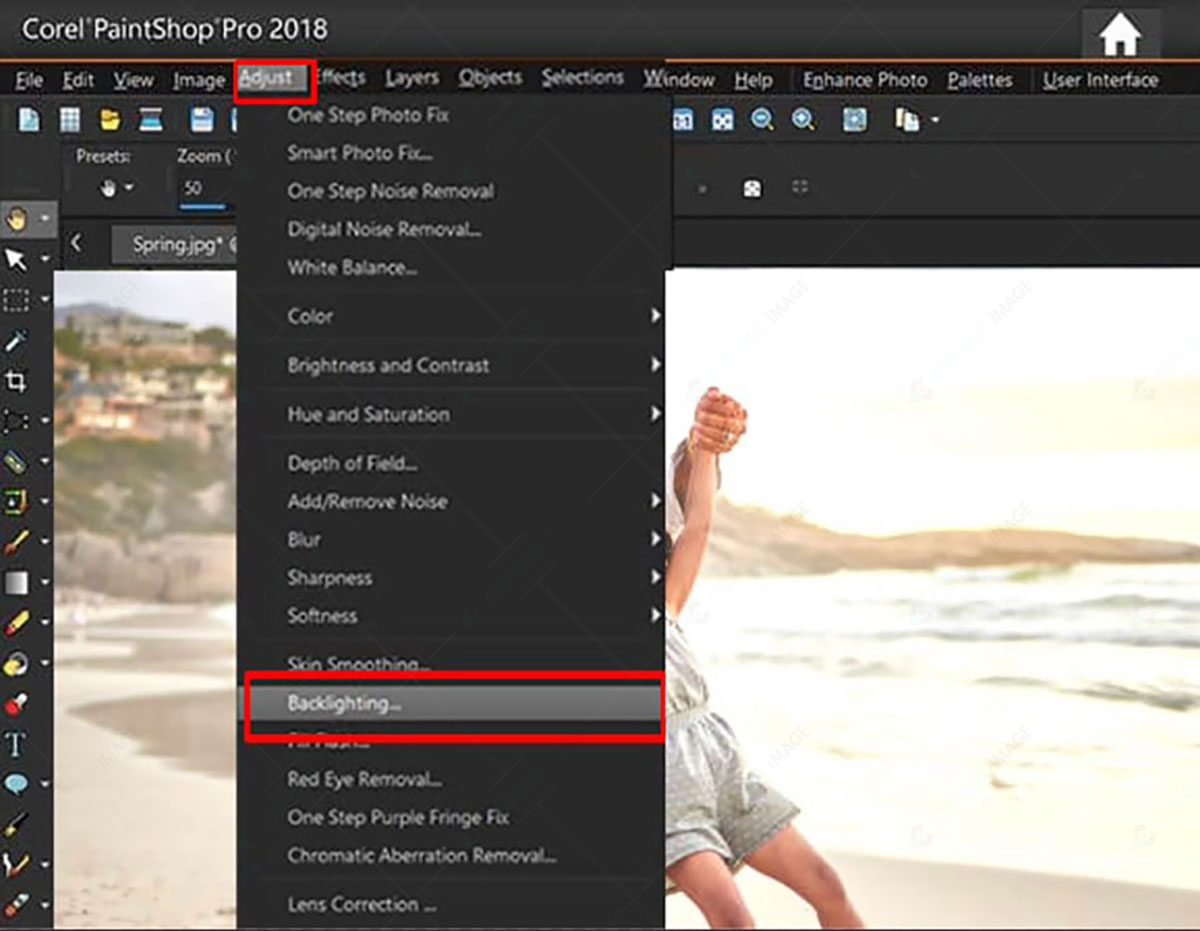
Technique-3: Using PaintShop Pro
PaintShop Pro is an image editing software for raster and vector graphics used in Microsoft Windows. It also provides some tools to improve overexposed photos. Let’s know How to Fix an Overexposed Photo using PaintShop Pro:
- First, you must download and install the PaintShop Pro software on your device (PC).
 This image is for illustrative purposes only. No offense or conflict with any cultural, religious, or social values is intended. All trademarks, logos, & content remain the property of their owners.
2. Then open the photo in PaintShop Pro.
3. Go to the Adjust tab and select the Backlighting option.
 This image is for illustrative purposes only. No offense or conflict with any cultural, religious, or social values is intended. All trademarks, logos, & content remain the property of their owners.
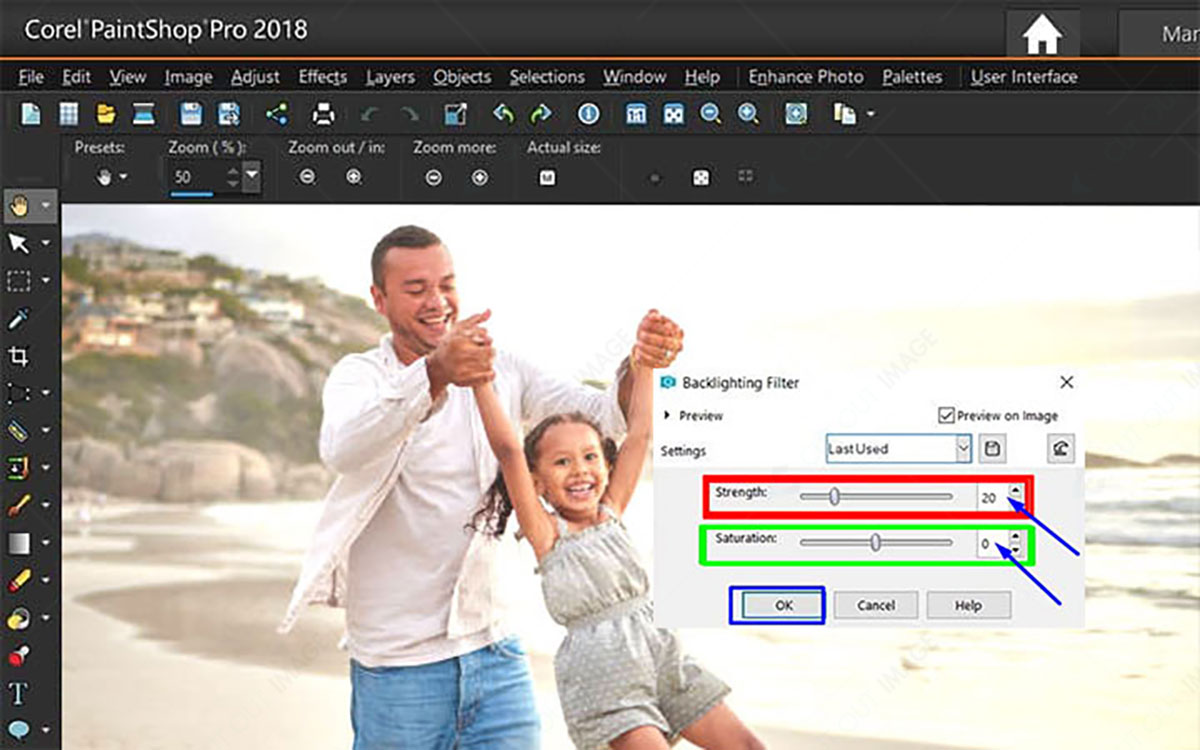
4. A pop-up will appear with the setting of Strength and Saturation.
5. Set the Strength by moving the slide or input value from 0 to 100.
6. Repeat the process of setting Saturation for the overall photo color. Remember, you can reduce the Saturation by putting a value less than 0 and increase the Saturation by putting a value greater than 0.
 This image is for illustrative purposes only. No offense or conflict with any cultural, religious, or social values is intended. All trademarks, logos, & content remain the property of their owners.
7. After setting the Strength and Saturation, click OK.
Technique-4: Movavi Picverse
Movavi Picverse is a user-friendly photo editing software that anyone can use without having advanced photo editing skills. One of the advantages of using this software is that you can fix overexposed photos using it. Let’s learn how to do it:
1. Open the photo and go to the ‘AI Adjust panel.
2. Adjust the HDR lighting and Enhance settings to set the colors.
3. You will find the Light and Color sections in the same tab.
4. Move the ‘Exposure’ and ‘Highlights’ sliders to the left from the ‘Light’ section to adjust the overexposed photo lighting.
5. Move the shadow slider to the left to clear the darker areas.
6. From the ‘Color’ section, adjust the ‘White Balance.’
Here is the final result:
Technique- 5: Photo Editing App:
It is difficult to capture the brightest or darkest areas using the small sensor of an iPhone or Android. Therefore, there is a chance to have overexposed photos while capturing with the phone. However, many photo editing apps are available for Android and iPhone to fix overexposed photos. Most of the photo editing apps that come up will almost similarly control. Therefore, I am sharing a few tips on using them.
A) Using the HDR Filter:
Photo editing apps offer various filters that you can overlay to your photos to get the perfect exposure photo. These filters won’t affect the details but change the exposure.
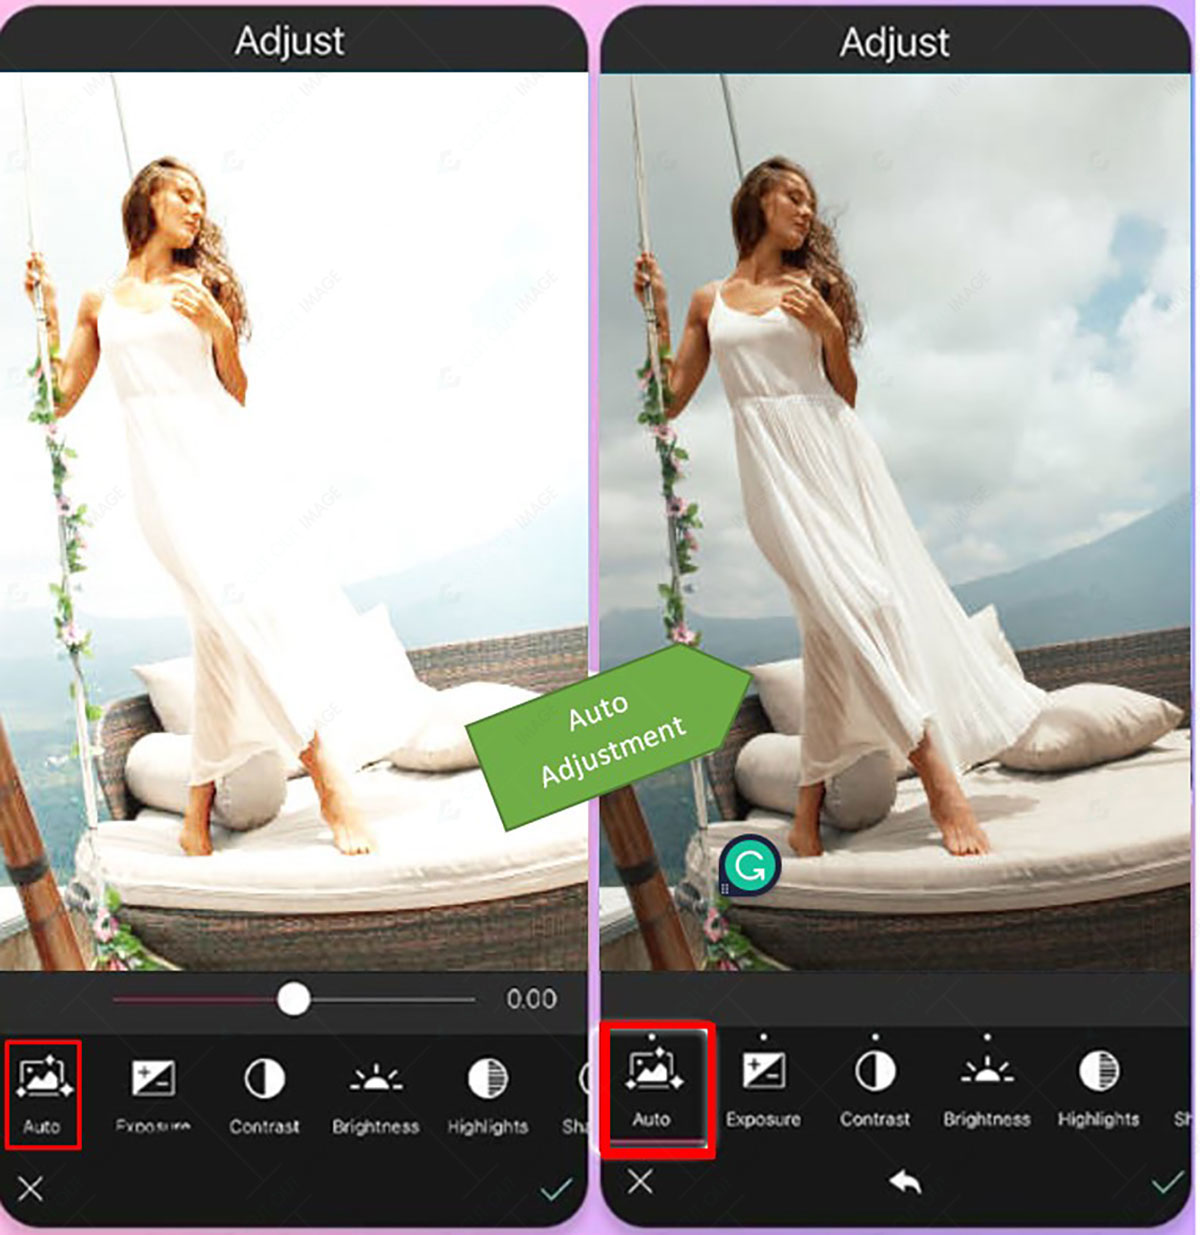
B) Auto Adjustment Tool:
Some photo editing apps like YouCam Perfect offer an Auto Adjustment tool. You can use this tool to fix the overexposed photo instantly. The app will automatically analyze the photo lighting and make other adjustments to correct the exposure.
 This image is for illustrative purposes only. No offense or conflict with any cultural, religious, or social values is intended. All trademarks, logos, & content remain the property of their owners.
C) Using Manual Settings:
If you don’t find any perfect filter from the available filters to fix the overexposed photo or if you are not satisfied with the auto adjustment, you can do it manually using the exposure slider as below:
1. Go to the Adjustment from edit options and select Light.
2. You will find the Exposure slider, also known as the brightness slider. Move it left to adjust the exposure.
3. You will also get the highlights slider and move it to the left.
4. Once you are satisfied with the Adjustment, save it.
The steps mentioned above are simple to apply for the beginner. But practice makes a man perfect, and an experienced professional can bring out the best output by utilizing the advanced tool to correct overexposed photos. If you feel you need professional retouching service, including fixing overexposed photos, you can contact professional service providers like Cut Out Image. Their experts will analyze your photos and make them perfect.
Why Are Photos Overexposed?
An overexposed photo means more light is present in the photo than usual, which diminishes the light area’s detail. There are a few reasons behind the issue. Here those are:
- Extensive Light: Light is an essential part of photography that makes the photo details visible. However, the brightest or most extensive light causes the photo to be overexposed. It happens when you shoot under direct sunlight or surrounded by extreme light settings.
- Camera Settings: Different camera settings issues can generate overexposed photos. Suppose you allow much light through the camera’s shutter speed, open the lens’s diaphragm many times via the lens’s aperture setting, and set the ISO to more than the demanded amount. In that case, it can result in an overexposed photo.
- Shooting Moving object: When we shoot a moving subject, it might create an overexposed photo because it affects the camera’s focus point. For example, shooting the running children or bus.
- Metering Knowledge: Improper knowledge or not being concerned about the camera’s metering mode can create overexposed photos. If the picture is overexposed, it will indicate that something is wrong. If you are unaware of this metering mode knowledge and ignore the information, it will generate an overexposed photo.
- Use of Flash Power: Flash power, also known as a lighting device, produces a temporary explosion of light during photography. Incorrect use of this flash power can cause overexposed photos.
Guidance to Avoid Overexposed Photos
As a photographer, you should follow some tricks and tips to avoid overexposed photos. So now I am sharing that practical and helpful guidance to avoid overexposed photos during photography. Here they are:
#1. Know about Exposure Triangle:
The exposure triangle includes the shutter speed, Aperture, and ISO. Remember, these elements impact one another. Therefore, proper knowledge of this Exposure Triangle can prevent overexposed photos.
#2. Set ISO Properly:
ISO number influences the camera sensor to light. Higher ISO can generate overexposed photos. So, use ISO 100 on a bright day while ISO 400 on a cloudy day. Moreover, you should use ISO 800 while photographing indoors and an ISO of more than 1600 in relatively lower light.
#3. Set Medium to high Aperture:
The Aperture lets light hit the camera sensor and adjusts the depth of area accordingly. When capturing a low stop with a wide aperture, the results create an overexposed photo. Therefore, I recommend using a medium to high Aperture.
#4. Specify Shutter Speed:
The shutter speed of the camera settings indicates the time the camera shutter opens while capturing a picture. There is a chance of overexposed photos if the shutter is open for longer. Therefore, 1/60 is consider a standard shutter speed to avoid overexposure.
#5. Follow Light Meter:
A light meter calculates the light quantity in a scene that helps you specify the most suitable exposure for a photo. Most famous DSLR cameras like Canon and Nikon have inbuilt light meters. You can try those or buy a light meter for your photography. While photographing, follow the light meter to avoid overexposure.
#6. Employ Exposure Compensation:
Your camera meter might be confused while photographing in shutter priority or aperture priority mode. Instead of using the manual mode, employ the exposure compensation. It will tell the camera whether the photo is overexposed or underexpose.
#7. Use Bracketing:
The practice of taking extra shots using +1 and -1 exposure is called bracketing. Using the bracketing can help you avoid overexposed photos.
#8. Shoot RAW Format:
Setting up image format can help you prevent overexposure. If you shoot a photo in a RAW format, you will get a chance to fix the overexposure. Otherwise, you can’t do it.
Final Thoughts
Photos being overexposed isn’t an uncommon issue. Even a professional photographer faces this problem. You can avoid it during photography by following the tips mentioned above. However, if you encounter this issue, I have also discussed the post-processing techniques of How to Fix an Overexposed Photo.
I hope you have enjoyed reading the blog and learned How to Fix an Overexposed Photo. Don’t hesitate to ask in the comment box if you still have questions. Also, you can check out my other blog on “smoke bomb photography,” and I believe you will like it too.