Disclaimer: This blog is for general informational and inspirational purposes only, based on publicly available information and personal insights. Images—whether of models, screenshots, or products—are for illustrative purposes only and do not depict actual subjects, scenarios, or views described. We do not intend to offend or conflict with any societal, cultural, religious, or political values.
How to Make Someone Tan in Photoshop: Summer is the most suitable time of the year that avails you the chance to bask in the sunlight to the fullest extent. But, unfortunately, it is also the season of damaging skin tone. It makes the skin tan, indicating your skin tried its best to shield itself from the ultraviolet radiation of the sun.
More often than not, people go on vacation during this period and enjoy different trips around the countryside, the sea beaches, and visiting new places. But, of course, the common but popular thing is sunbathing, which offers the chance to big-note oneself with stunning tan skin for that month.
But for any reason, if you miss sunbathing, will it disappoint you? Well, it’s not a great problem since Photoshop is there to provide you with the tool to make the skin tan in any previous or current photos. So the thing you only need is the knowledge of Changing Skin Color in Photoshop.
Besides, I will explain all the nuts and bolts of the process in this blog. Endure reading.
What Is Tan Skin?
The term ‘Tan’ emanated from ‘tannum,’ meaning oakbark for leather tanning. From 1590, it was added in English as a name of color defining a light brown shade of skin.
It genuinely safeguards in contradistinction to the sunlight’s ultraviolet radiation that is the grounds of skin tissue impairment in the appearance of a sunburn.
It boosts the quantity of melanin in the skin’s texture. Therefore, it changes the skin’s natural color into a little dark. The main thing to concentrate on for transforming this skin color is focusing on the highlights and shades individually.
How to Make Someone Tan in Photoshop
Since everyone desires to have tan skin for being attractive, you are not apart from them, right?
Suppose you don’t have enough time to go to the beach or don’t have any interest or energy to sunbathe, but you also want to have tan skin. What to do then? Well, you can play a trick. You can capture it in-house and move to photo editing with Photoshop. How? Let’s know them brick by brick.
Method-1: Using Color Range Command [ How to Make Someone Tan in Photoshop ]
1. Select a photo you want to bring under the process and open it in Photoshop.
2. Copy the Layer to create a new layer and rename it Layer 2.
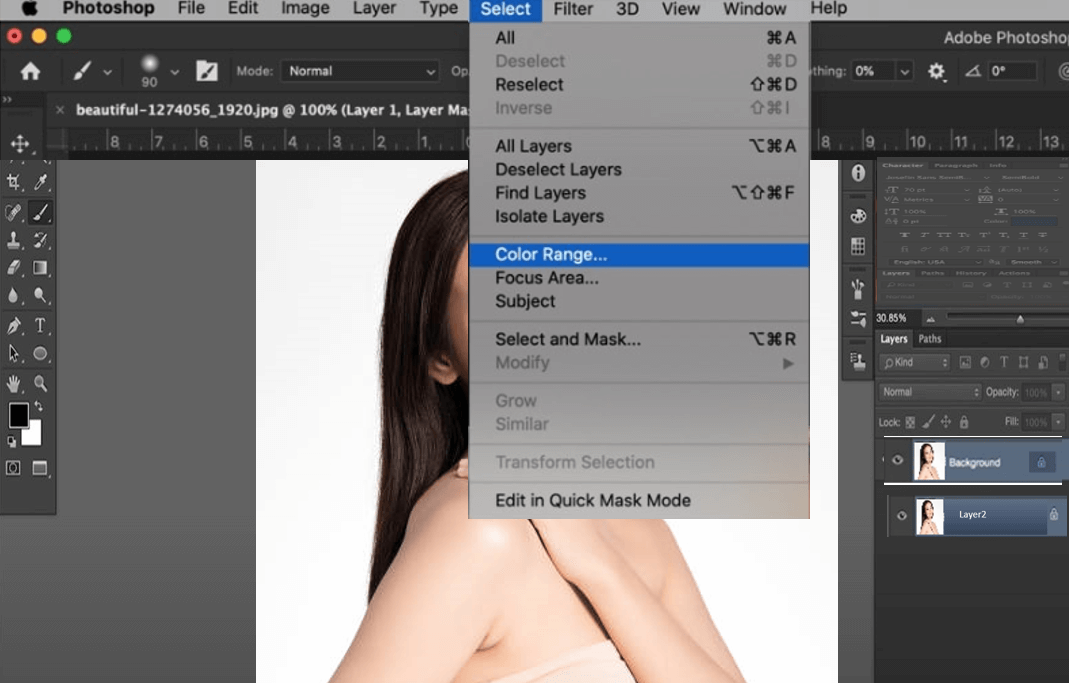
3. Moving to the new Layer, go to the select command, then choose the Color Range option.
 This image is for illustrative purposes only. No offense or conflict with any cultural, religious, or social values is intended. All trademarks, logos, & content remain the property of their owners.
4. Pick the ‘Skin tone’ option from the pop-up and checkmark the ‘Detect Faces’ located under it.
5. Drag the slider left to right to adjust the Fuzziness.
6. There will be a preview showing the impact of adjustment. For example, the white color will be selected, whereas the black one will vanish.
7. After the satisfying adjustment, click on OK.
 This image is for illustrative purposes only. No offense or conflict with any cultural, religious, or social values is intended. All trademarks, logos, & content remain the property of their owners.
8. Make another copy of the Layer and rename it Layer 3.
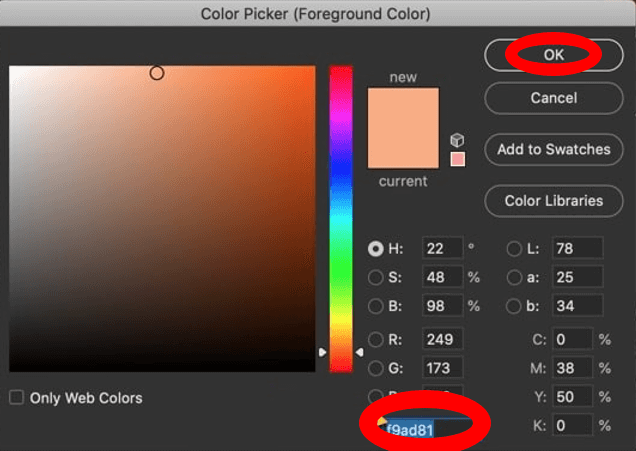
9. Now change the blend mode to color, and from the available option, pick the foreground color.
10. After that, select the skin tone according to your preference and click ok. It will set the foreground skin color.
 This image is for illustrative purposes only. No offense or conflict with any cultural, religious, or social values is intended. All trademarks, logos, & content remain the property of their owners.
11. Now, fill Layer 2 with the foreground color of Layer 3 by deselecting. You can check out my blog on how to deselect in photoshop if you don’t know it.
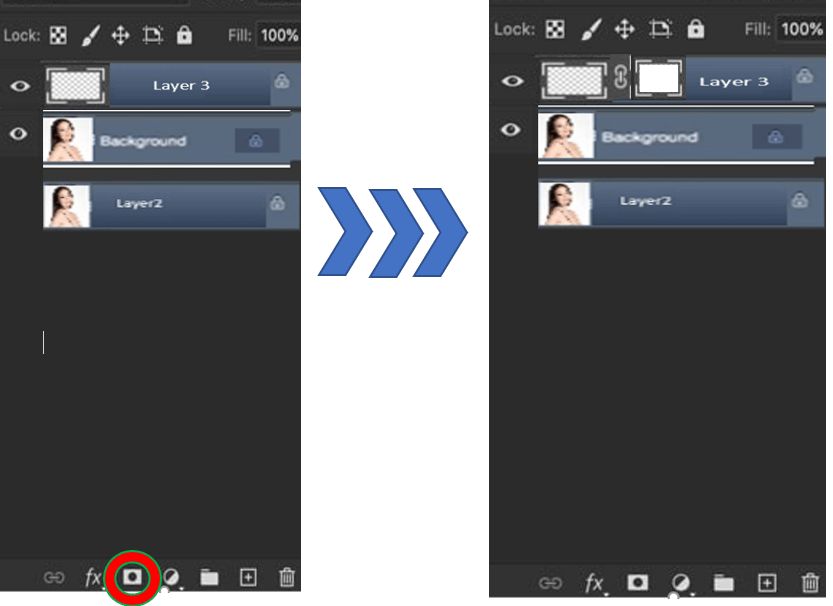
12. Apply the Layer Mask to remove skin color in unwanted spaces, and for that, go to Layer>Layer Mask. It will add a new layer beside the skin color layer.
 This image is for illustrative purposes only. No offense or conflict with any cultural, religious, or social values is intended. All trademarks, logos, & content remain the property of their owners.
#13. Make the foreground black.
#14. Pick the brush tool from the tool panel located on the left portion of the window.
 This image is for illustrative purposes only. No offense or conflict with any cultural, religious, or social values is intended. All trademarks, logos, & content remain the property of their owners.
#15. Brush over the part from where you desire to clear the skin tone.
#16. Depending on the photo’s resolution, reduce the opacity by 50 to 70%.
Finally, you have changed the color and turned the subject color tan.
Method-2: HSL Adjustment [ How to Make Someone Tan in Photoshop ]
Transforming skin color with the mask is a little bit time-consuming. So there is another process to convert the skin color into a tan. That is the HSL adjustment. It is a very easy method and demands less time considering the previous technique. Let’s know the steps:
- As usual, first, select the image you want to work on. But, before that, don’t forget to do the culling. Do you know what does culling mean in photography? If not, check out my blog on that, to be clear.
- Duplicate the picture for the backup facility and rename it.
- Click on the new layer and use any selection tool available in photoshop to outline the skin part you want to change the color. Do you know How to Add an Outline in Photoshop?

This image is for illustrative purposes only. No offense or conflict with any cultural, religious, or social values is intended. All trademarks, logos, & content remain the property of their owners.
- Select the ‘Image’ command from the top of the bar and pick ‘Desaturate’ from the ‘Adjustments’ options. It will make the skin colorless.
 This image is for illustrative purposes only. No offense or conflict with any cultural, religious, or social values is intended. All trademarks, logos, & content remain the property of their owners.
- Go to the ‘Layer’ command from the top of the bar, select ‘New Adjustment Layer and finally pick the Hue/Saturation option.
 This image is for illustrative purposes only. No offense or conflict with any cultural, religious, or social values is intended. All trademarks, logos, & content remain the property of their owners.
- A new dialogue box will appear on the screen; click ‘OK’ on it.
- From the Adjustment panel, choose the icon of Hue/Saturation and go to the properties.
- You will get a screen with Preset, Hue, Saturation, and Lightness settings. There is a ‘colorize’ option too.
- Tick mark the box adjacent to the ‘colorize’. It will add some color to the skin. Now we will adjust the color to make it according to our expectations.
- Set the preset ‘Master’ from the drop-down menu.
- Drag the Slider left to right or put a value to adjust the Hue. The range for the Hue is ‑180 to +180.
- Drag the Slider left to right or put a specific value to adjust the Saturation. The saturation value is between ‑100 to +100.
- To increase or decrease lightness, drag the Slider for Lightness or put a value ranging from ‑100 to +100.
 This image is for illustrative purposes only. No offense or conflict with any cultural, religious, or social values is intended. All trademarks, logos, & content remain the property of their owners.
After all the adjustments, you have converted the skin into a tan. So, save the file to use.
 This image is for illustrative purposes only. No offense or conflict with any cultural, religious, or social values is intended. All trademarks, logos, & content remain the property of their owners.
Method- 3: Using Eyedropper Tools [ How to Make Someone Tan in Photoshop ]
 This image is for illustrative purposes only. No offense or conflict with any cultural, religious, or social values is intended. All trademarks, logos, & content remain the property of their owners.
The eyedropper tool offers the option to customize the color according to preference without any trouble. You also can change color according to a reference color. That’s why it will be convenient to change your skin color into a tan. Let’s do it.
- Download skin tone swatches on your device.
 This image is for illustrative purposes only. No offense or conflict with any cultural, religious, or social values is intended. All trademarks, logos, & content remain the property of their owners.
- Wonderful skin color means Red>Green>Blue.
- Unplug the picture in photoshop and replicate the layer to rename it.
- Choose a quick selection tool to outline the skin part that you want to change color.
- Mouse-Click on the ‘New Layer Mask’ sign below the bar to produce a new Layer Mask.
 This image is for illustrative purposes only. No offense or conflict with any cultural, religious, or social values is intended. All trademarks, logos, & content remain the property of their owners.
- Select the ‘Curves adjustment layer and go to ‘Properties.’
- From the left part, select the ‘Eyedropper’ tool.
- Click twice on the ‘Black Eyedropper’ and pick a pitchy red pigment.
- Select ‘No’ in the available pop-up window asking to set the shades as defaults.
- With the black eyedropper color the hair area.
- Click twice on the ‘Black Eyedropper’ and pick light green. Then, click ‘No’ as before.
- Apply the white eyedropper to color the skin.
- Double-click on Gray Eyedropper. A color picker window will appear on the screen with a 50% Gray color.
- Change the gray color to a tan skin color now. For that, go to the skin color library that you have downloaded first. Then, pick a preferable skin tone that makes the skin tan as a Foreground color.
- After that, press ‘OK’. When another option box appears, click ‘No’.
 This image is for illustrative purposes only. No offense or conflict with any cultural, religious, or social values is intended. All trademarks, logos, & content remain the property of their owners.
- Set the foreground color once black and then white using the brush tool to refine the tone.
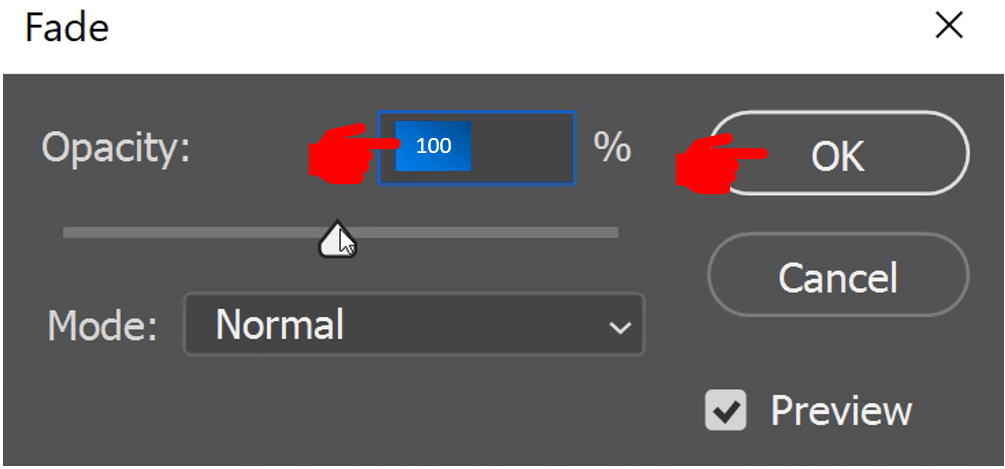
- Move to the ‘Edit’ command from the top bar and select ‘Fade Brush Tool’ to set the ‘Opacity’ to 100% and click ‘OK’. It will make the skin shade look more authentic.
 This image is for illustrative purposes only. No offense or conflict with any cultural, religious, or social values is intended. All trademarks, logos, & content remain the property of their owners.
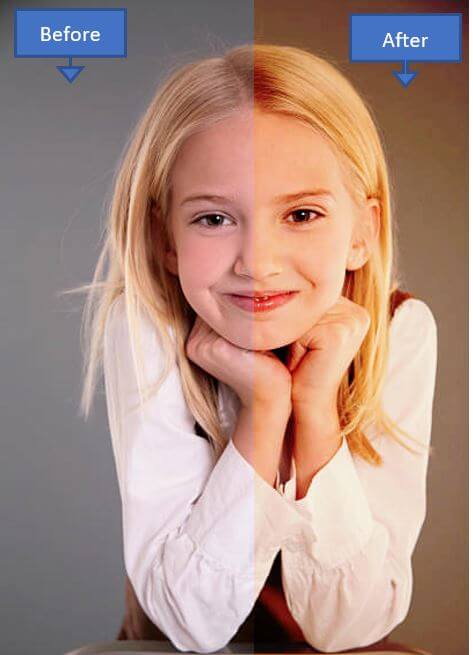
Finally, you have successfully changed the skin color to tan. Let’s compare the output with the original.
 This image is for illustrative purposes only. No offense or conflict with any cultural, religious, or social values is intended. All trademarks, logos, & content remain the property of their owners.
Why Will You Prefer Tan Skin?
Some tanned and non-tanned women’s images were provided in a magazine to test skin preference in a study. Surprisingly, almost everyone liked a tanned model that was more attractive than a typical white one.
Who doesn’t want to appear glamorous?
Tanning enriches glamor with its sun-kissed glow. Everyone harbors a firm wish to show themselves as good and attractive. Therefore, women and men prefer to see themself as tanned, especially the under or overweight persons.
As a result of their great interest in getting golden-brown skin, both men and women take different self-tanning products who don’t have time to stay or visit the beach.
But the scenery was not like this before 1920 when fairer skin was considered a symbol of the elegant and brown symbolized middle class. However, in 1923 when Coco Chanel returned from a cruise with pale sunburn, the tendency shifted.
Almost 38% of women desire to gain tan skin to sweeten their all-around physical appearance though it links with skin cancer. One of the reasons is that they want to look attractive instead of snow-white during the summer season since they wear less between June-July than in other periods of the year. Another reason is to continue a good relationship with a partner by looking attractive, and 64% of women firmly accept this fact.
I have discussed all the processes of How to Make Someone Tan in Photoshop. I have also discussed the reason to do so. You are now thinking that changing the skin tone into tan is not a piece of cake for a novice since it demands much skill. Besides, the main concern should be the quality. So, you can save time and achieve quality by passing the buck to a professional service provider like Cut Out Image.