Disclaimer: This blog is for general informational and inspirational purposes only, based on publicly available information and personal insights. Images—whether of models, screenshots, or products—are for illustrative purposes only and do not depict actual subjects, scenarios, or views described. We do not intend to offend or conflict with any societal, cultural, religious, or political values.
Who doesn’t upload pictures on social media nowadays? In this modern world, the smartphone has diverted everyone into a photographer, and they are sharing their photo on social media. For photography passion, people prefer the iPhone because its professional quality camera takes impressive photos. What’s the key to the best iPhone photography? You will get the answer by reading this blog because in this blog today, I am going to share the 10 Best iPhone Photography Tips. If you’re initiating iPhone photography, read on to start taking better iPhone photos right now!
What Is iPhone Photography?
When you do the photography using the iPhone instead of any DSLR and edit the photo without any computer, then it is called iPhone Photography. Here, you are doing all the steps of photography using your iPhone, and it’s not so hard if you follow accurate tips.
Are you wondering if the iPhone camera can capture a professional photo? Yes, it can, though it is less advanced than a DSLR camera. The things needed for quality pictures are appropriate equipment.
However, photography is full of creativity and mastery of composition settings. Therefore, iPhone photography is not a hard nut to crack. It is like a skill that you can master by experimenting and practicing. Remember, practice makes a man perfect.
10 iPhone Photography Tips for Natural Photos on Your iPhone
Don’t assume iPhone photography is a Gordian knot. It is easy if you can follow some excellent tips correctly. In this part of the blog, I will share the 10 Best iPhone Photography Tips under two categories:
- 10 Best iPhone Photography Tips for Composition
- 10 Best iPhone Photography Tips for Technical facts
10 Best iPhone Photography Tips for Composition
Composition is the visual element in a photograph. Therefore, one of the crucial facts for the best iPhone Photography is the proper composition arrangement. Here are the 10 best iPhone Photography Tips for composition setting to learn and improve your skill:
#1. Divert the Standpoint:
Normally, we capture photos from an eye-level perspective. Sometimes it fails to make the picture compelling. Therefore, come out of your traditional practice and try capturing images from different standpoints. Try this composition idea for your Summer Photoshoot Ideas and see how ingenious memory it creates.
There are a few reasons for capturing pictures from different angles:
- It creates a fascinating picture showing the world from a new viewpoint.
- Capturing from a lower point can help visualize the sky in the background.
- Shooting from different points helps in avoiding unwanted objects.
#2. Close-View Shots:
You can get the credit for good photography by ingeniously capturing the world. Capturing things in close view can be a great way to accomplish it. Try to capture the close-view shots revealing the subject’s unnoticed pattern, color, or textures. The close snaps of complicated components can amaze you with the result and help you get an appraisal.
 This image is for illustrative purposes only. No offense or conflict with any cultural, religious, or social values is intended. All trademarks, logos, & content remain the property of their owners.
You can pick a colorful flower, bug, leaves, water droplets, and other subjects for such capture.
A close view of vegetables like cabbage can create an incredible concept for your photography with its complex patterns.
Close-view shots are also a good practice for portrait photography of people and pets, where you can capture the subject’s facial expression and attributes. Using a macro lens, you can shoot the details of tiny objects in the best way.
#3. Catch the Directing Lines:
You can create a roadmap for your photo by capturing extended straight lines. Such lines are known as leading or directing lines because they direct the eye toward something in the picture. However, directing lines can split your photo into different parts by adding graphical attraction.
#4. Construct Depth Sense:
While photography, we always focus on two dimensions of the frame, forgetting about the depth sensor, which our eyes adore seeing. Constructing depth makes the picture more engaging by grabbing the viewer’s attention. This iPhone photography tip will instantly make your photos more appealing.
Therefore, implement the idea by framing the main subject behind a blurred object in the background. You also can construct the depth sense using a leading line or close-up view of the subject.
You also can create depth of sense by shooting the main subject through a frame. In addition, you can include different graphical components to create a varying sense of depth. The technique creates an excellent output in the case of landscape photography for roads, railways, vehicles, rivers, or fences.
#5. Bring Harmony in Composition:
Our brain prefers harmony for a soothing view of a frame’s composition. However, often a minimum symmetry in composition can make the picture eye-catchy. For example, you can balance the composition of one side, keeping the opposite side of the frame imbalance. Employing symmetry is an amusing practice to make a remarkable image. Reflection of the subject in the image creates a perfect balance you can capture with your iPhone.
#6. Involve Simplicity:
A newbie photographer often uses overwhelmed compositions in photos that distract the viewers. A single subject can be a strong composition. However, sometimes simplicity brings out a great result. Therefore, it is one of the 10 Best iPhone Photography Tips to keep your subject simple. Try to avoid all distractions from the frame. Don’t bother about negative space.
#7. Orientate Subject Correctly:
For the best iPhone photography, pick the proper composition orientation for your photography. For example, the orientation for geography photography isn’t the same as product or food photography. Therefore, select the appropriate orientation for your iPhone photography.
For illustration, you can use the portrait orientation for single-subject shooting, like fashion or product photography, where you want the viewer’s attention on the Subject. But for nature photography, you should use the landscape orientation to cover the subject area horizontally.
For uploading photos on social media, you should decide about horizontal and vertical directions because different social media platforms have different requirements. For instance, you need vertical photos for Instagram Stories while horizontal photos for Twitter.
 This image is used solely for illustrative purposes. We do not intend to offend or conflict with any societal, cultural, religious, or political values. Image Source: 123RF
#8. Use Crosswise Arrangement:
You should concentrate on composition balance if you want to learn iPhone photography by heart. Using the diagonal balance is one of the 10 Best iPhone Photography Tips. Keeping the subjects in frame’s one side might create an imbalanced view. For a better view, position your multiple subjects in diagonal alignment that will direct the viewer’s eye to the scene.
 This image is used solely for illustrative purposes. We do not intend to offend or conflict with any societal, cultural, religious, or political values. Image Source: 123RF
Using leading lines, you can manage the diagonal balance in your photo. Using leading lines, you can manage the diagonal balance in your photo. For a precise sense, glance over the image below. Here you can see the water directs the view diagonally to the hill.
Professional Photo Editing Trial – Upto 100 Images.
#9. Apply Rule of Thirds for Composition Design:
Placing the main subject in the center always doesn’t give a good view. Do you know about the Rule of Thirds in Photography? It is an essential rule to design the composition of a photo flawlessly. I have shared the details in my blog, “Rule of Thirds in Photography.” Check it out to apply the rule in your composition design for iPhone photography.
For better visualization, don’t forget to place the subject closer to the intersected lines. It can accommodate any photography category, like landscape, portraits, or other photography. You can apply the rule of thirds for 30th Birthday Photoshoot Ideas too.
#10. Apply Golden Triangles:
One of the magical rules of composition for photography is Golden Triangles, which you can also apply to your iPhone photography. There is a close relation between golden triangles and the rule of thirds in composition design. However, to lay the golden triangles in your iPhone photography, you need to divide diagonally from one corner to another, which makes the composition astonishing. The diagonals on the image can reveal every detail leaving an interminable footmark on the spectator.
Technical Tips for the Best iPhone Photography
iPhone photography is not so hard but requires some technical application to create an excellent photo with a remarkable memory. So let’s know about the 10 best technical tips for iPhone Photography:
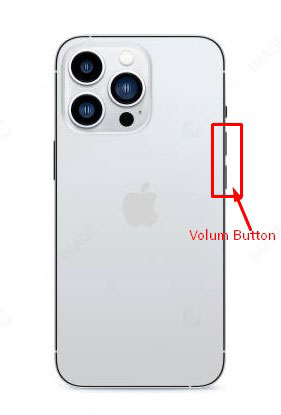
#1. Set Camera Timer:
Set the camera timer for regular shots of iPhone photography. One of its advantages is that it prevents the camera shake while capturing the photo using the thumb to tap the shutter switch on the phone.
Alternatively, you can also use the volume buttons to capture photos.
 This image is for illustrative purposes only. No offense or conflict with any cultural, religious, or social values is intended. All trademarks, logos, & content remain the property of their owners.
#2. Focus and Exposure Settings:
iPhone photography with an automatic camera setting is relatively easy. With this automatic setting, the iPhone camera can automatically focus on a subject, but unfortunately, it always doesn’t focus correctly. Therefore, sometimes you need to go with a manual setting.
Focus and Exposure are two basic settings that you can handle easily. First, you have to find the subject and tap on the screen to set focus. Then, swiping up or down, you can adjust the Exposure with brightness or darkness. Your setting will be saved when the AE/AF LOCK appears in a yellow box, and the setting is ready to use for capturing the picture without auto settings.
#3. Capture in Smooth Light:
Quantity and quality of light are significant concerns for any photography, and it’s not exceptional for your iPhone photography. However, most of the subjects look most pleasing in soft light. You can get the soft light by blending it with something while coming from the source. The light coming from the lampshade is an example of soft light.
Skip placing the subject close to the light source during indoor photography. I recommend you take some images with the lights on and take some off while doing indoor photography. Because the warm, cool or soft light can impact the picture exposure. During post-production, you can keep the best shots and delete the others.
While doing outdoor photography, avoid the middle of the day because the sun lights directly overhead at that time. Remember, a flashlight is harsh that can make an unflattering photo. Therefore, skip using a flashlight while doing iPhone photography.
 This image is used solely for illustrative purposes. We do not intend to offend or conflict with any societal, cultural, religious, or political values. Image Source: 123RF
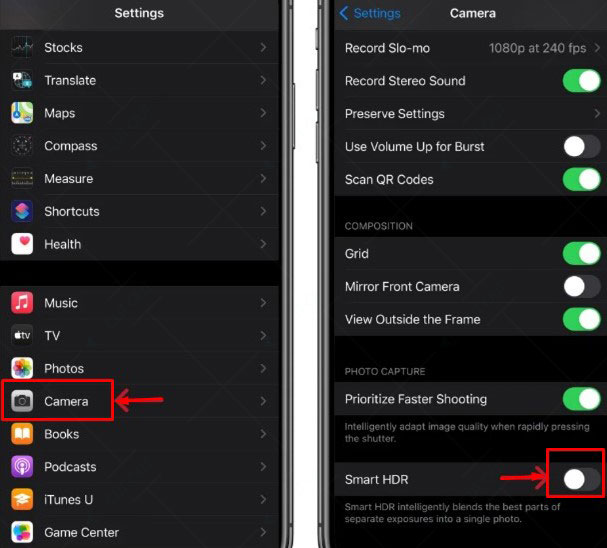
#4. Utilize HDR:
High Dynamic Range, also known as HDR, is a camera setting that captures different exposures and merges them to create a well-exposed photo. You can use this HDR to capture a good picture for your iPhone photography when the subject contains a few dark and bright parts. The basic settings include on, off, and automatic, which you can choose by tapping on the HDR icon on the top screen of the iPhone camera.
You need to set the HDR manually if you are using iPhone XR, XS / XS Max, 11, 11 Pro, SE 2, 12, 12 mini, 12 Pro / 12 Pro Max. In such a case, you won’t get the HDR icon on the screen if the Smart HDR is turned on in the camera setting. To turn off the Smart HDR, you need to do as below:
- Go to the camera setting option.
- Slide left to the Smart HDR.
 This image is for illustrative purposes only. No offense or conflict with any cultural, religious, or social values is intended. All trademarks, logos, & content remain the property of their owners.
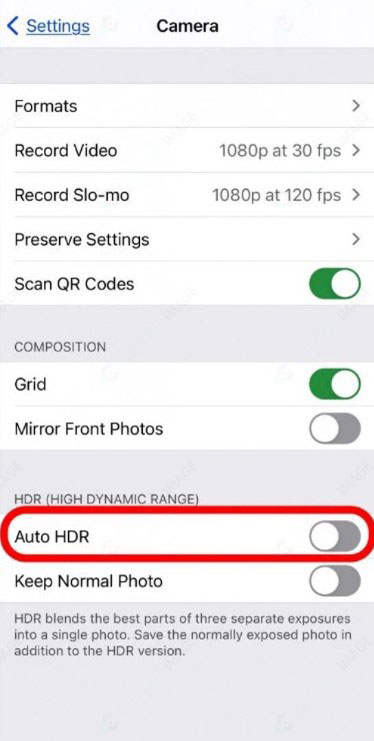
If you are using the old iPhone version (On iPhone X / 8/8 Plus, turn off Auto HDR), you must slide left to Auto HDR.
 This image is for illustrative purposes only. No offense or conflict with any cultural, religious, or social values is intended. All trademarks, logos, & content remain the property of their owners.
You can control the HDR feature from the camera app using an iPhone model supporting HDR. Click on the HDR icon to set the mode to On or Off.
![]() This image is for illustrative purposes only. No offense or conflict with any cultural, religious, or social values is intended. All trademarks, logos, & content remain the property of their owners.
This image is for illustrative purposes only. No offense or conflict with any cultural, religious, or social values is intended. All trademarks, logos, & content remain the property of their owners.
#5. Consider the Image Size:
Different social media platforms prefer different size photo requirements. As a result, the platform automatically resizes the photo if it doesn’t match the condition, and there is a chance of losing the pretty view of the photo. Therefore, you should consider the photo size before uploading it on social media. Then, you can use a cut out image app to get the perfect size or ratio for the social media where you will upload the photo.
 This image is for illustrative purposes only. No offense or conflict with any cultural, religious, or social values is intended. All trademarks, logos, & content remain the property of their owners.
#6. Use Filters:
iPhone offers a bunch of filters that you can use while capturing photos. To use the filter, go to the top right-hand corner of the screen and tap on the three circles overlapping each other. After that, choose the filter you like to apply. For example, you can create dramatic colors using the vivid filter. Then, you can remove the color using Mono, Silvertone, or Noir filters.
If you don’t like the applied filter color, you can change it later without changing the picture quality. iPhone filter differs from other filter apps because it uses a filter on the original photo and prevents oversaturation with abnormal colors.
#7. Use Burst Mode:
Capturing a fast-running object or person like a kid, moving car, etc., is challenging in photography. If you fail to capture it at the perfect time, the outcome will be blurry, making the photo unattractive. However, you can handle this using the Burst Mode feature of the iPhone, and it’s easy to apply. Press and hold the shutter button up when capturing in landscape mode or left when shooting in portrait orientation. You’ll see the burst mode counter appear, and it will continue to shoot in Burst Mode until you release the button. Later select the apparent capture of a fast-moving subject and delete the rest.
#8. Use of flash:
Almost every camera nowadays contains a flashlight, and so does the iPhone. You can activate the flashlight by going to the triangle sign on top and selecting the bolt lightning icon from the bottom, as shown below:
 This image is for illustrative purposes only. No offense or conflict with any cultural, religious, or social values is intended. All trademarks, logos, & content remain the property of their owners.
You can set the flashlight to auto, on, or off according to your need. For example, you should turn on the auto flash when you are capturing in a poorly lighting environment. You can turn on the flashlight when photographing scientific or medical spottings or detailing work-related issues. Don’t use a flashlight if you snap any artistic or creative work or product for sale.
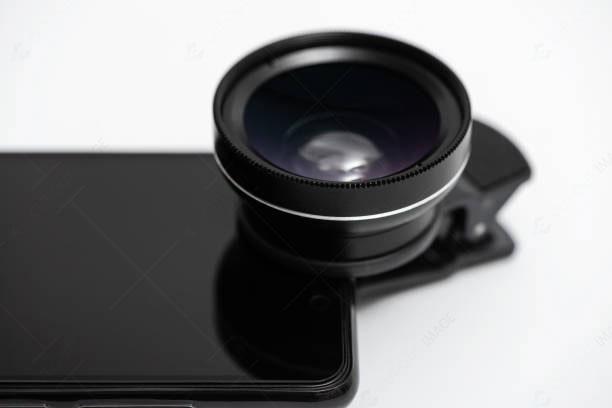
Utilize the iPhone Photography accessories: A little investment in accessories can help you make great iPhone photography. Tripods, lenses, selfie sticks, and lights are helpful accessories for iPhone photography. These are light to carry and affordable to buy.
You can get small pocket-sized to large Tripods available in the market. Using Tripod or selfie stick, you can get steadier photos.
 This image is used solely for illustrative purposes. We do not intend to offend or conflict with any societal, cultural, religious, or political values. Image Source: 123RF
Using an attachable lens can develop the photography function.
A portable light can help you manage the lighting requirement.
#10. Use iPhone photography Apps:
Only capturing can’t ensure stunning photography. Therefore, a professional photographer applies image post-production service for Photo Retouching purposes. You also can apply photo retouching using iPhone photography apps to make your photo outstanding. For example, you can clean up scratches and dirt using the TouchRetouch app and adjust the lighting using Adobe Lightroom. You also can apply filters to change the color saturation. Besides, using different iPhone photo editing apps, you can adjust the size with the crop tool, Straighten the image using the Straighten tool.
An iPhone is excellent for capturing photos while traveling or doing any photography. So far, in this blog, I have discussed the 10 Best iPhone Photography Tips considering composition setting and technical facts. By reading this blog, I believe you will be able to capture beautiful pictures with your iPhone by applying the tips discussed above. Pay attention to the light, composition, and colors and photo editing to bring outstanding results. Best of luck with your new creation.