![Rule of Thirds in Photography [ A Complete Guide ]](https://www.cutoutimage.com/wp-content/uploads/2022/09/Rule_of_Thirds_in_Photography.webp)
Disclaimer: This blog is for general informational and inspirational purposes only, based on publicly available information and personal insights. Images—whether of models, screenshots, or products—are for illustrative purposes only and do not depict actual subjects, scenarios, or views described. We do not intend to offend or conflict with any societal, cultural, religious, or political values.
Who doesn’t upload photos online in this modern time? Almost every one of us shares our thoughts and feelings online through photos. But just pressing the shutter button, everyone can’t shoot a perfect picture because the skill requires the idea of exposure, compositions, and some other techniques. The Rule of Thirds in Photography is one of the techniques you need to learn to take an excellent photo and edit it in post-production.
Is it the first time you have heard the name “Rule of Thirds in Photography”? If so, you will learn more about it by reading this blog because today, I will share the idea of the Rule of Thirds in Photography in detail. Besides reading the blog, you will learn how to make your photos pleasing by adopting the rule of thirds and why you need to follow this technique. So, let’s start the learning journey!
What is the Rule of Thirds in Photography?
Composition is the part and parcel of a photo that has the power to break or make the photo outstanding. Therefore, you must go through a number of compositional guidelines to make a pleasing picture. The Rule of Thirds is one of the most significant compositional guidelines which helps you create a well-balanced composition.
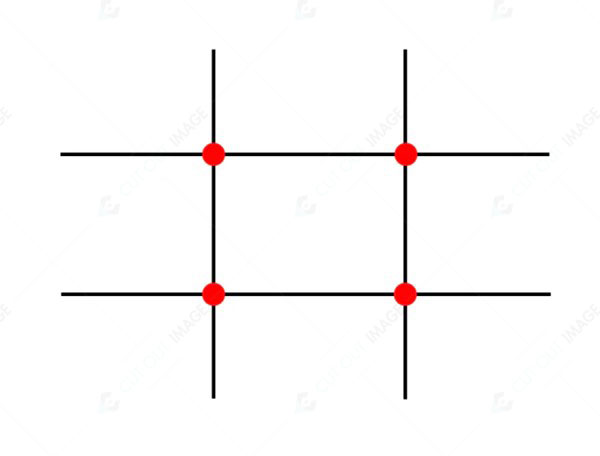
The Rule of Thirds in photography is splitting the photo into 3 parts with horizontal and vertical lines that create 9 square boxes giving the view of a Tic-Tac-Toe board. The sweet spots generated from the intersected lines are essential parts of the grid because this is where the subject or other elements are positioned in a well-balanced way.
The immediate purpose of using the Rule of Thirds in photography is to make the photo stunning and attractive. Therefore, photographers need to follow the trail of the rules of thirds during photography and the post-production process to make the photograph excellent. Research has revealed that these sweet spots are the focal points where a spectator’s eyes like to focus.
Let me describe the Rule of Thirds with a graph and example to generate a crystal clear understanding. Using the Rule of Thirds, you can see the photo is divided into 9 squares as below graph where the red marked parts are the sweet spots as mentioned above:
 This image is for illustrative purposes only. No offense or conflict with any cultural, religious, or social values is intended. All trademarks, logos, & content remain the property of their owners.
Following the Rule of Thirds, you should naturally put your subject around the sweet spots to seize the viewer’s attention. To make a perfect visually dynamic photo, you should set the main subject in the grid’s top, base, left, or right box. However, avoid keeping the main subject in the center box to capture a well-balanced image.
 This image is for illustrative purposes only. No offense or conflict with any cultural, religious, or social values is intended. All trademarks, logos, & content remain the property of their owners.
In addition, if your subject is tall or long, place it near one of the sweet spots for well-balanced composition instead of keeping it in the center box. Let’s see the difference between using the subject in the center avoiding the Rule of Thirds and using the subject near one of the sweet spot using the Rule of Thirds in the pictures below:
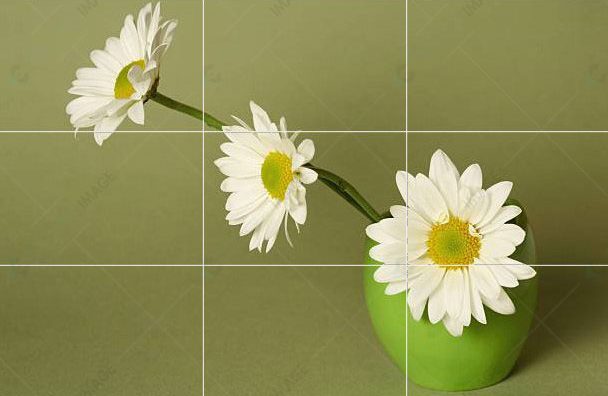
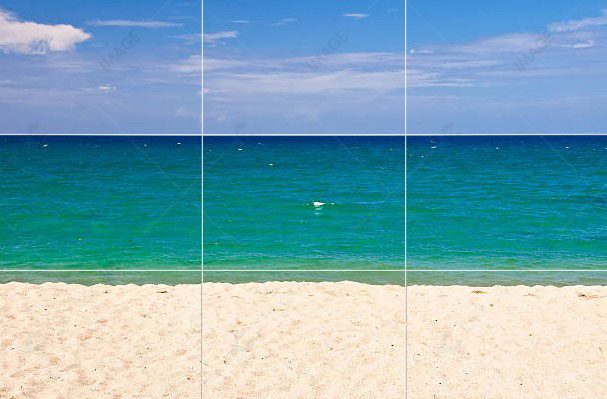
Let’s see a few more pictures as examples of the following Rule of Thirds:
In this picture, an adorable baby raccoon disguises itself from danger with a copy area. Here, the most noticeable element is the baby raccoon. According to the rule of thirds, the photo’s main subject is placed near or around the intersected points.
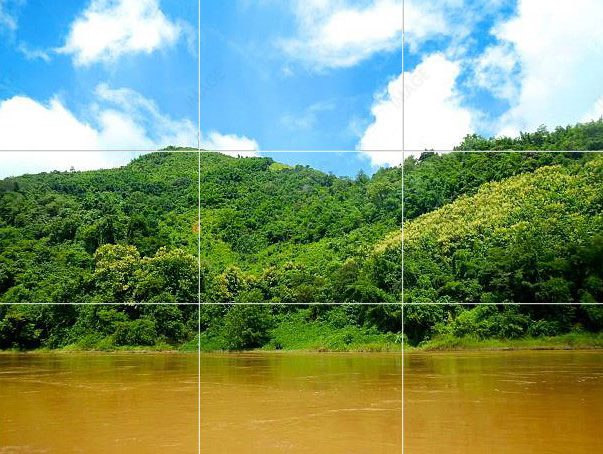
Here is another example of the Rule of Thirds for a geography photo from Summer Photoshoot Ideas. The main subject of the image is the land area. Therefore, the horizontal two-thirds (bottom) of the picture covered the land part, and the other part of the third covered the sky.
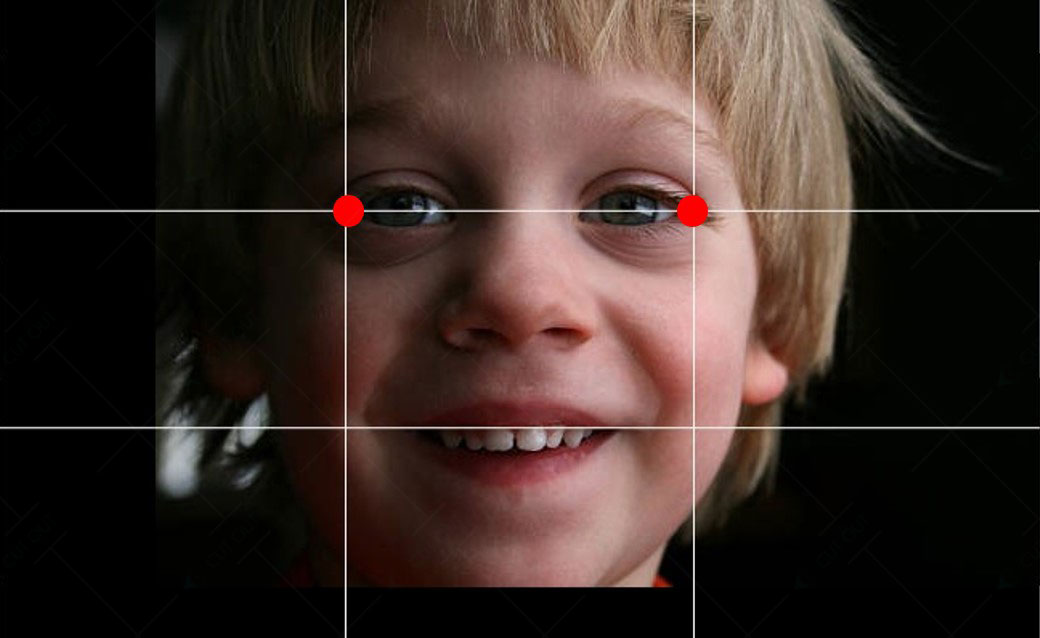
Here is one more example of a Rule of Thirds. According to the Rule of Thirds, the eyes are positioned in the upper horizontal part of this picture. In addition, each eye intersects with a vertical line.
 This image is for illustrative purposes only. No offense or conflict with any cultural, religious, or social values is intended. All trademarks, logos, & content remain the property of their owners.
The Origin of Rule of Thirds in Photography
Though the Rule of Thirds is a significant guideline for photography, it wasn’t developed by the photographers. If truth be told, it was created by painters in the Renaissance era.
During the era of the Renaissance, there was a debate among painters about the color balance and the proportion of space the picture element should occupy. Finally, they decided that one-third of the photo should have land and water, whereas two-thirds should contain the sky. From this concept, the name “Rule of Thirds” came. The concept is obtainable in John Thomas Smith’s 1797 artwork “Remarks on Rural Scenery.” In this artwork, he admitted the result of splitting paintings using a grid strategy to maximize the impact on the viewer’s eye.
The artists used the Rule of Thirds for centuries in Painting until photography was invented. Of course, painting and photography processes are different, but still, they have some distinctive similarities. Therefore, the Rule of Thirds has become a significant formatting process for photographers. Moreover, in today’s world, the Rule of Thirds applies to disciplines like design, Painting, illustration, cinematography, and photography.
Below are two examples of paintings of 1797 and modern photography using the rule of thirds:
 This image is for illustrative purposes only. No offense or conflict with any cultural, religious, or social values is intended. All trademarks, logos, & content remain the property of their owners.
Importance of Rule of Thirds in Photography
Human eyes naturally get attracted to the intersection points of a split image. In this case, the Rule of Thirds is the critical concept for creating a well-balanced photo. It equips a manageable way to organize your subject into one of the best positions for an attractive image. In addition, it lets you determine the background and foreground space to generate a lovely picture.
Do you know about picture dynamism? It directs the viewer to the vital element after making a visual tour of the other part of the picture. The rule of thirds reinforces this picture dynamism creating an engaging picture.
 This image is for illustrative purposes only. No offense or conflict with any cultural, religious, or social values is intended. All trademarks, logos, & content remain the property of their owners.
Rule of Thirds nurses you in creatively employing the negative area in the background. It also eradicates the blank spaces encircling your subject. Accordingly, this practice facilitates you to prioritize the picture and concentrate on the subject.
Without following the rule of thirds, when you capture a photo keeping the subject in the center, the viewers will get stuck on the subject only where the other elements of the picture will get ignored. But when you keep the subject off-center following the rule of thirds, the viewer will see further details outside the main subject. Thus, applying the rule of thirds improves the visible effect of one’s work.
A picture is a storyteller, and correctly applying the rule of thirds adds profoundness to the photo to create a pictorial story. For example, what will be your main subject if you capture a landscape photo? The sky or the beauty of the location, right? While capturing a shot, keeping the horizon line at the scene’s midpoint will divide the image in half. Consequently, the viewers will struggle to interpret the story of the photo. Here, the rule of thirds will help you appropriately arrange the picture elements that describe the story.
 This image is for illustrative purposes only. No offense or conflict with any cultural, religious, or social values is intended. All trademarks, logos, & content remain the property of their owners.
Rules of Third Learning Method [Rule of Thirds in Photography]
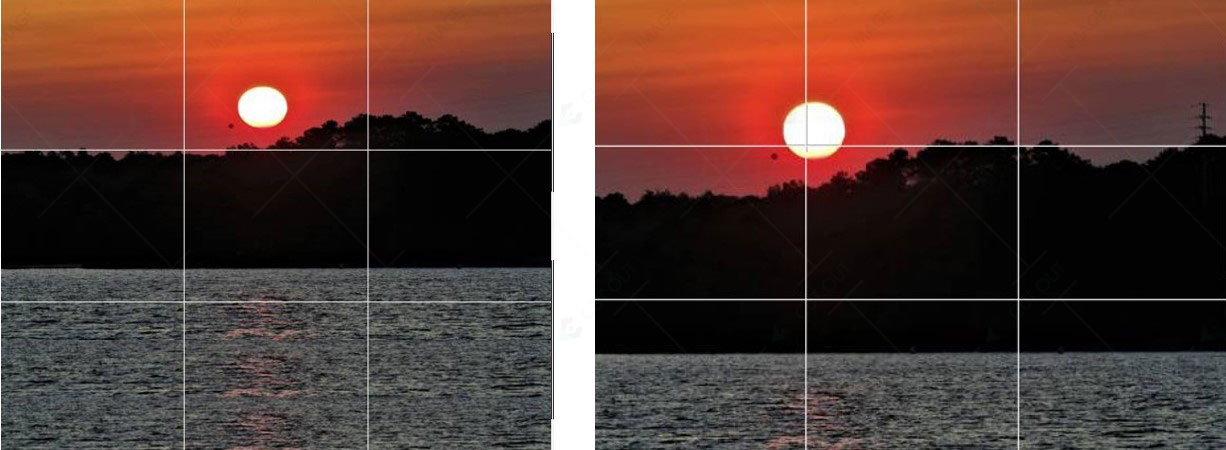
Photography is easy, but the rule of thirds might make it complicated to capture a better shot because you have to consider many aspects while capturing the photo. Look at the below pictures:
 This image is for illustrative purposes only. No offense or conflict with any cultural, religious, or social values is intended. All trademarks, logos, & content remain the property of their owners.
In the right image, the sky is in the upper grid where the sun falls in the intersection point, the land in the middle grid, and the water in the bottom grid. All the elements are set correctly, giving a soothing view. On the other hand, in the left picture, you can see where the sun is on the upper, and the water covers more than one-third portion. Unfortunately, the left image fails to generate interest making the picture dull and motionless. Therefore, you should start learning the rule of thirds in your photography.
You should go to the camera setting to get the 9-square box grid for applying the rule of thirds. Though each camera has a different setting, you can find the grid view option from the camera’s menu. You also can do a quick Google Search with the camera model to get the grid setting guidelines. Of course, you can apply the grid view on your smartphone too.
Utilize these gridlines as a guide to fit the subject across the intersections and line them up. In the beginning, it will be time-consuming and complex, but after a short time, you will be habituated to it. You can capture the sky, ocean, and skyline while practicing the rule of thirds. Once you are good at using the rules, you can apply them in Fall Photoshoot Ideas too.
However, practice makes a man perfect. Therefore, once you learn and practice the rule of thirds, you will naturally have “a good eye” for the rule of thirds. To practice the Rule of Thirds, you can do the following things:
- Capture numerous pictures of the same subject from different grid line rules.
- Capture the subject, keeping it in and off the center.
- Glance over the images and choose the best one.
- Show those to your mentor or any photo expert. Learn from them which one is the best and which one is not. Also, try to know the reason behind that.
- Practice, practice, and practice.
Breaking the Rules of Thirds [Rule of Thirds in Photography]
Photography is craftwork where the rule of thirds functions as the theory of making it appealing. However, sometimes breaking the rules can help you come outside the box and create something incredible. Therefore, once you learn the rule of thirds, don’t fear breaking it to do something creative.
Every rule comes up with the free pass of breaking it for making something creative. Therefore, you must understand the functions of the rule of thirds in your picture and how you can break it to create an aesthetic image. Here are some cases when and why you should break the rule of thirds in your photography:
- Flat Lay Photography: If you are doing flat lay photography and don’t want the eye roaming, you can break the rule of thirds.
 This image is used solely for illustrative purposes. We do not intend to offend or conflict with any societal, cultural, religious, or political values. Image Source: Unsplash+
- Reflection Photos: While capturing the reflection photos, you can go for breaking the rule of thirds that can help you accomplish conclusive balance.
- Construct the Story: Since the picture depicts a story, paying attention to the story behind the photo is essential. So, you can break the rule of thirds if applying it doesn’t make sense to the story.
- Symmetry Images: conventional symmetry always holds a position in photography. To create a dramatic photo with a centered subject around which other elements diverge, you can break the rule of thirds.
- Mesmerizing Subject: If you find that applying the rule of thirds can distract the viewer’s attention from the mesmerizing subject of the photo, you can break the rule and capture it in your way. For example, placing a person’s face in the center might give a great expression instead of keeping it on another side, following the rule of thirds.
- For Creating Soothing Effect: Employing the rule can concoct suspense between your subject and the negative space in the photo. To make the photo eye-shooting, you can go out of the rule of thirds.
- Close Shot: In the close shot, if the person falls into the middle, but it tells a story soothing your eyes, you can break the rule of thirds. For example, in this photo, you can see the father and daughter placed in the middle in closed mode. It’s not abiding by the rule of thirds, but by making the field blur, you can make the subject compelling and break the rule of thirds. Besides, the picture tells the story of a happy father and daughter.
Rule of Thirds in Different Photography
#1. Rule of Thirds in Landscape Photography:
New photographers capturing landscape scenery often place the horizon in the middle of the photo. Such a photo shows that the image is divided into two parts and doesn’t look good. Using the rule of thirds, he could divide the frame into three parts and appropriately keep the land, water, and sky on those grids. It also makes the photo pleasing to the eye. Therefore, applying the Rule of Thirds is advantageous for such landscape photographs.
#2. Rule of Thirds in Wildlife Photography:
While capturing wildlife photography following the rule of thirds, you should keep some negative space to add dynamism to the photo. See the image below, a sandhill crane is flying in the lovely white cloud and blue sky. There is copy space for the crane showing flying upwards. By following the rule of thirds, the empty spaces are kept around the crane for dynamic view and placed the bird in the intersected point.
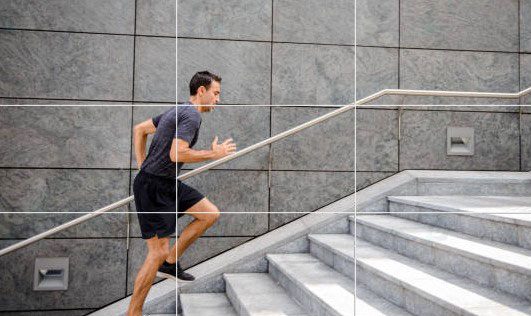
#3. Rule of Thirds in Directional Movement:
The rule of thirds is applicable for directional movement photos to pay detailed attention to the subject’s travel direction. Try to place the subject near hot spots opposite the direction. For example, if the subject moves to the right, put it on the left sweet spot. It will provide your subject with the impression of moving ahead.
 This image is used solely for illustrative purposes. We do not intend to offend or conflict with any societal, cultural, religious, or political values. Image Source: Pexels
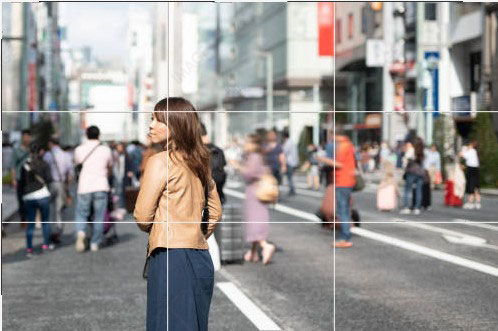
#4. The Rule of Thirds in Street Photography:
Street photography is challenging since you want to capture the candid without any direction. Therefore, it’s tough to maintain a hundred percent accuracy while following the rule of thirds. So, try your best to apply the technique to get the best result. First, ensure placing the main subject follows the grid. In this example picture, the main focus is the woman. The other elements or persons in the photo are not placed perfectly, but the woman was set on the sweet spot correctly.
 This image is for illustrative purposes only. No offense or conflict with any cultural, religious, or social values is intended. All trademarks, logos, & content remain the property of their owners.
#5. The Rule of Thirds in Food Photography:
Instead of following the fast and foremost rule, follow the rule of thirds as a guideline for your photography. In the case of food photography, try to set your composition on the sweet spots or off-center to make it lovely.
In this example, a small bowl of couscous is garnished with parsley. Again, the main subject is positioned off-center but in the sweet spots following the rule of thirds.
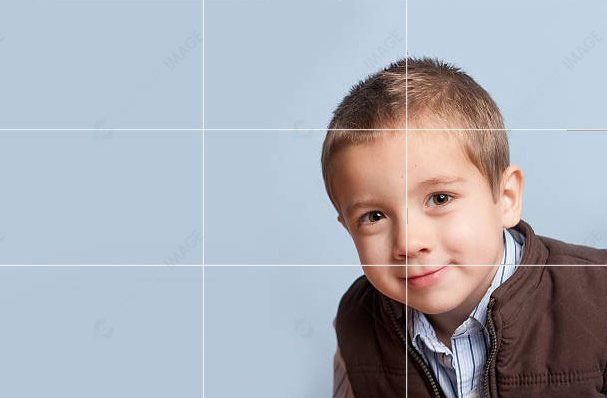
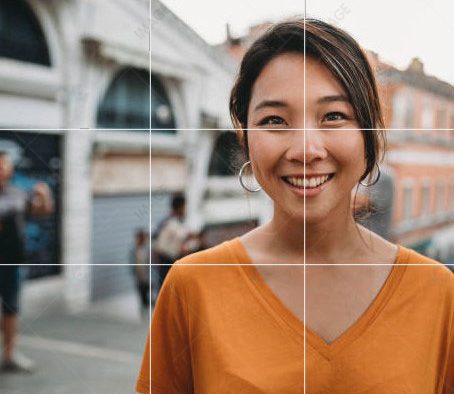
#6. Rule of Thirds in Portraits of Faces:
While capturing the portraits of faces, try to keep the eyes in the one-third to balance the picture’s compositions. In the example below, the eyes are placed in the upper third. Here the horizontal and vertical lines intersect in between the eyes.
 This image is for illustrative purposes only. No offense or conflict with any cultural, religious, or social values is intended. All trademarks, logos, & content remain the property of their owners.
#7. Rule of Thirds in Wedding Photography:
Whether you are a professional photographer or doing photography as a passion, you can do excellent wedding photography following the rule of thirds. Try to keep the eyes in the sweet spots to create a wonderful picture of the subject. Then, balance the skyline horizon when you hold nature as the backdrop for the photo. To make the wedding photos more stunning, you can take the post-production service from Cut Out Image.
#8. Rule of Thirds During Post-production:
While practicing, you won’t be able to correctly apply the Rule of thirds every time in every photo. However, you can touch them up later by the photo editing process.
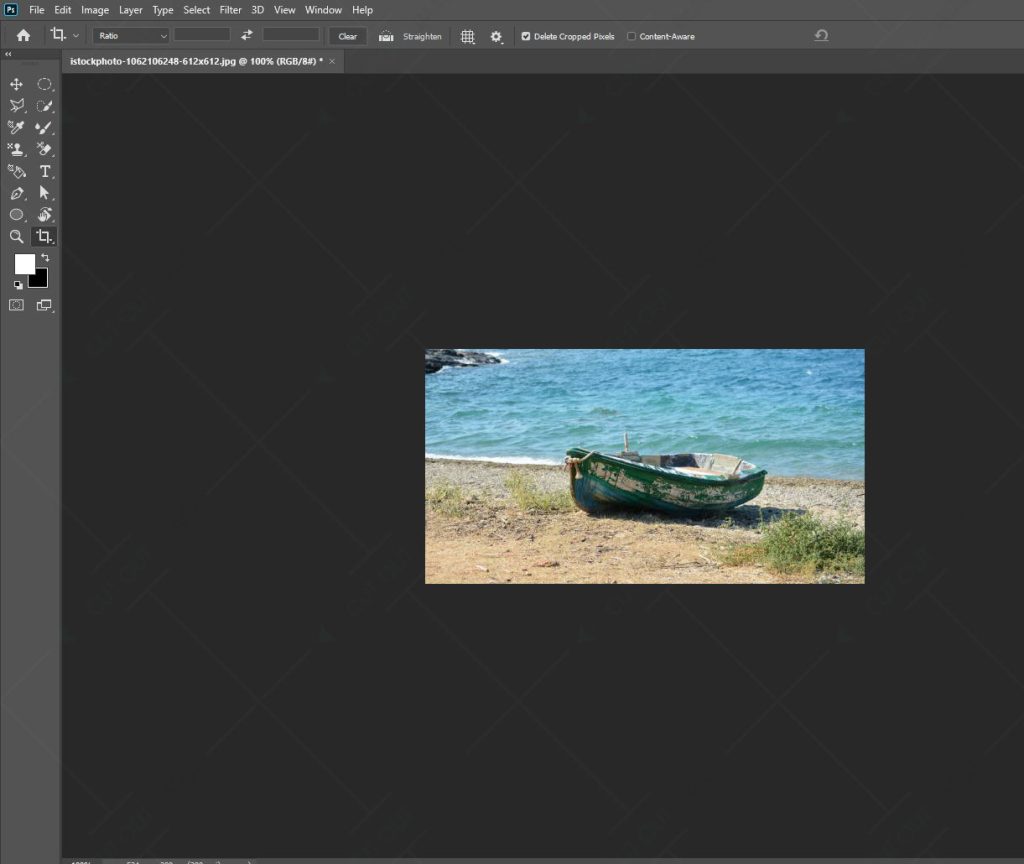
For the post-production process, you can use Adobe Photoshop or Lightroom. Using this software, you can deal with position or angle-related issues and place the subject in the correct position. For this, you must apply the crop feature, where you will get the Rule of Thirds overlay as a guide in this software. You can use the overlay to identify the removable areas and the subject’s position. While editing, you’re familiar with the Rule of Thirds.
To apply the rule of thirds in photoshop, follow the below Step by Step:
- Open the photo in photoshop
 This image is for illustrative purposes only. No offense or conflict with any cultural, religious, or social values is intended. All trademarks, logos, & content remain the property of their owners.
- Select the Crop tool from Photoshop.
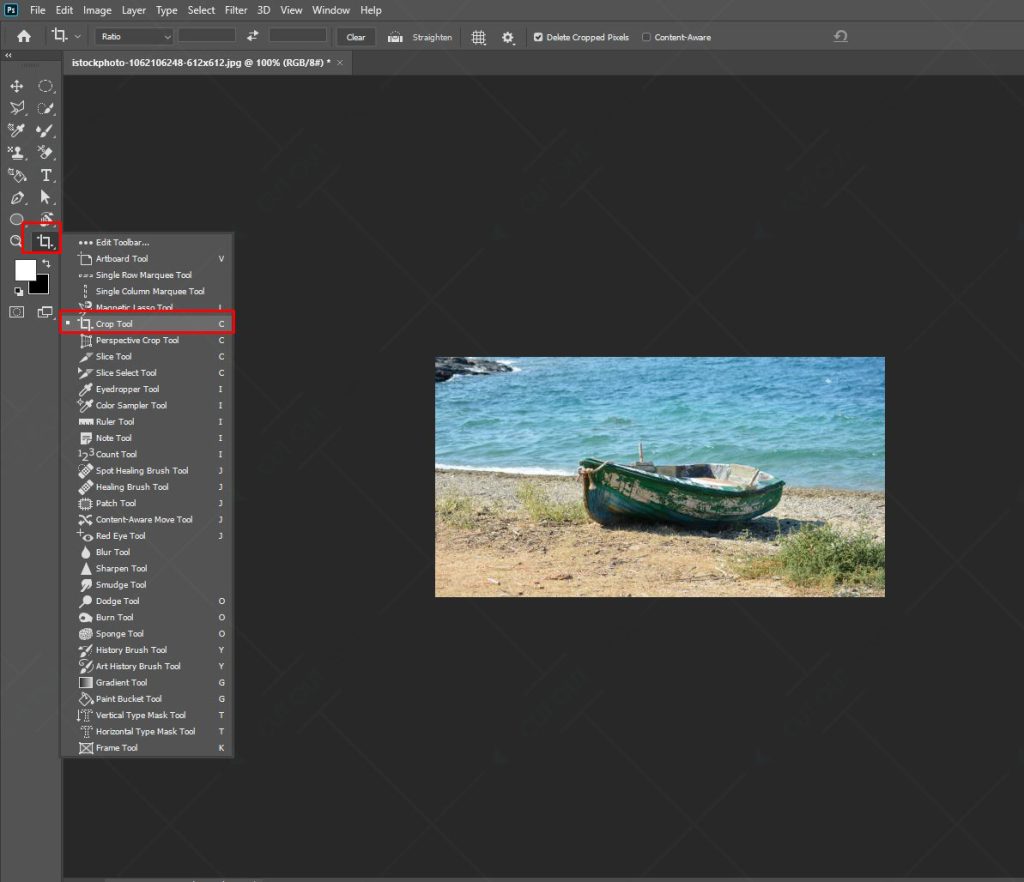 This image is for illustrative purposes only. No offense or conflict with any cultural, religious, or social values is intended. All trademarks, logos, & content remain the property of their owners.
- There will be an overlay of a grid of 9 boxes over the photo.
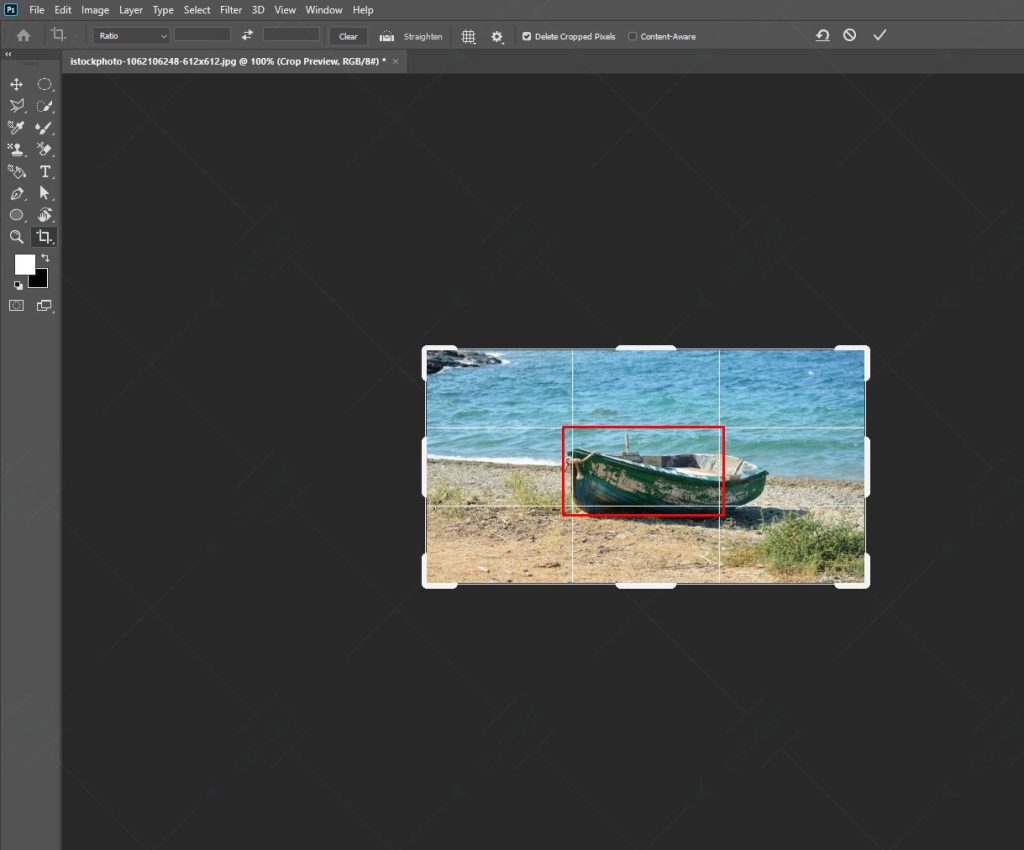 This image is for illustrative purposes only. No offense or conflict with any cultural, religious, or social values is intended. All trademarks, logos, & content remain the property of their owners.
- Drag the borders or corners of the picture to resize.
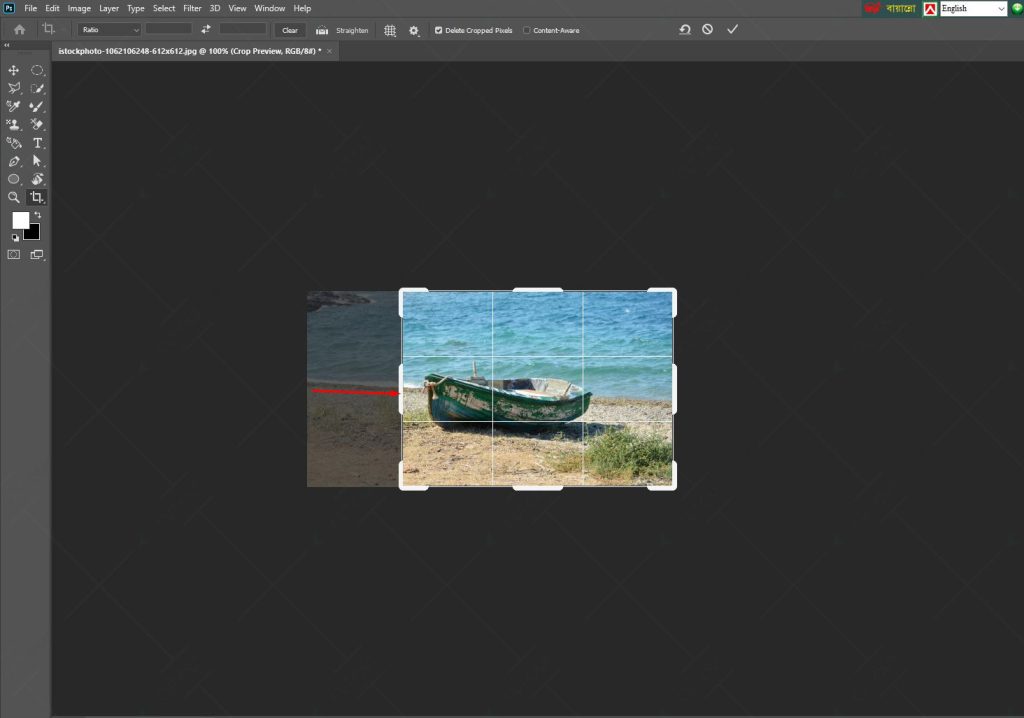 This image is for illustrative purposes only. No offense or conflict with any cultural, religious, or social values is intended. All trademarks, logos, & content remain the property of their owners.
- When you are satisfied with the image, save it.
The Rule of Thirds is the guideline for arranging the photo element to make it aesthetic. It’s the tool to balance the composition and create appropriate visual effects in the photo. The technique is not challenging, but mastering it requires a significant amount of practice with patience. Moreover, always following the rule of thirds is not mandatory. So, you can break it, but you have to learn it accordingly. Hopefully, you have learned about the rule of thirds after reading this blog. Now, it’s time to jump into action!