Disclaimer: This blog is for general informational and inspirational purposes only, based on publicly available information and personal insights. Images—whether of models, screenshots, or products—are for illustrative purposes only and do not depict actual subjects, scenarios, or views described. We do not intend to offend or conflict with any societal, cultural, religious, or political values.
Have you ever uploaded an image to the website or your online shop, and it got pixelated? I meant the photo quality got reduced with square pixels. You can’t use pixelated images for personal or commercial purposes. Then How To Unpixelated an Image?
There are many ways to Unpixelated such an image, and today in this blog, I will share all the methods step-by-step with other required details about How To Unpixellated an Image. Keep reading to know about those. Here is the topic I will discuss in this blog:
- What is Unpixelated?
- How To Unpixelated an Image
- Why do Photos Become Pixelated?
- Why Need Unpixelate Images?
What is Unpixelated?
Unpixelating, also known as depixelating, is the technique of fixing a pixelated image. Here Pixelation means Pixelate Effect resulting in a blur or appearing individual pixels large to the naked eye because of enlarging an image beyond resolution by force.
For example, you have a low resolution photo but want to fit it according to your website needs. When you resized, you noticed little square pixels and rough edges in the image. It is Pixelation, and fixing the issue is Unpixelated.
How To Unpixellated an Image
IIn this blog portion, I will discuss the core topic of How To Unpixelated an Image. You can do it in several methods depending on the type of pixelation and the desired outcome. Let’s know them:
Method-1: How To Unpixellated an Image in Photoshop
Photoshop is the magic lamp to solve all photo editing problems. If you need to Unpixelate your Image to regain high resolution, you must do it using Photoshop. However, you can Unpixelate an image following ways:
Way-01: Using Noise & Sharpen Filter
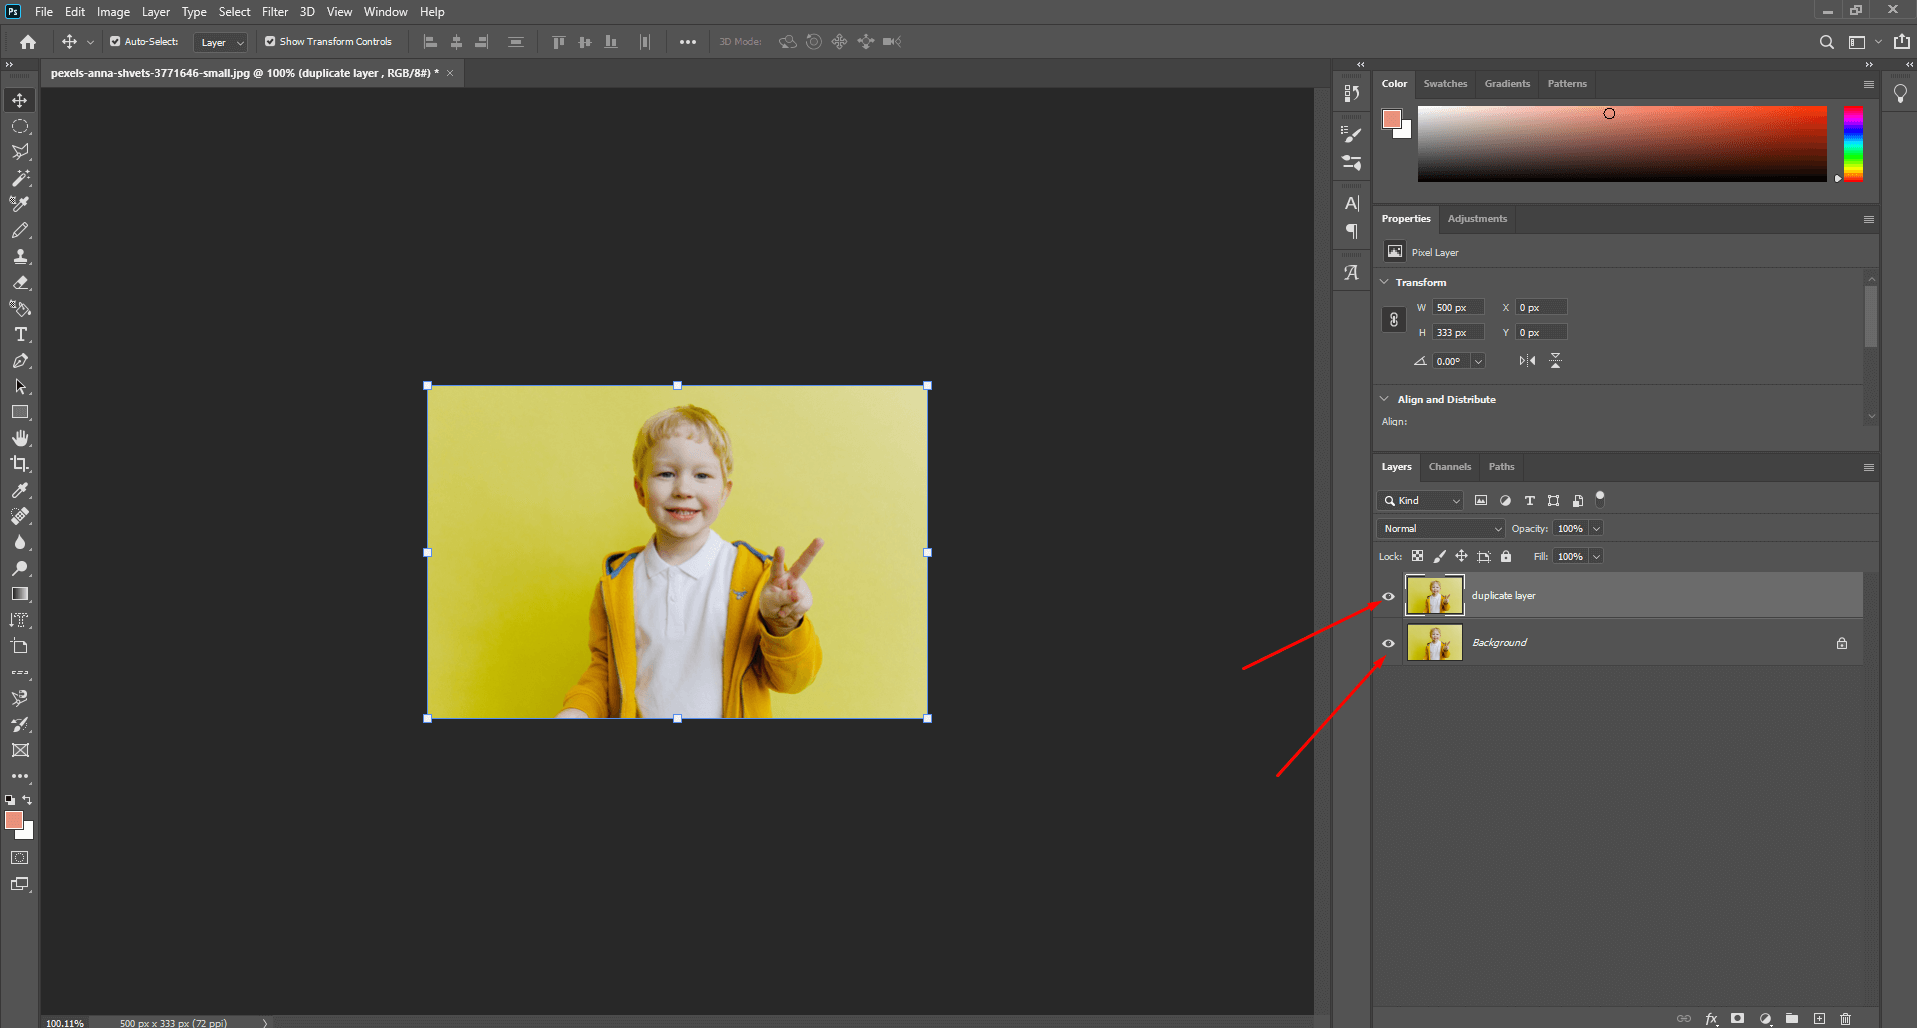
- Open the Image and duplicate the layer.
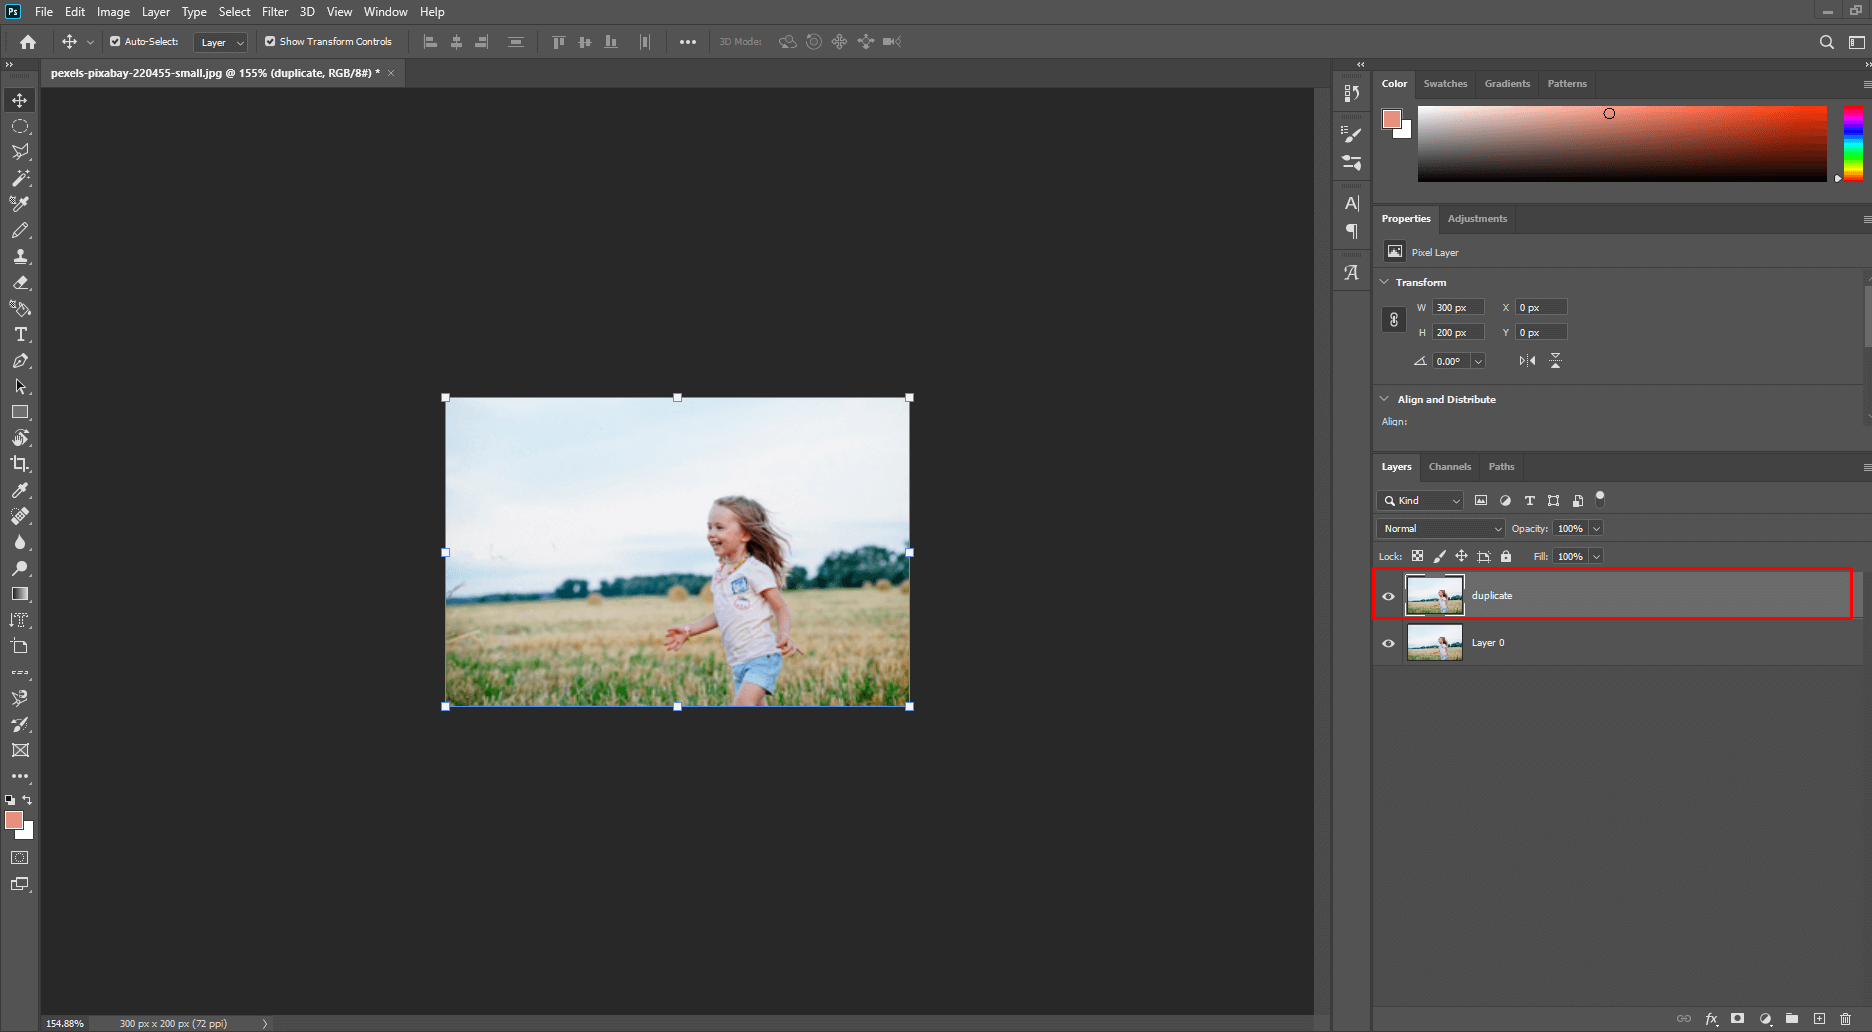 This image is used solely for illustrative purposes. We do not intend to offend or conflict with any societal, cultural, religious, or political values. Image Source: Pexels
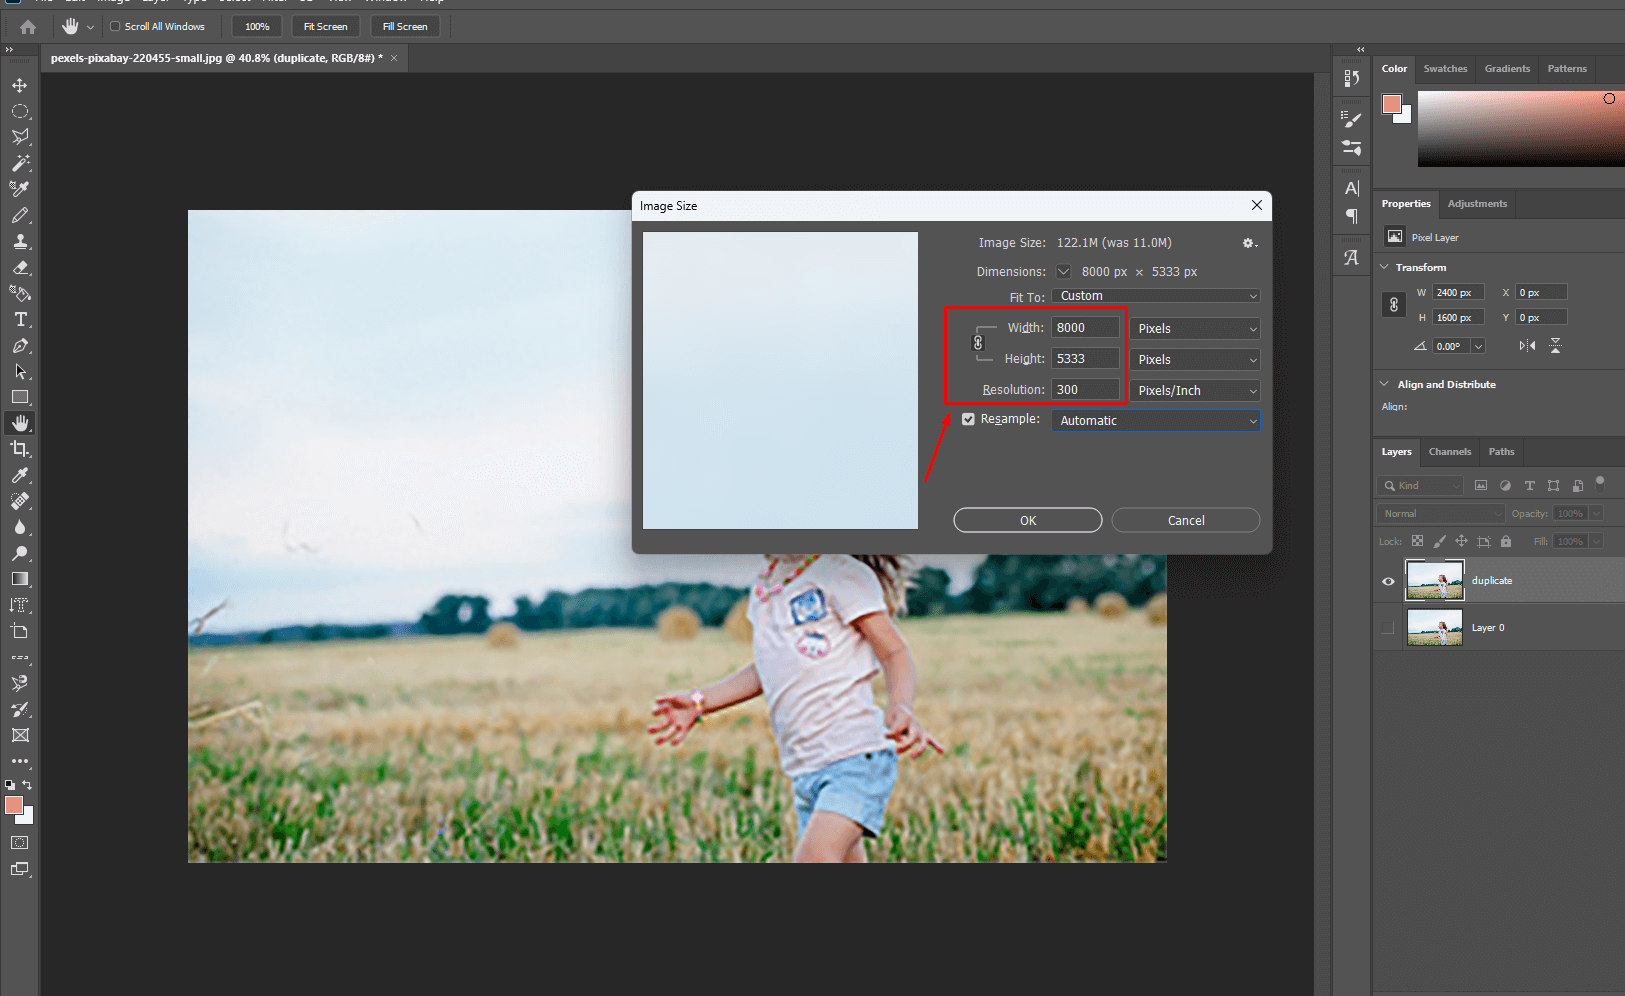
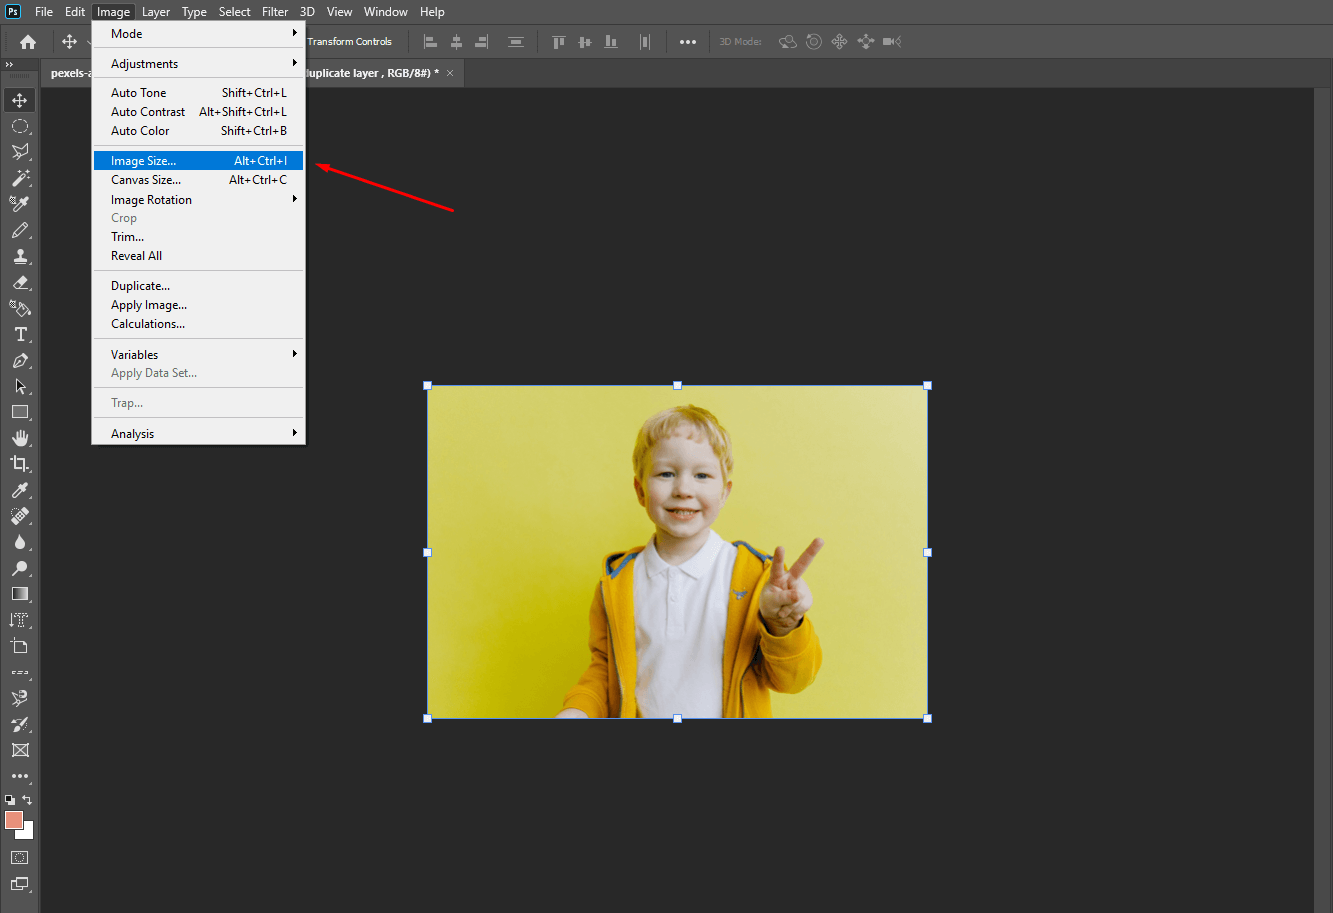
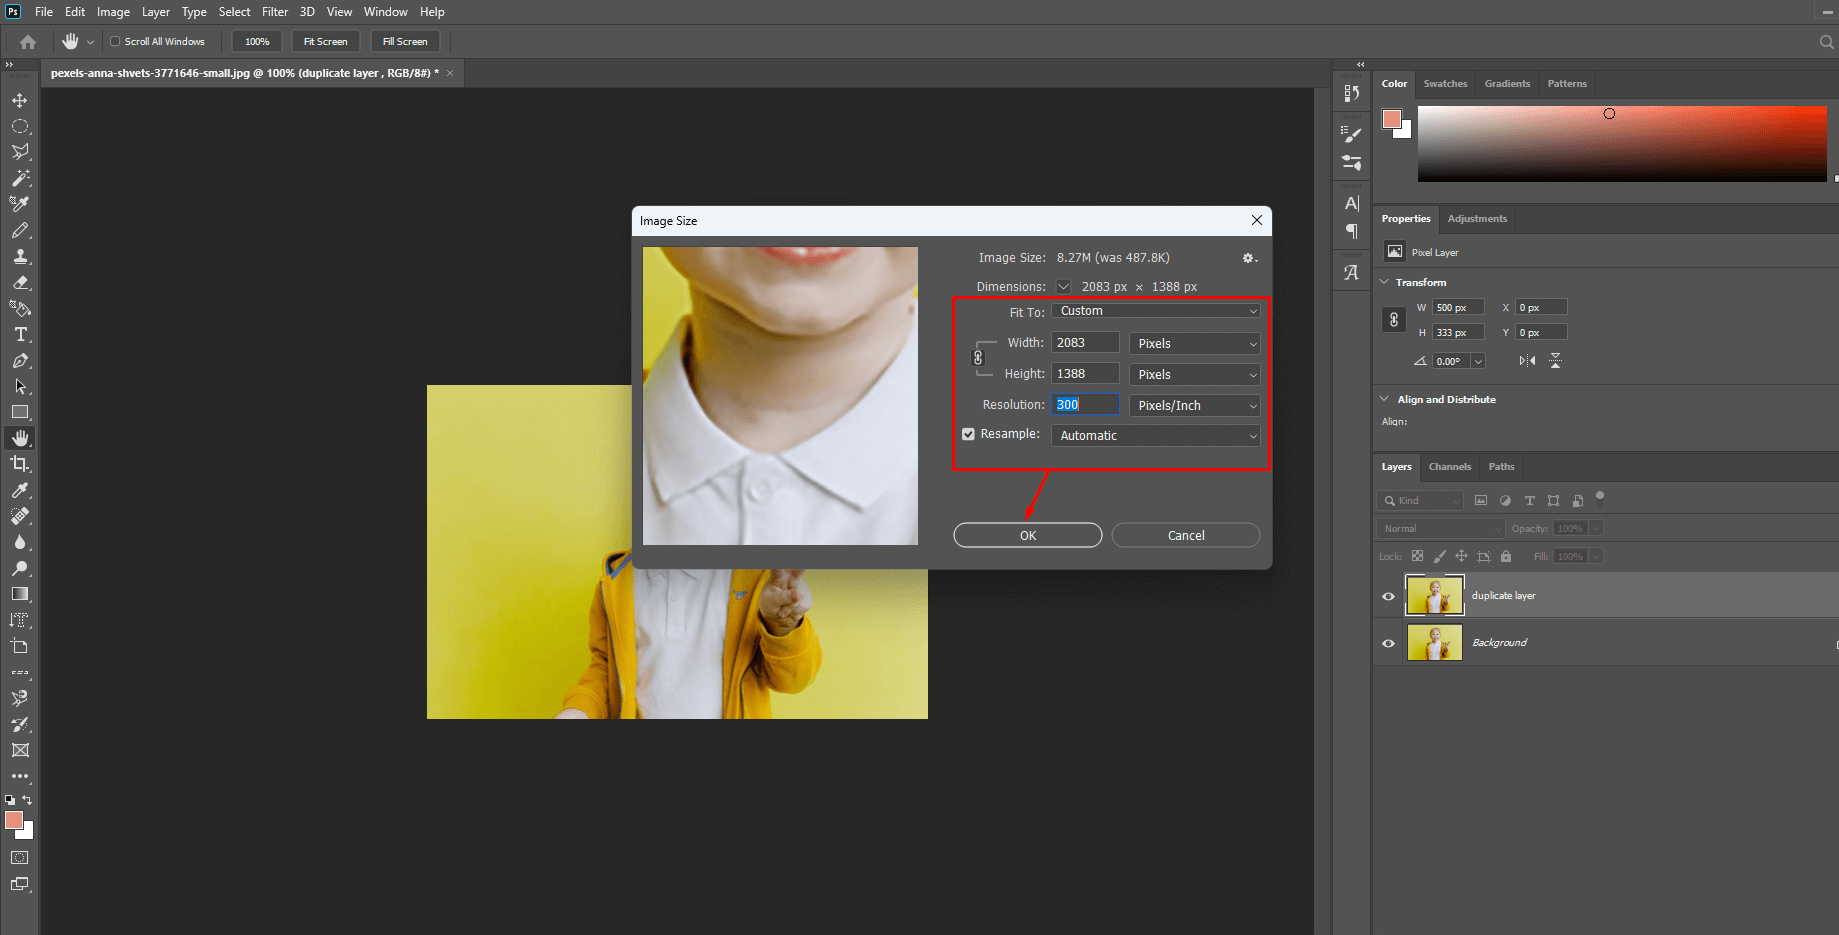
- Select ‘Image Size’ under the ‘Image’ command from the top menu.
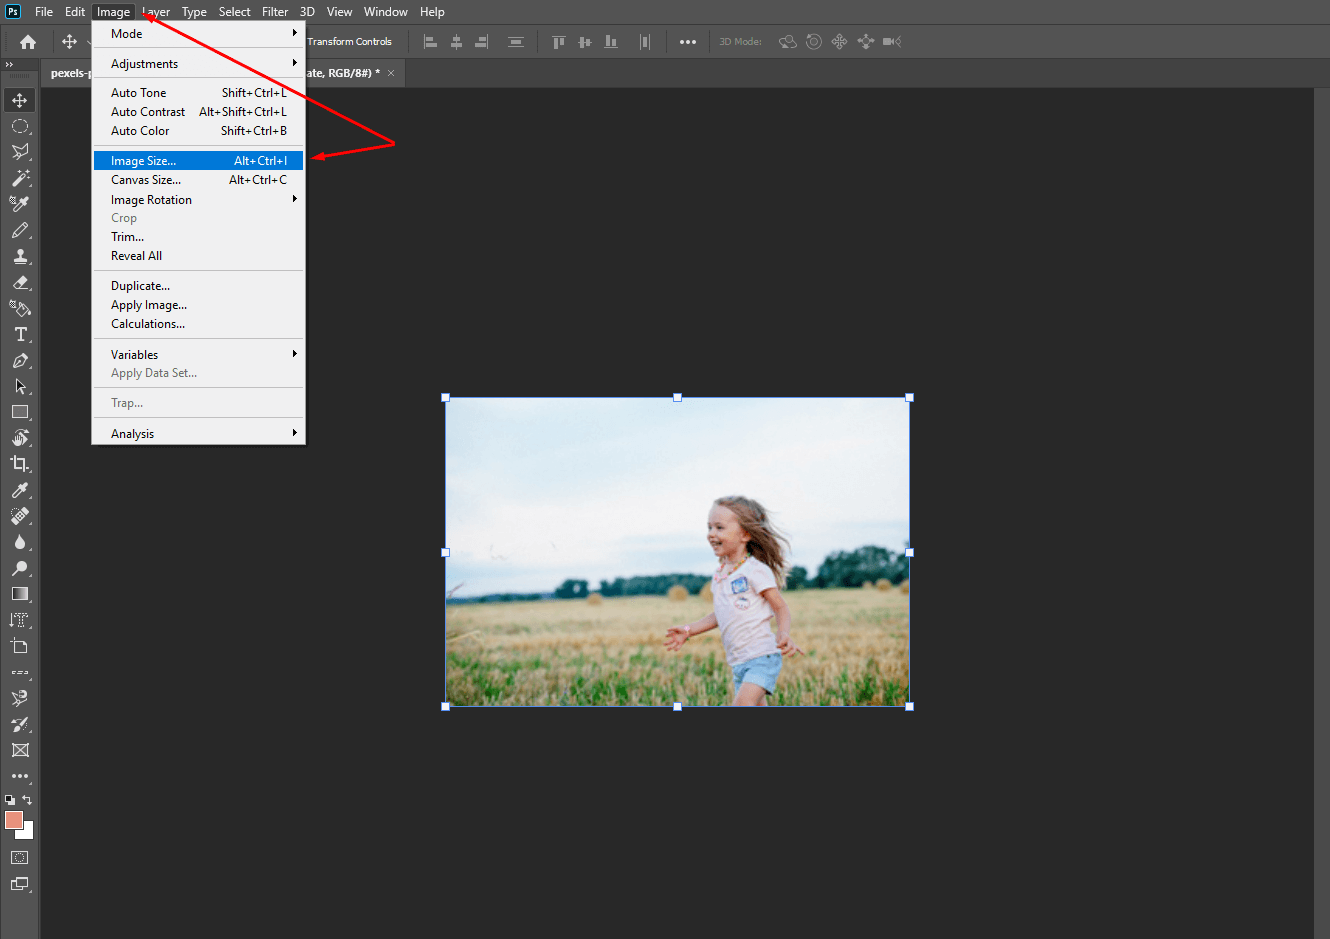 This image is used solely for illustrative purposes. We do not intend to offend or conflict with any societal, cultural, religious, or political values. Image Source: Pexels
- A pop-up appears with the resize option. Fill in the required fill, checkmark the boxes beside Constrain Proportions, and resample the Image. Then click Ok.
 This image is used solely for illustrative purposes. We do not intend to offend or conflict with any societal, cultural, religious, or political values. Image Source: Pexels
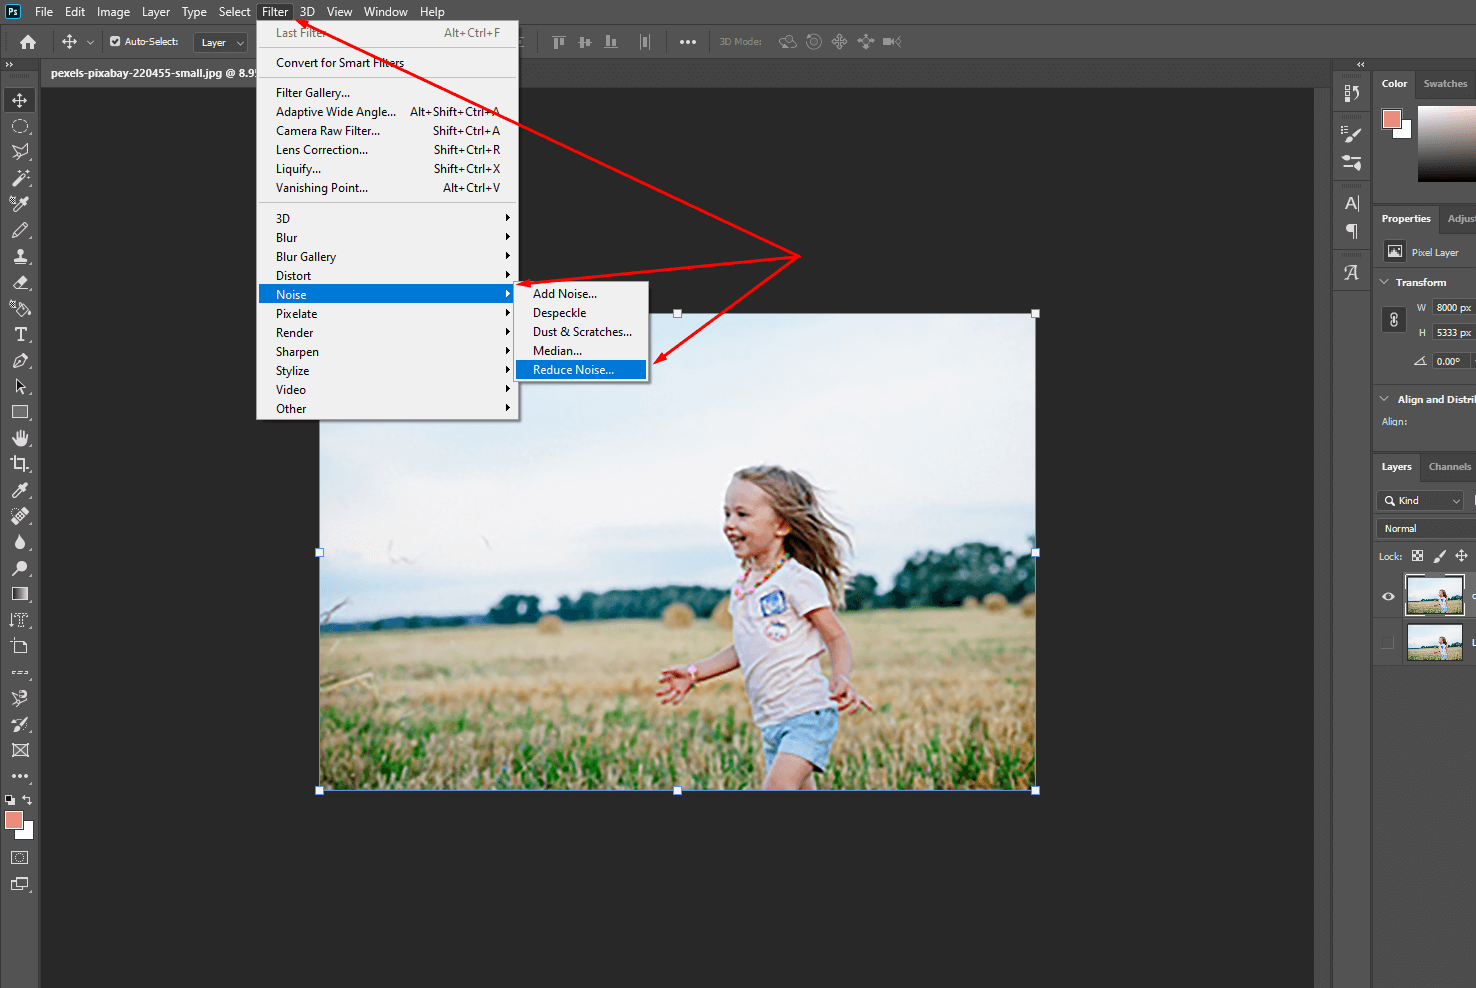
- After resizing, go to the ‘Noise’ option and select the ‘Reduce Noise’a idea from the variable options.
 This image is used solely for illustrative purposes. We do not intend to offend or conflict with any societal, cultural, religious, or political values. Image Source: Pexels
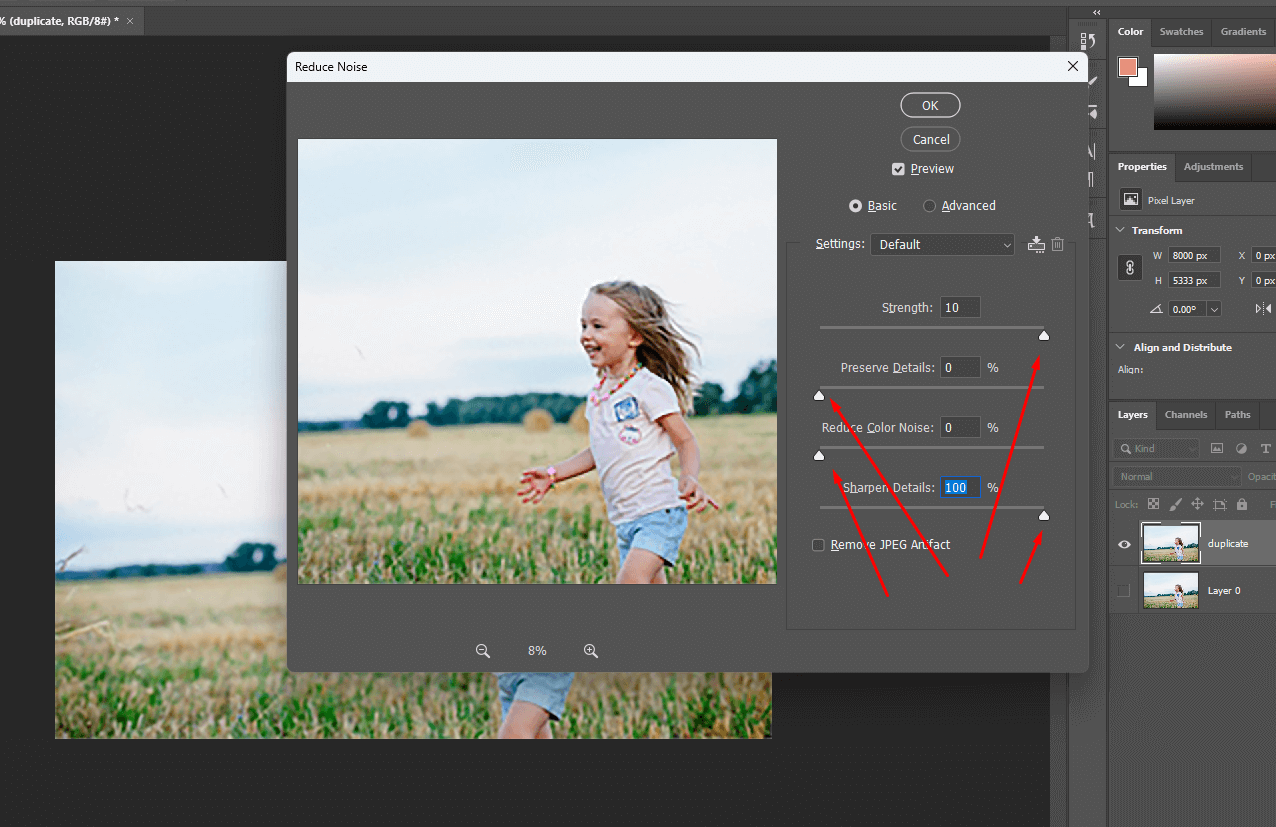
- A dialogue box will appear. Move the sliders as per need.
 This image is used solely for illustrative purposes. We do not intend to offend or conflict with any societal, cultural, religious, or political values. Image Source: Pexels
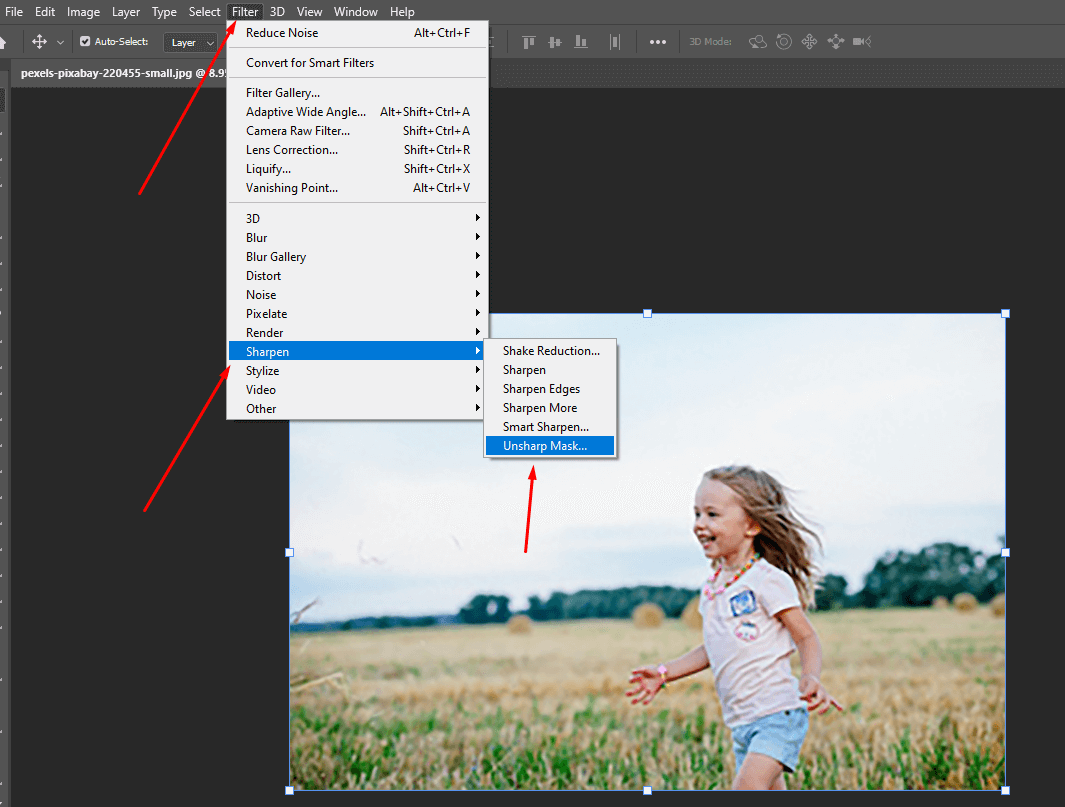
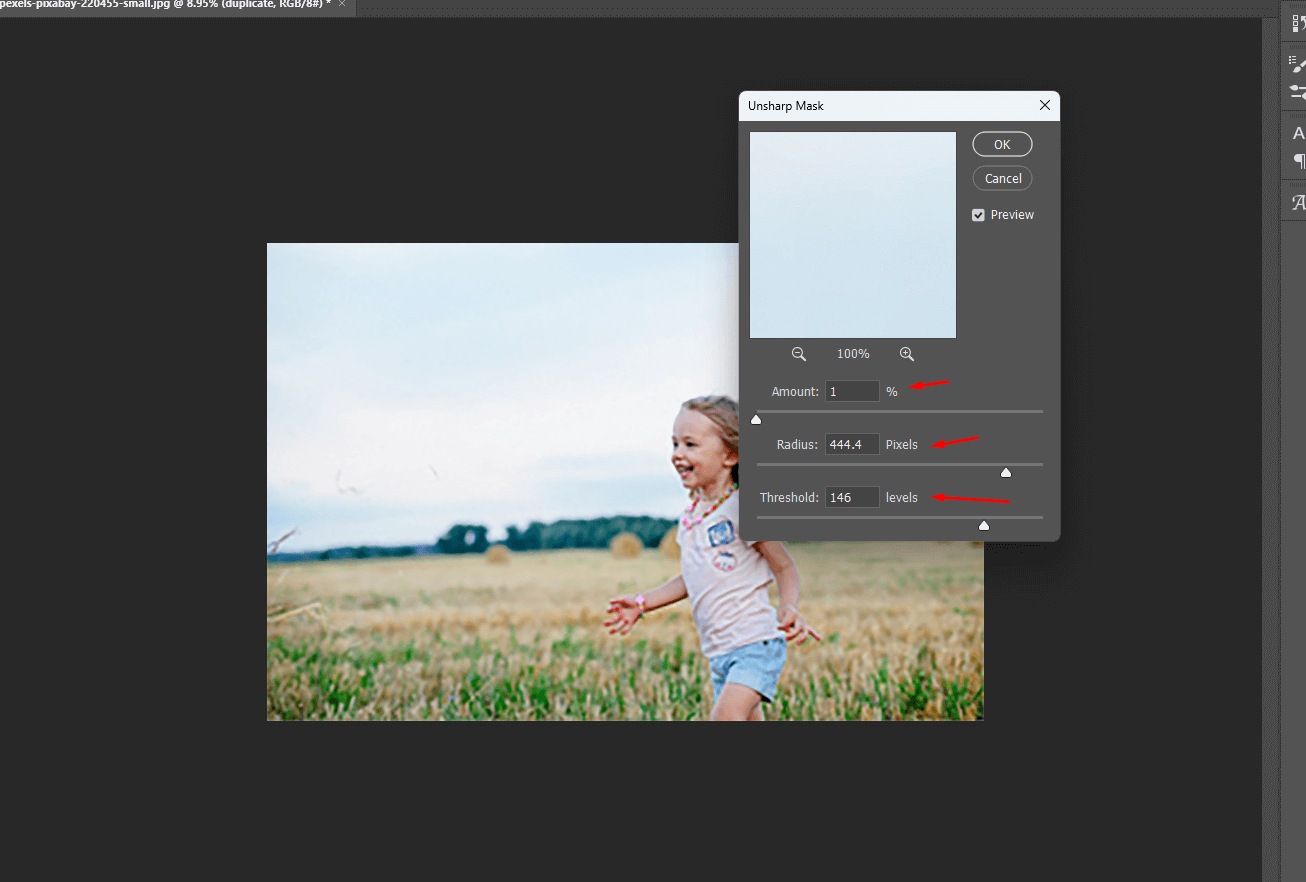
- Now, Go to Filter and select unsharp mask Under Sharpen.
 This image is used solely for illustrative purposes. We do not intend to offend or conflict with any societal, cultural, religious, or political values. Image Source: Pexels
- Now again, go to Filter and select the unsharp mask Under Sharpen.
 This image is used solely for illustrative purposes. We do not intend to offend or conflict with any societal, cultural, religious, or political values. Image Source: Pexels
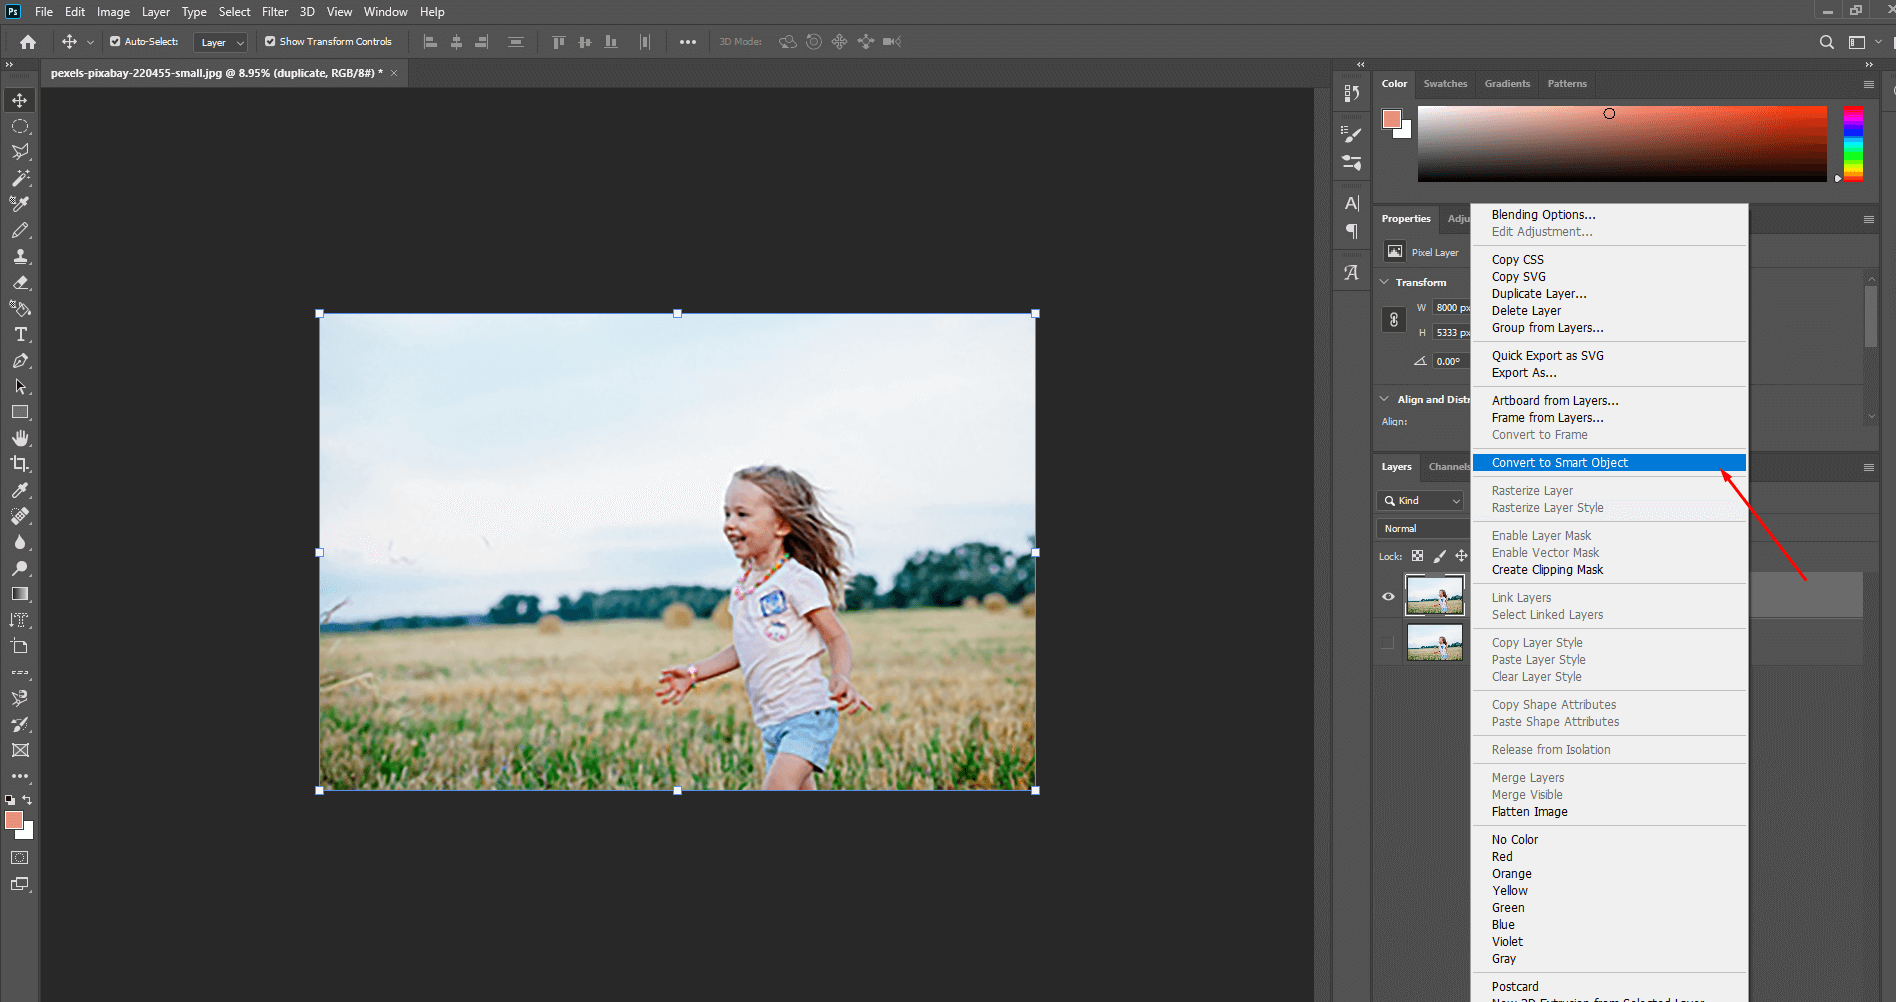
- After adjusting the Noise, go to the Layer Palette from the right and right-click to get the ‘Convert to Smart Objects’ option.
 This image is used solely for illustrative purposes. We do not intend to offend or conflict with any societal, cultural, religious, or political values. Image Source: Pexels
- A dialogue box will appear. Move the sliders and click OK.
- The Image is Unpixelated
Way-02: Using Photoshop High Pass Filter
- Open the photo and duplicate the layer.
 This image is used solely for illustrative purposes. We do not intend to offend or conflict with any societal, cultural, religious, or political values. Image Source: Pexels
- Go to ‘Image’ located at the top bar and select ‘Image Size’ to resize the resolution.
 This image is used solely for illustrative purposes. We do not intend to offend or conflict with any societal, cultural, religious, or political values. Image Source: Pexels
- A pop-up dialogue box will appear with pixel and size options. Change the information according to need. Checkmark the box beside ‘Constrain Proportions’ and click ‘OK.’
 This image is used solely for illustrative purposes. We do not intend to offend or conflict with any societal, cultural, religious, or political values. Image Source: Pexels
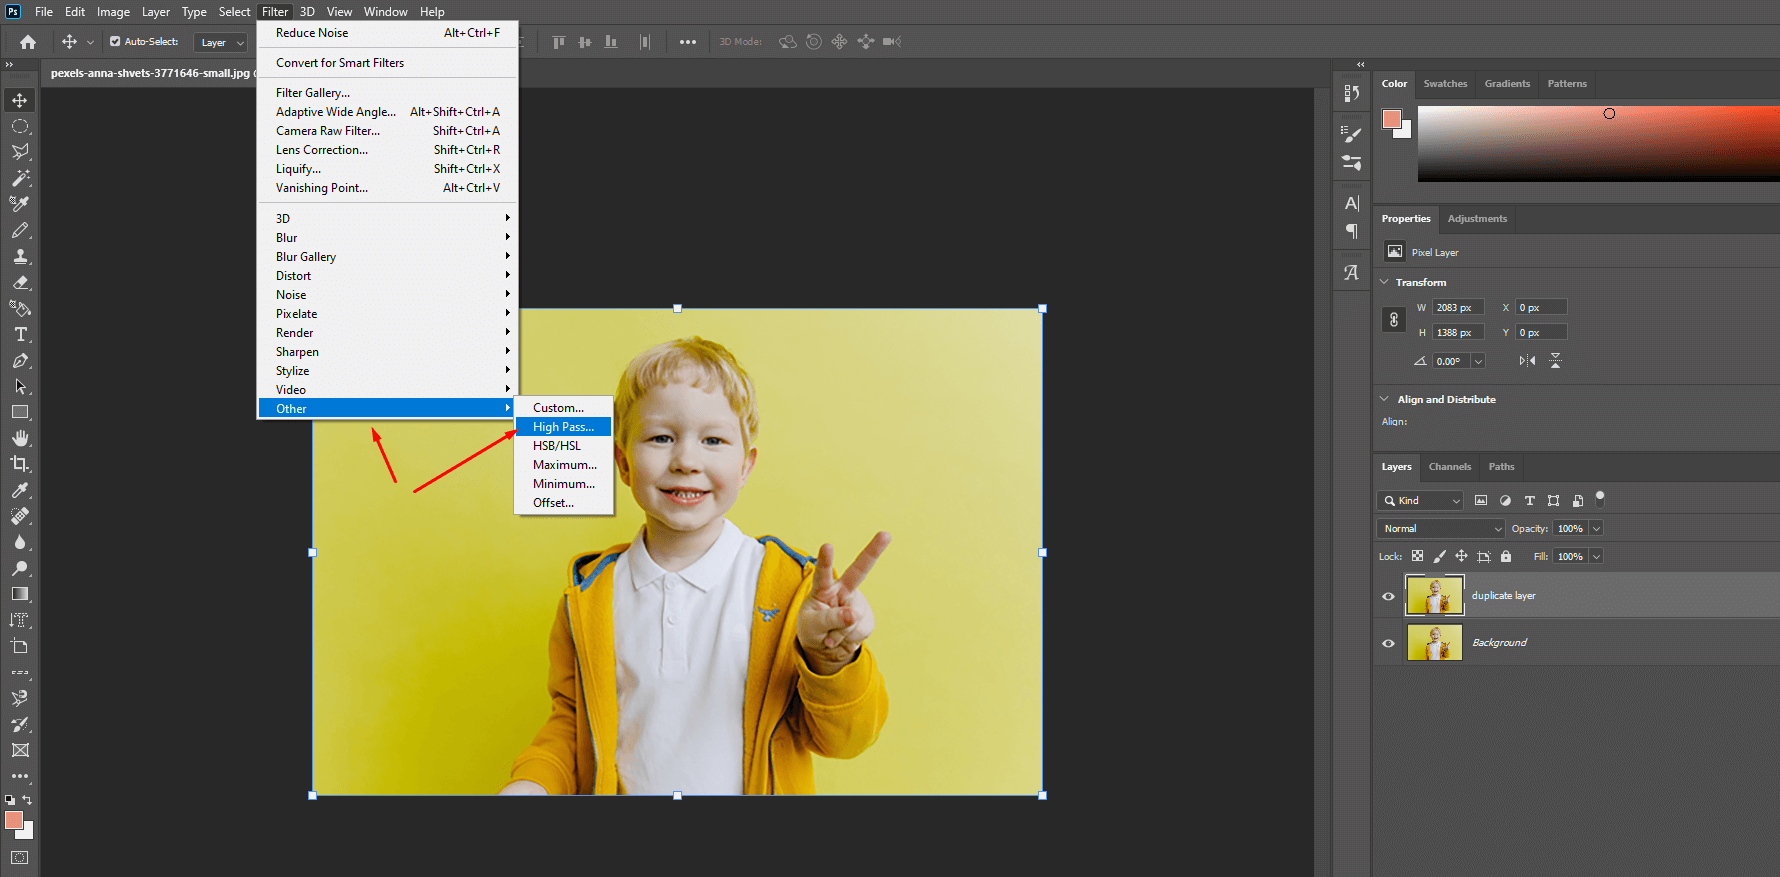
- Now go to Filter from the top bar and select ‘High Pass filter’ from the ‘Other’ option. It will make the layer gray.
 This image is used solely for illustrative purposes. We do not intend to offend or conflict with any societal, cultural, religious, or political values. Image Source: Pexels
- Go to the Layer panel and set the layer blend mode to ‘Overlay.’ It will make the grayed layer clear.
 This image is used solely for illustrative purposes. We do not intend to offend or conflict with any societal, cultural, religious, or political values. Image Source: Pexels
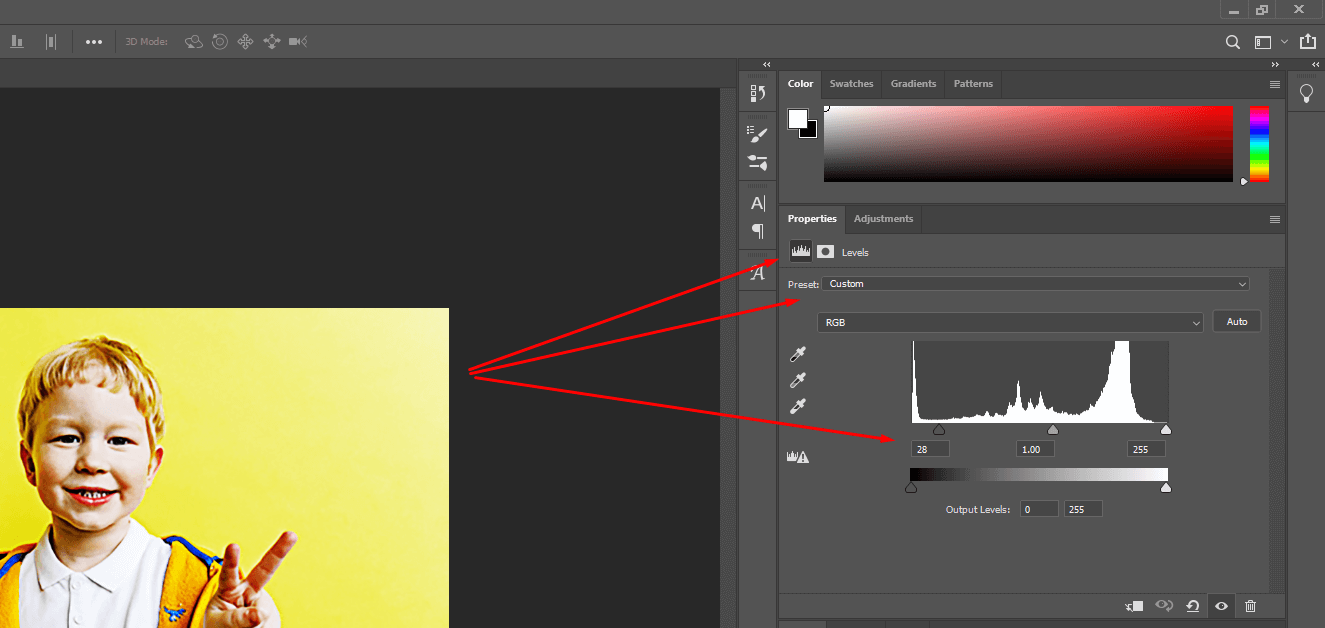
- Go to the Adjustment layer to the right, and select the Level. A histogram will appear. Move the slider to adjust the brightness.
 This image is used solely for illustrative purposes. We do not intend to offend or conflict with any societal, cultural, religious, or political values. Image Source: Pexels
- Press Ctrl+Alt+Shift+E to combine the layers, and the final output is ready.
Method-2: How To Unpixellated an Image in Lightroom
- Open the photo in Lightroom and duplicate the layer.
- Click on the Edit icon and zoom in on the photo providing details.
- Move the Sharpening and Noise Reduction slider to the right to adjust the image sharpening and noise levelRename the image and Save the File.
- Click File> Export.
Method-3: How To Unpixelated an Image Using GIMP
- After downloading and installing GIMP, open it.
- Load the photo and resize the photo by going to Image>Image Size as you did before.
- Now select the inc (Lanczos3) algorithm and click OK.
- From the Filters menu, select the Enhance option.
- Then select unsharp Mask and move the Sharpening slider to the right.
- Save the file for subsequent use.
Method4: How To Unpixelated an Image Online
Fotor: Fotor is a fantastic way of editing images. With the help of this photo, we can Unpixelate an Image easily. The steps are:
- Open the photo in the software.
- Go to the ‘Adjust’ option and find the “AI Enlarger ” tool.
- Clicking the tool will show the preview of the canvas.
- Click Apply and save the file.
VC Free Image Upscaler: It is a fully automated tool for Unpixelated images online for free. You don’t have to download the system. Instead, you can use it on the website. Let’s learn the steps:
- Go to the web browser and access the tool by searching by name or link.
- Click on ‘Add Image’ to upload a photo.
- Select the option you want to apply to smooth up the photo appearance avoiding being bitmapped with tiny squares anymore.
- Save the photo.
Let’s Enhance: It is a user-friendly editor for increasing image resolution and persisting quality. Let’s know about it:
- Open the page in a browser and click the Try for free button
- Now upload the photo by clicking the browse button
- Now save the photo
Few more online platforms to unpixelate an image are-
- AI Super HD-VanceAI
- Vance AI Image Enlarger
- Pixenate
- Vance AI Image Sharpener
- Raw.pics.io
- PineTools
- LunaPic
- ImageUpscaler.com
- BigJPG
- Imglarger.com
Method5: How To Unpixellated an Image Offline
Pixbim is one of the most powerful AI-supported image unpixelator. You can download the unto fix unpixelate an image of the pixelated problem on your Windows. Here are the steps:
- Launch the software and open the images
- Adjust parameters by dragging
- Download the photo once it is ready.
Movavi Photo Editor can be used on Windows & Mac for image editing. Similar to Pixbim, it can restore an image’s lost pixels. Here is step by step idea on how to unpixelate images with Movavi Photo Editor:
- Download and install the app on your Windows or Mac OS.
- Upload the photo you want to work on.
- To modify the photo automatically, click on ‘Magic Enhance.’
- Export the image and save on your device.
Method 6: How To Unpixellated an Image on Phone
Suppose you have selected the best Engagement Dress for Photoshoot and captured a few photos on your phone. Unfortunately, when you changed the photo size, it got pixelated. In that case, the good news is that Android phones and iOS have many built-in editing features to Unpixelated an image. Let’s know about them-
- iPhone: Open the photo in the app. Then tap Edit, located in the upper-right corner. Here you will find various editing options. Swipe left to right to adjust sharpness. Also, you can Unpixelate the image by customizing the Definition, Noise Reduction, Contrast, and more.
- Android Phone: Storing pixelated photos in the Google photo app, you can Unpixelate them with your Android phone’s built-in Sharpen tool feature. For that, you have to open the photo and tap Edit. To get the adjustment options select Adjust and utilize Sharpen tool to reduce the image pixelation. To improve the quality apply Denoise, HDR, and other features.
However, you can also download image unpixelator apps from App Store and Google Play Store to Unpixelate an Image on your phone.
Why do Photos Become Pixelated?
Million tiny pixels make up an image. We need to unpixelate an image when there pixelation takes place. Let’s know some cases when we need to Unpixelate the image:
- Enlarge a Small Image: When we try to stretch or resize low-quality pictures, the picture gets pixelated. In this case, we need to unpixelate the image to improve its quality.
- Camera Errors: Often, pictures get blurry or pixelated for camera errors or old low-resolution cameras that Unpixelated can fix.
- Scanner Error: When your picture gets pixelated after scanning, you need to unpixelate the image.
- Non-compatible Program: Often, your picture gets pixelated for opening the photo in non-compatible programs or applications. You need to Unpixelated the image to fix the quality.
- Damaged by Compression: JPEG or other format image compression degrades image quality. Un-pixelating is applicable here to improve the image quality and restore the original image.
However, you should know that you can’t always unpixelate an image if the image has been compressed heavily or it has very little information available in the image. Moreover, you can’t ensure the same quality after unpixelate as in the original high-resolution image.
Helpful Link: How to Get Adobe Creative Cloud Student Discount
Why Need Unpixelate Images?
You need to unpixelated a pixelated image for a specific purpose. Here are some common reasons why you may need to unpixelate an image:
- Improve Image Quality: Blurred Image makes it challenging to see photo details. Unpixelating can improve the quality of an image, making the photo visually appealing and clear to see details. It helps online sellers to show details when customers enlarge the photo.
- Restoring Images: If you have an old photo captured with older low-resolution cameras or damaged over time, you need to unpixelated the Image for restoration purposes.
- Pinpoint Details: Law enforcement agencies need to Unpixelate an image for forensic investigations if the subject or other details is blurred to identify.
- Recreate Character: To recreate any movie or game character of the early 20th century, you need to apply an unpixelated process. It will help designers to recreate classic games with high resolution.
Final Words [ How To Unpixellated an Image ]
Since a picture is made of pixels, you can’t avoid pixelation, but you can fix it. In this blog, I have shared several methods of How To Unpixelated an image. Hopefully, those methods will help you encounter a pixelation problem. So, recheck those from the discussion and pick one ideal for you. You can also contact Cut Out Image to get the service professionally.
If you find this blog helpful and want to check out my other blogs, here are a few for you: