![How To Wrap an Image in Photoshop [Complete Solution]](https://www.cutoutimage.com/wp-content/uploads/2022/10/How-To-Wrap-an-Image-in-Photoshop.webp)
Disclaimer: This blog is for general informational and inspirational purposes only, based on publicly available information and personal insights. Images—whether of models, screenshots, or products—are for illustrative purposes only and do not depict actual subjects, scenarios, or views described. We do not intend to offend or conflict with any societal, cultural, religious, or political values.
Did you hear about wrapping images in Photoshop? It is the technique of wrapping a photo around an object using Photoshop. In addition, it isn’t the same as text wrapping. Besides, the image wrapping feature can give your design a touch of creativity, making it realistic. You likely have heard about the photoshop warp tool, though you might not play with this innovative feature. I shared How to Create a Gradient in Photoshop in my previous blog. Today I will share How To Wrap an Image in Photoshop.
What is the Photoshop Warp Tool
Almost everyone knows about Photoshop, an image editing software developed by Adobe for digital world professionals. The software holds numerous features for making a faulty and ordinary photo perfect and stunning. The warp tool is one of those useful features that help you accommodate an image on any shape or object.
The professionals use the warp tool of Photoshop as a part of Ecommerce Photo Editing. It allows them to manipulate and modify the figure and volume of objects in a photo without making it look deformed.
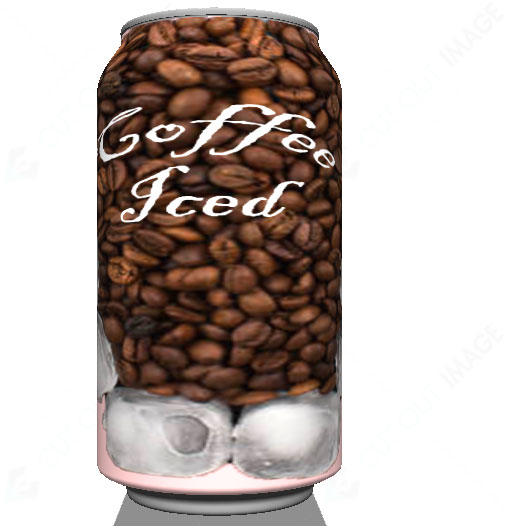
Wrapping an image on an object in photoshop emphasizes the 3D view of the product and makes the photo more engaging and realistic. Check out the below photo for a basic understanding of the wrapping image. Here the coffee text and coffee bean with ice photo were wrapped on the metallic can representing a can for iced coffee.
 This image is for illustrative purposes only. No offense or conflict with any cultural, religious, or social values is intended. All trademarks, logos, & content remain the property of their owners.
Way to Access Warp Command
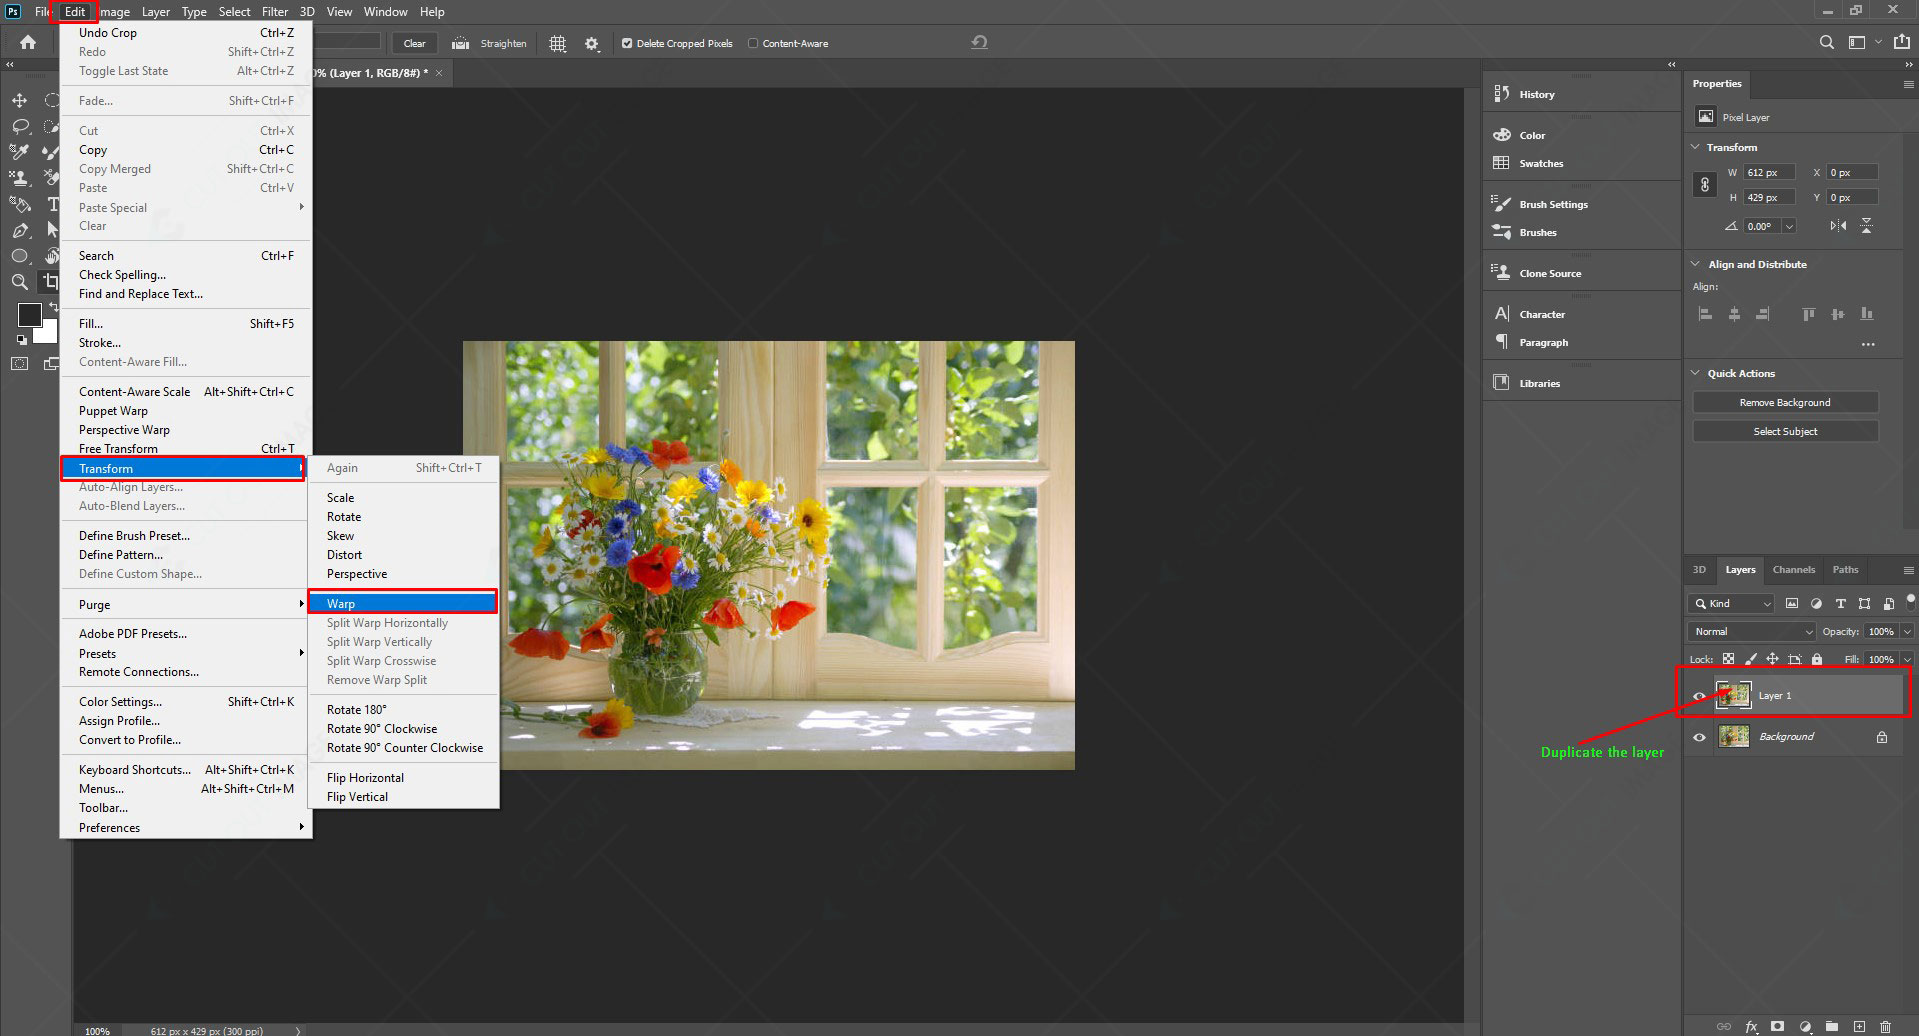
A direct way of wrapping images in Photoshop is customizing the Free Transform tool’s Warp option presets. To access the warp command, you need to open photoshop first. Then load an image and duplicate it since you can’t work on the background layer. Therefore, simply press Ctrl+J to recreate the same layer. Finally, select the photo you want to warp if you work with two photos.
Now it’s time for a warp tool. Move to the menu bar and click on Edit. From the available options, select Transform and then Warp.
 This image is for illustrative purposes only. No offense or conflict with any cultural, religious, or social values is intended. All trademarks, logos, & content remain the property of their owners.
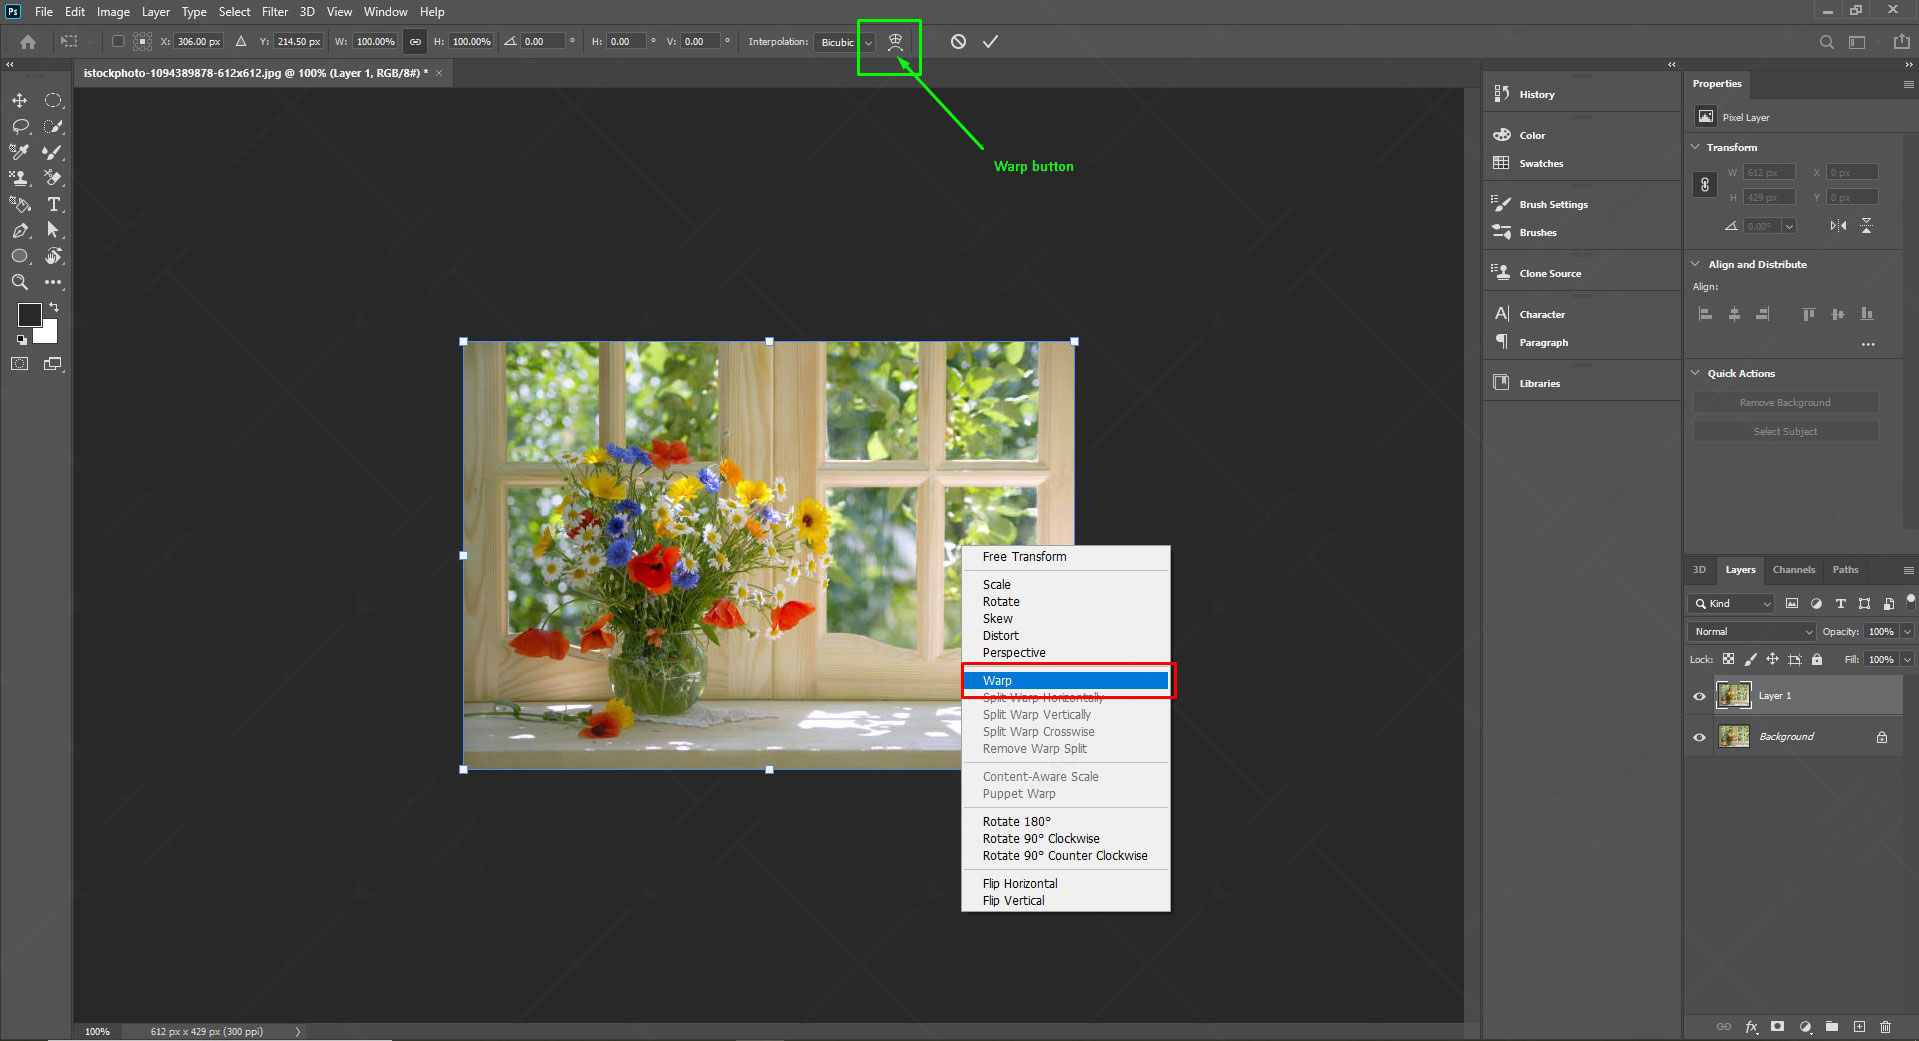
Alternatively, you can press Ctrl+T on PC or CMD+T on Mac and right-click on the photo to get the warp option. You also can get the warp mode button in the tool options bar.
A grid of 9 boxes you saw in the Rule of Thirds in Photography will appear with control points. The four corner square control points look like the bezier handles of the pen tool. Using these points, you can adjust the shape of the selection in any order.
 This image is for illustrative purposes only. No offense or conflict with any cultural, religious, or social values is intended. All trademarks, logos, & content remain the property of their owners.
How To Wrap an Image in Photoshop
To wrap an image in an object without misshaping the photo, you can utilize the warp tool of Photoshop. You can do it in two ways- utilizing the predefined shape from the menu bar or any custom shape using the control points of the warp tool.
Professional designers usually employ a shape first and then pull the control points to accomplish the expected outcomes. Let’s learn a few ways How To Wrap an Image in Photoshop.
Steps to wrap an image with another image in Photoshop:
1. Open two photos in photoshop.
 This image is for illustrative purposes only. No offense or conflict with any cultural, religious, or social values is intended. All trademarks, logos, & content remain the property of their owners.
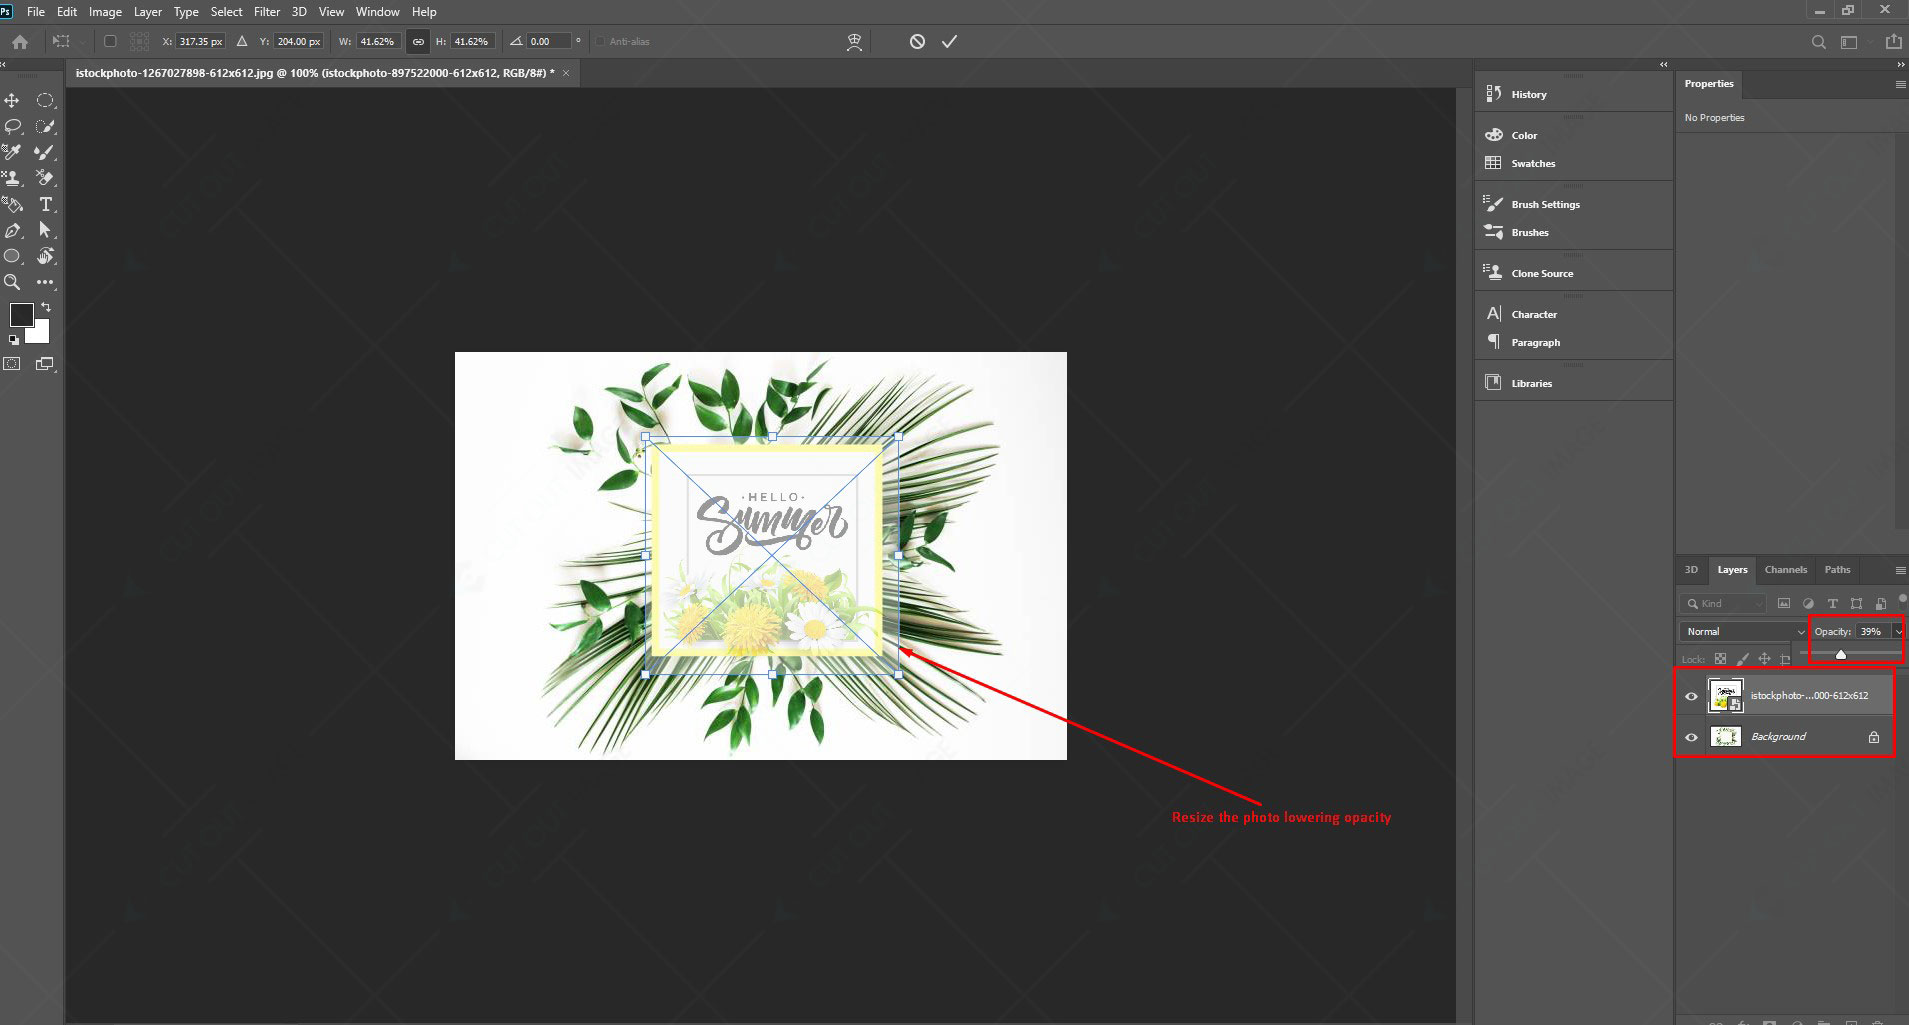
2. Select the photo layer that you will wrap with the other photo. Do the Photoshop Color Correction if needed and then resize using Transform. Lower the opacity while resizing to see the adjustment properly.
 This image is for illustrative purposes only. No offense or conflict with any cultural, religious, or social values is intended. All trademarks, logos, & content remain the property of their owners.
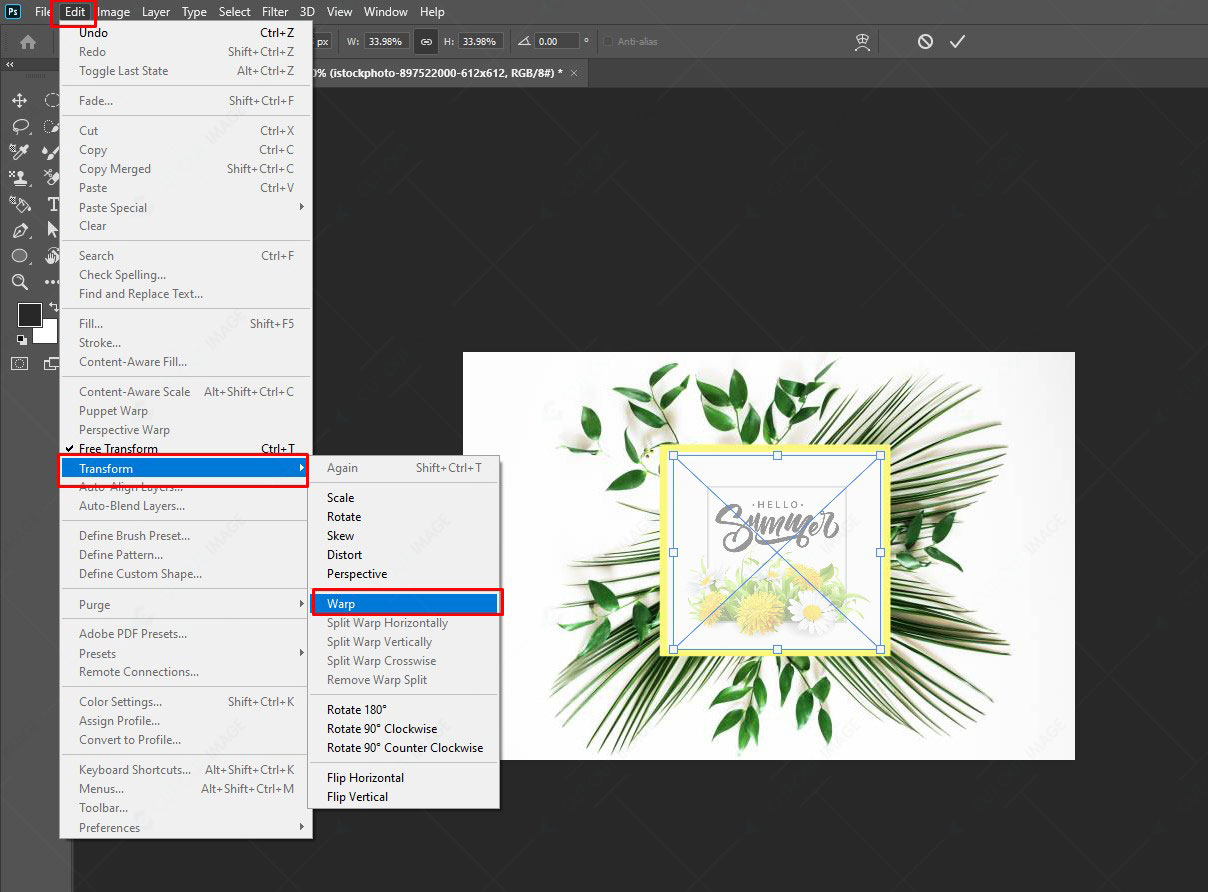
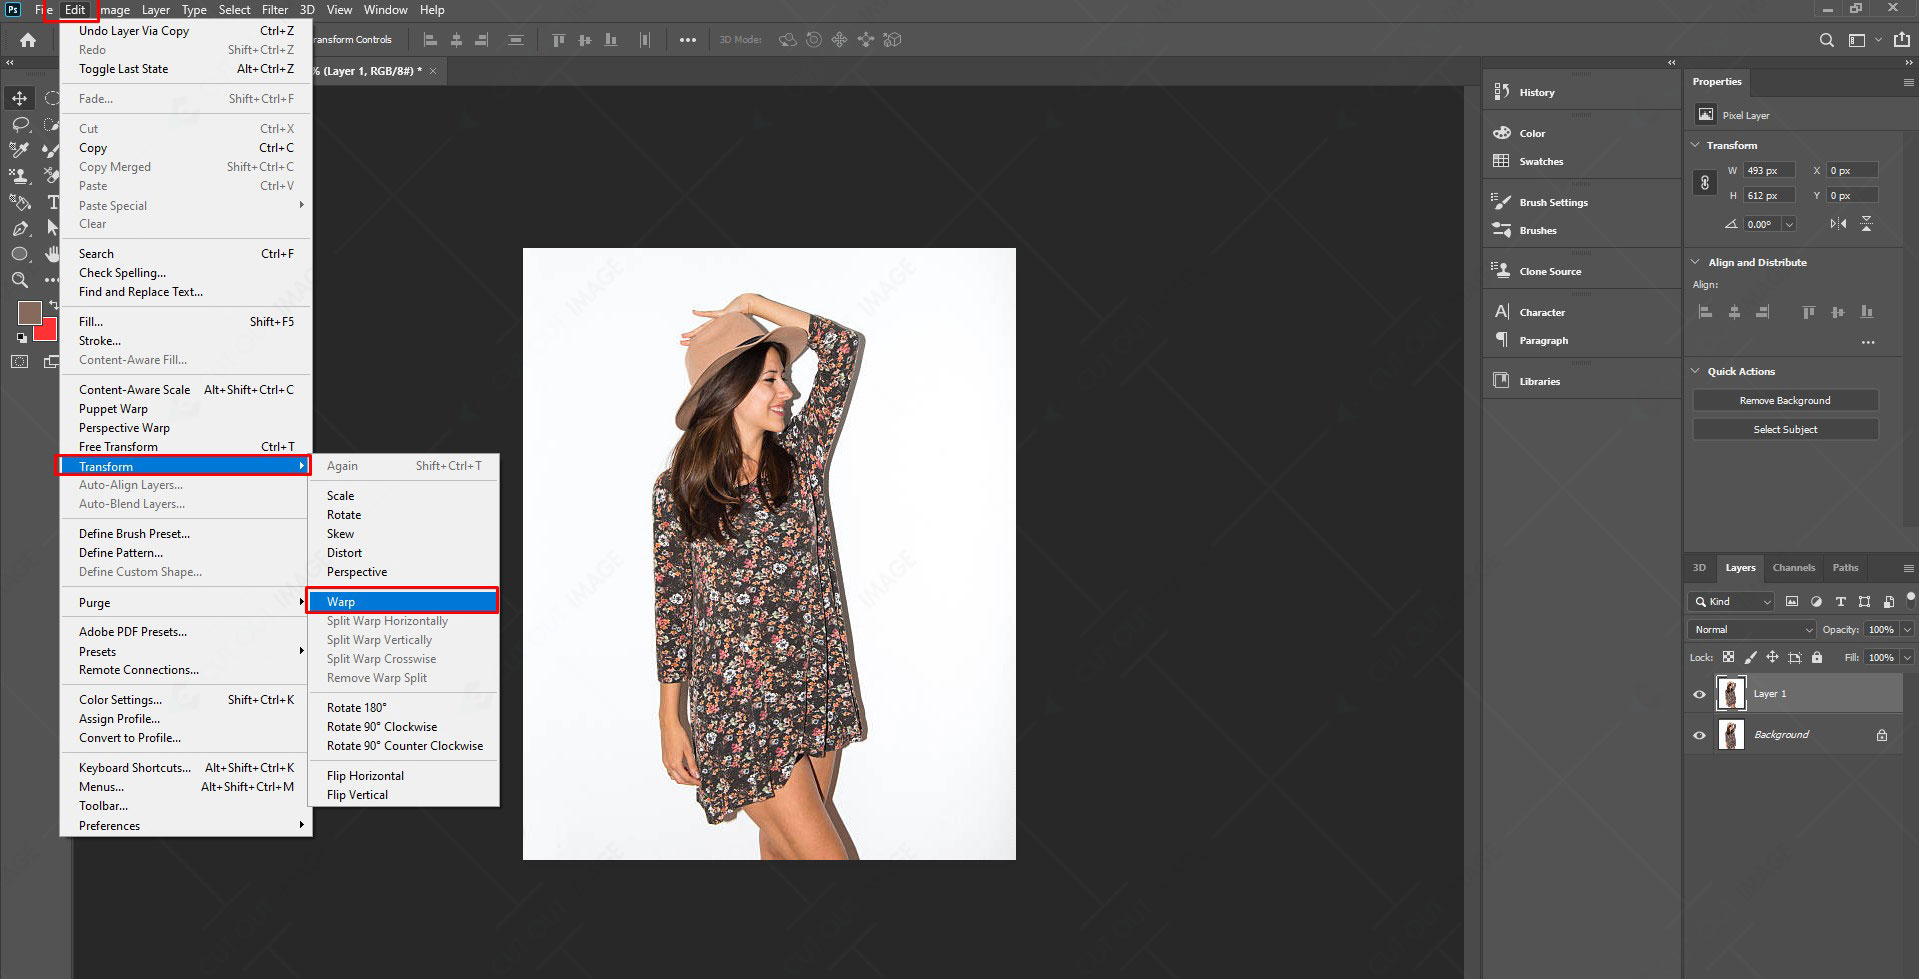
3. Now click on the Edit tab from the menu and select Transform. There you will get a bunch of options. Select the Warp option from there.
 This image is for illustrative purposes only. No offense or conflict with any cultural, religious, or social values is intended. All trademarks, logos, & content remain the property of their owners.
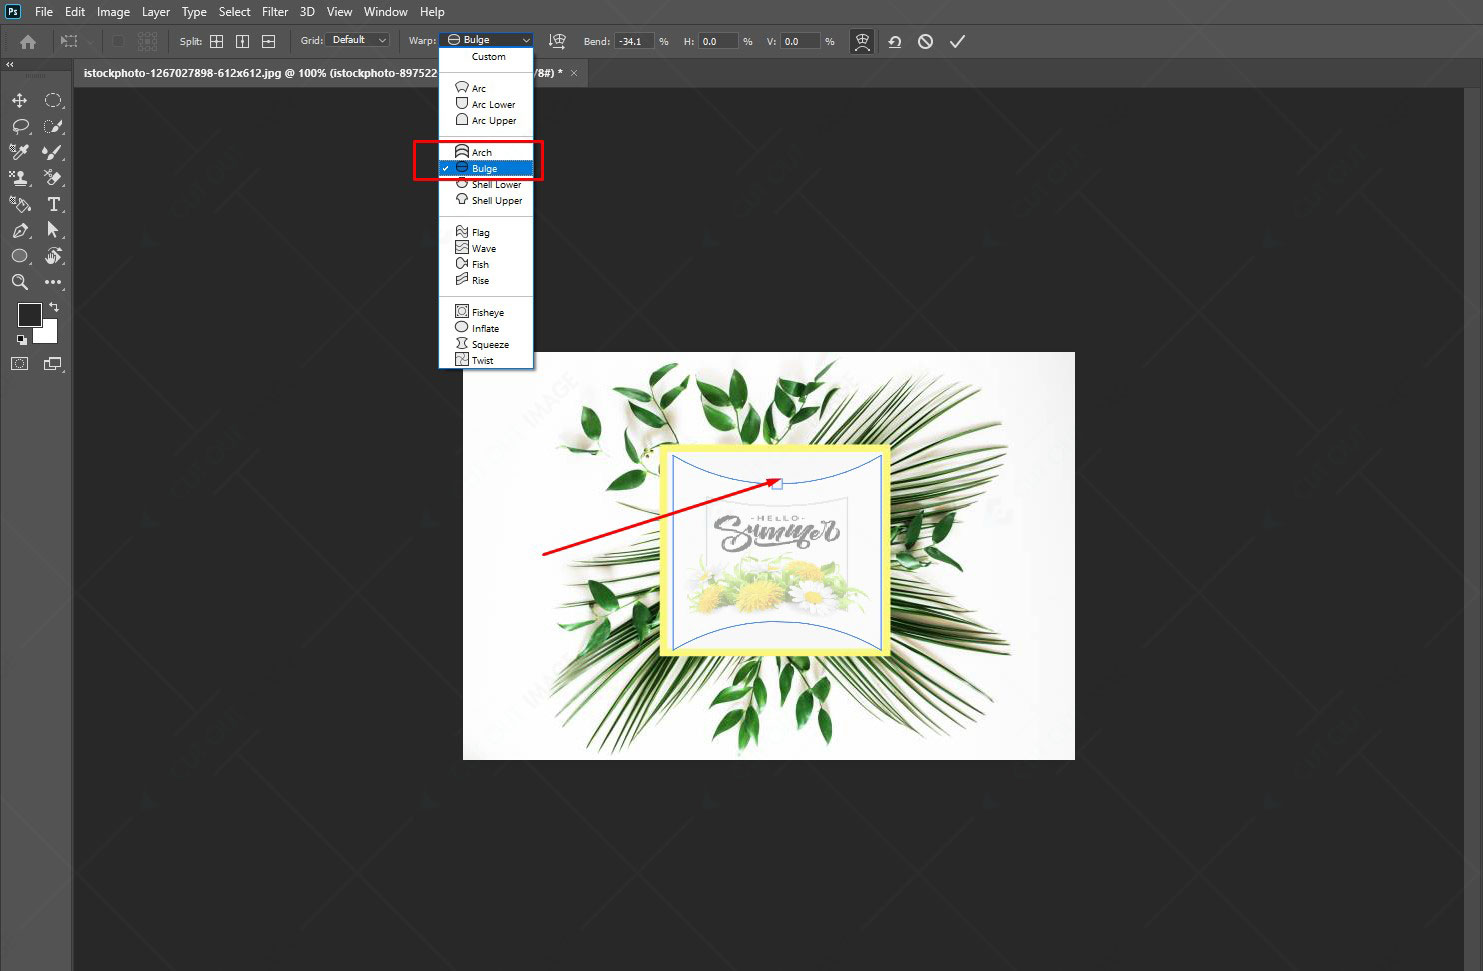
4. From the toolbar select the warp preset to shape your wrapped image. Select a shape from the custom option that best suits the portion or object you want to wrap around.
 This image is for illustrative purposes only. No offense or conflict with any cultural, religious, or social values is intended. All trademarks, logos, & content remain the property of their owners.
5. Drag the control points to set the picture properly. Hold the Ctrl key on the keyboard and drag the grid to position the points without moving the grid points. Once you are done with adjusting points, press Enter to fit the image tightly with the object.
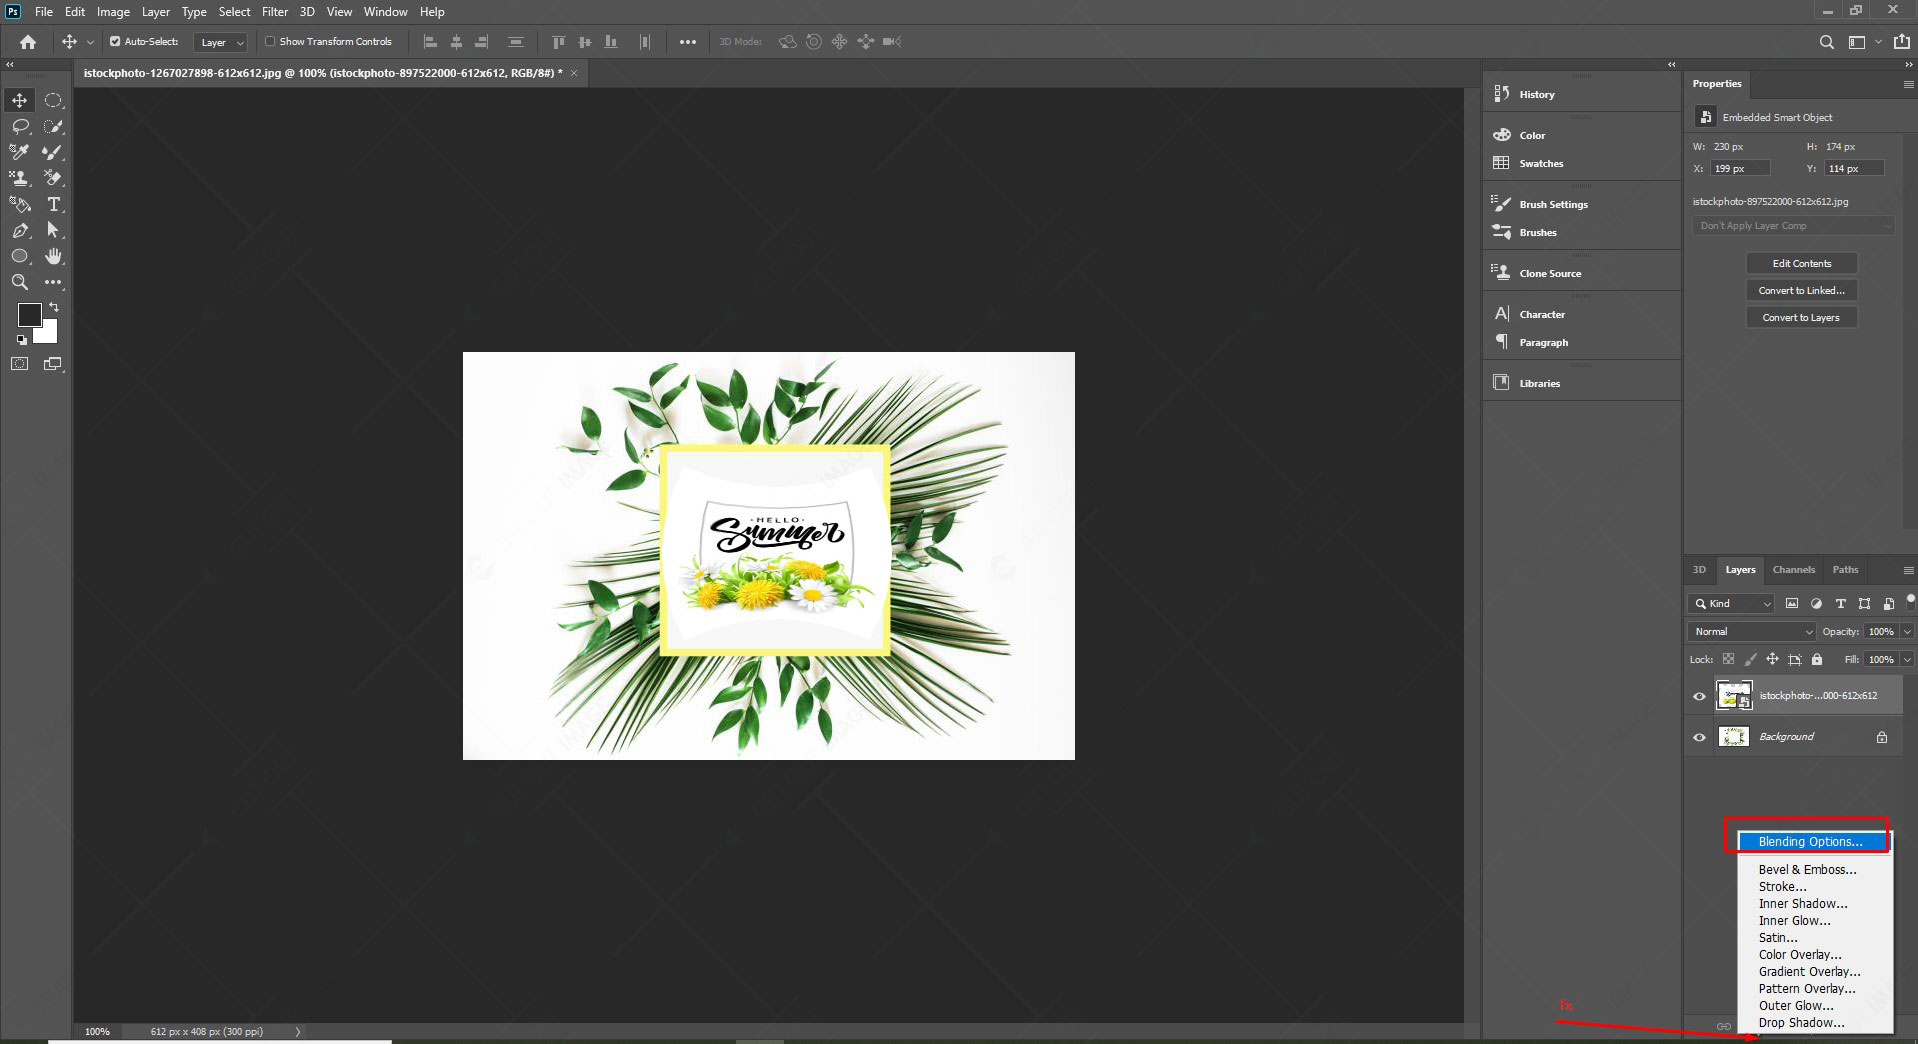
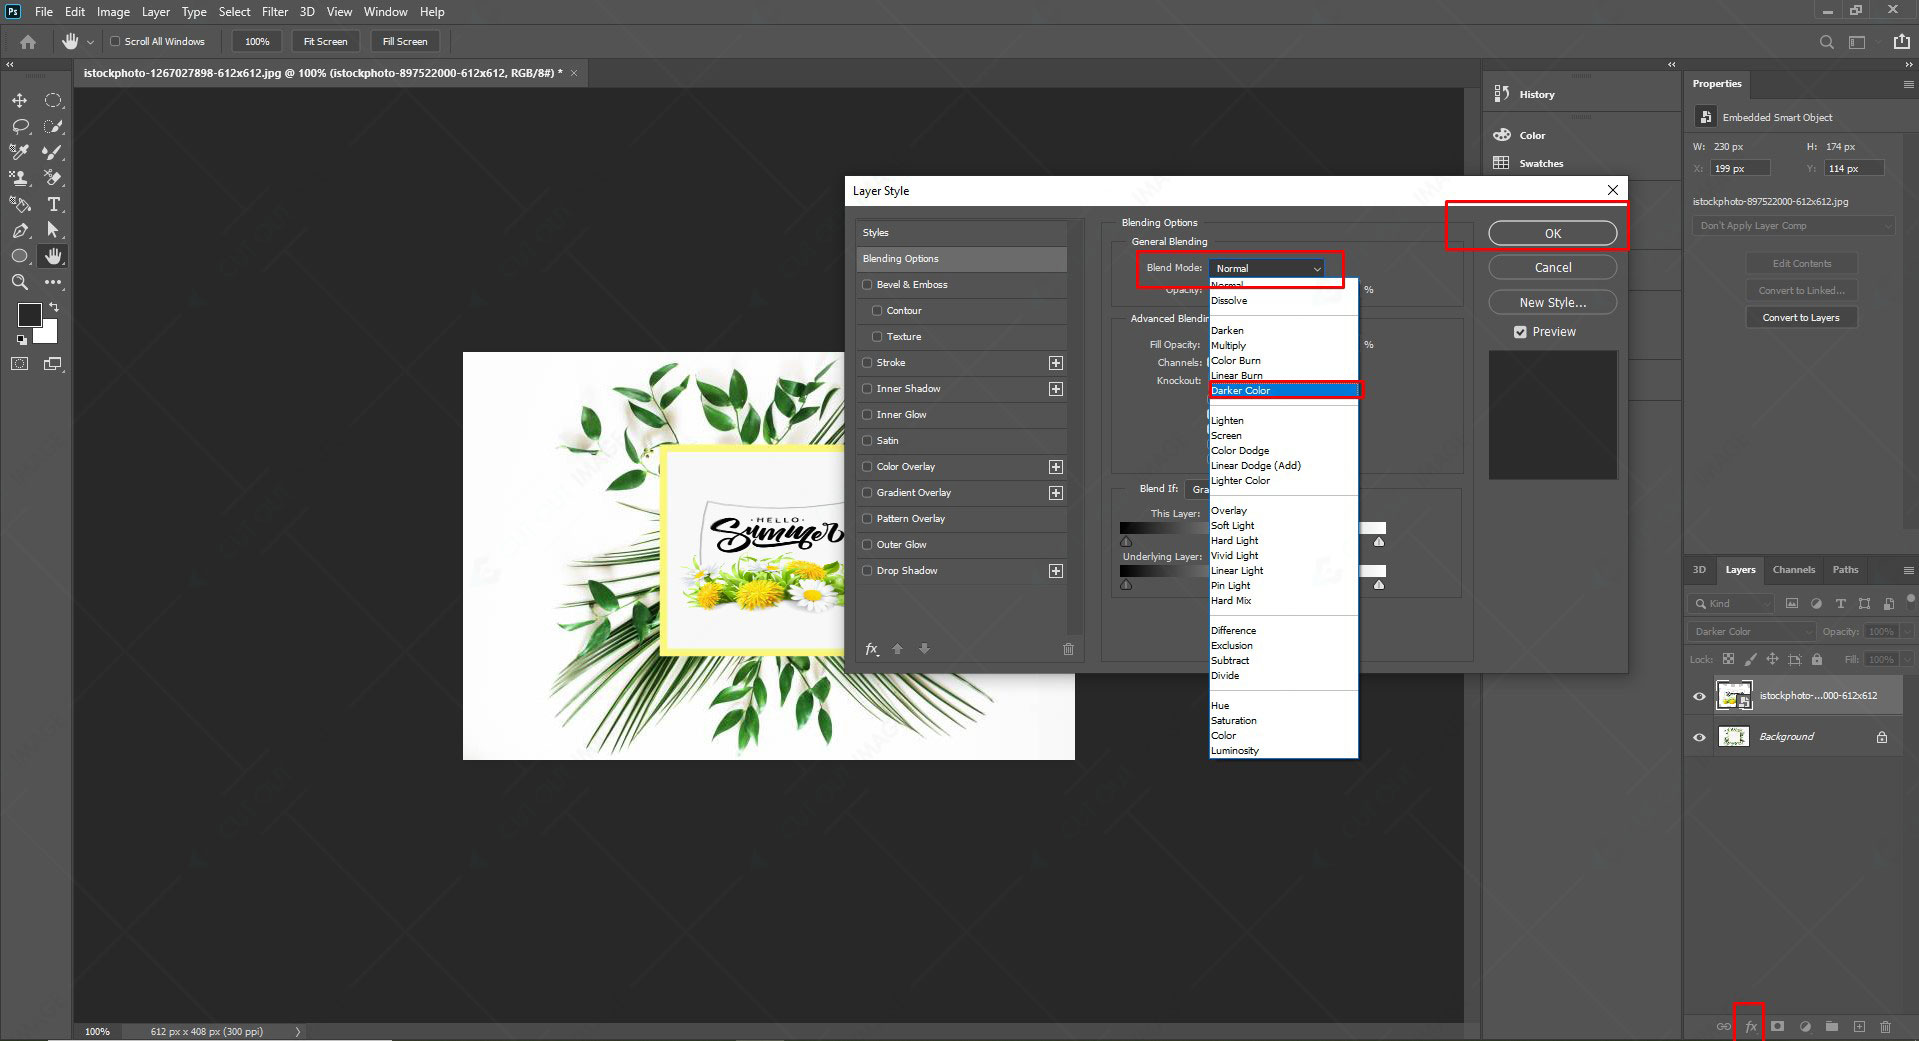
6. Go to the fx (Add a layer style) from the below panel of the layer and select Blending mode from the appeared list. A pop-up will appear with settings. From there try out different moods for a better result. Then click Ok.
 This image is for illustrative purposes only. No offense or conflict with any cultural, religious, or social values is intended. All trademarks, logos, & content remain the property of their owners.
 This image is for illustrative purposes only. No offense or conflict with any cultural, religious, or social values is intended. All trademarks, logos, & content remain the property of their owners.
7. While wrapping an image in photoshop, you should concentrate on the natural appearance. Therefore, you should apply a reflection shadow if the environment demands it.
8. Finally, you are done wrapping an image into another in Photoshop.
 This image is for illustrative purposes only. No offense or conflict with any cultural, religious, or social values is intended. All trademarks, logos, & content remain the property of their owners.
Steps to wrap 3D images in Photoshop:
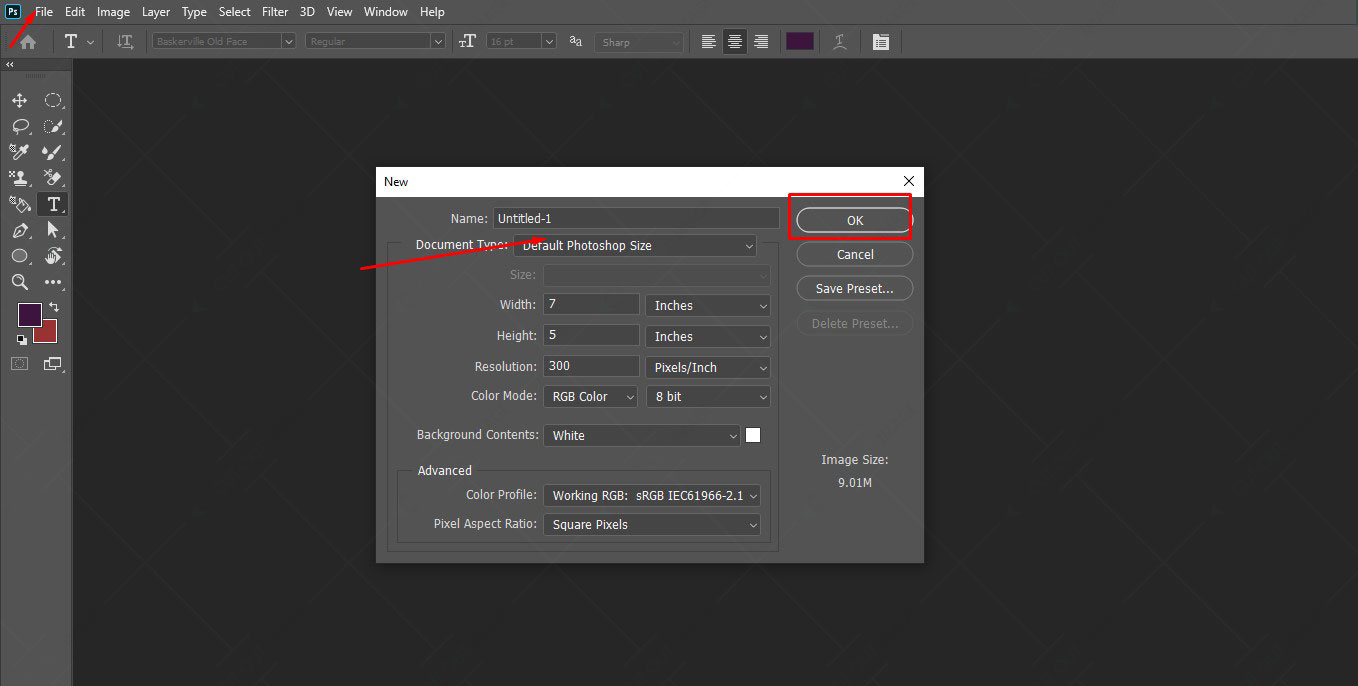
- Open Photoshop with a blank canvas.
 This image is for illustrative purposes only. No offense or conflict with any cultural, religious, or social values is intended. All trademarks, logos, & content remain the property of their owners.
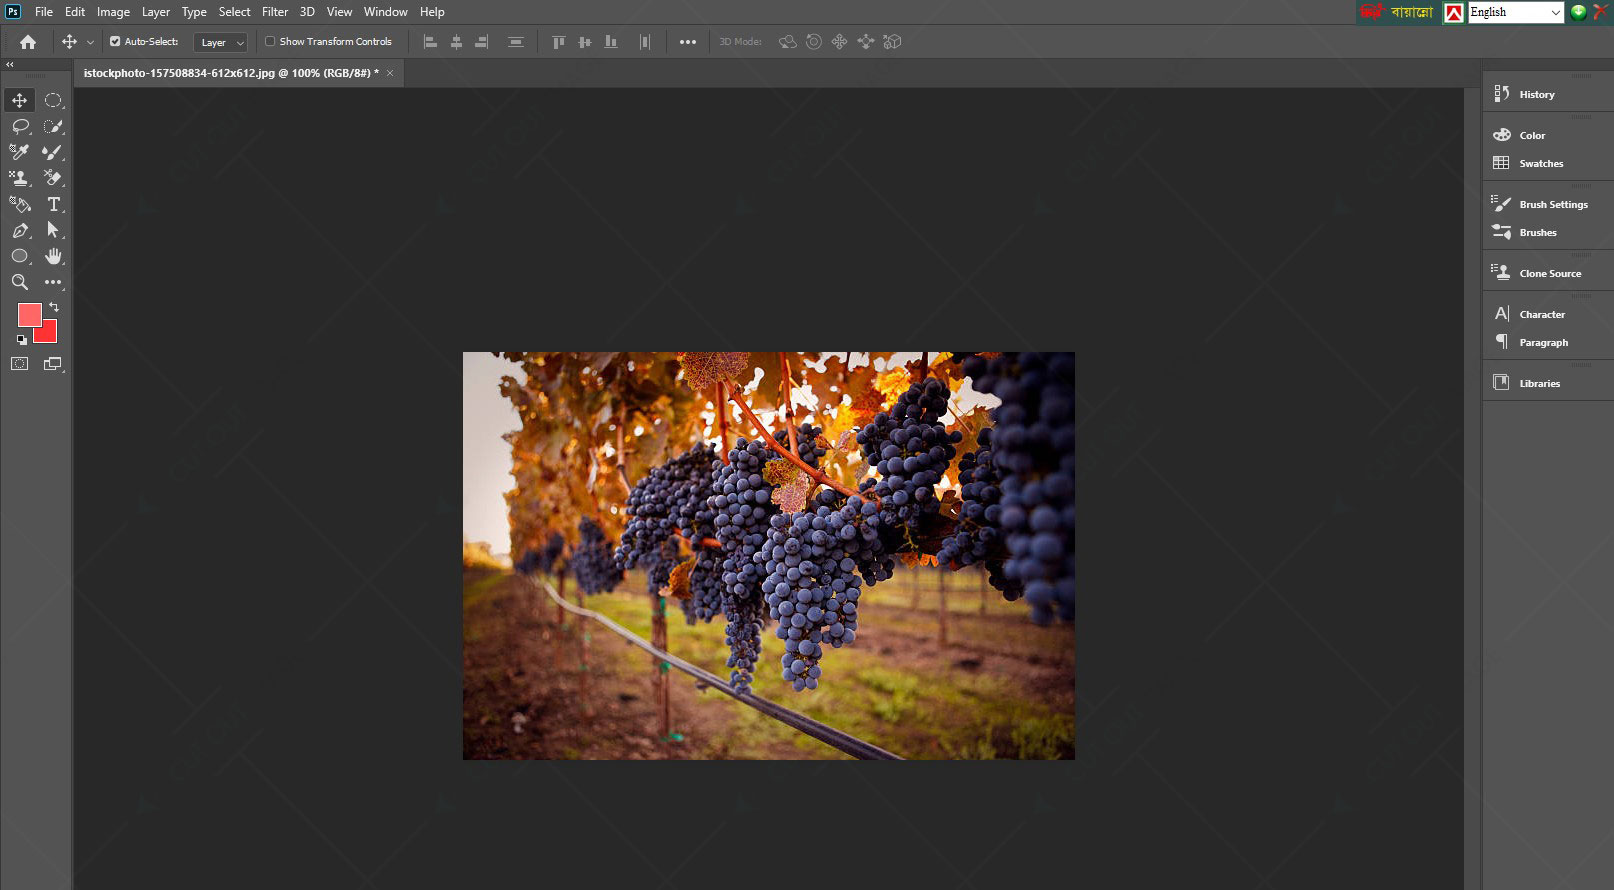
2. Upload the photo that you want to wrap with a 3d object.
 This image is for illustrative purposes only. No offense or conflict with any cultural, religious, or social values is intended. All trademarks, logos, & content remain the property of their owners.
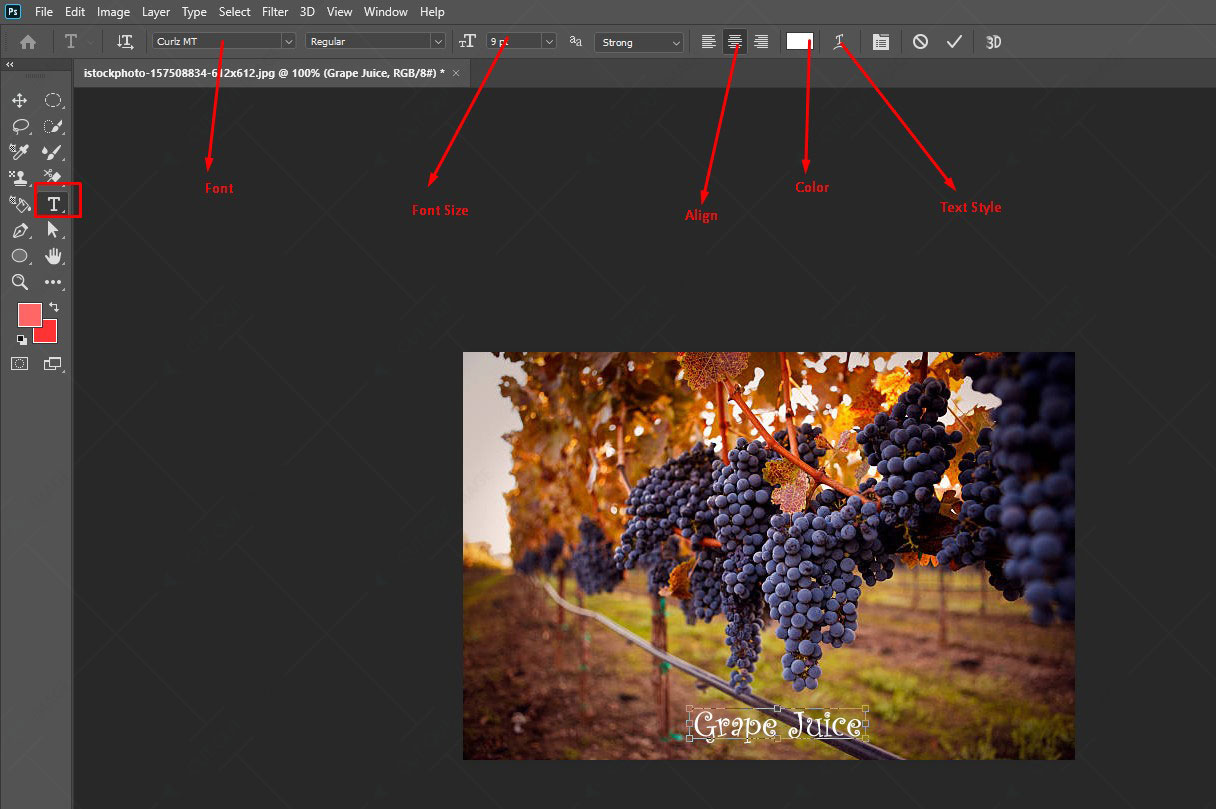
3. Write down the required text using the Text tool from the left panel. Do the color, size or style modification from the above tool bar.
 This image is for illustrative purposes only. No offense or conflict with any cultural, religious, or social values is intended. All trademarks, logos, & content remain the property of their owners.
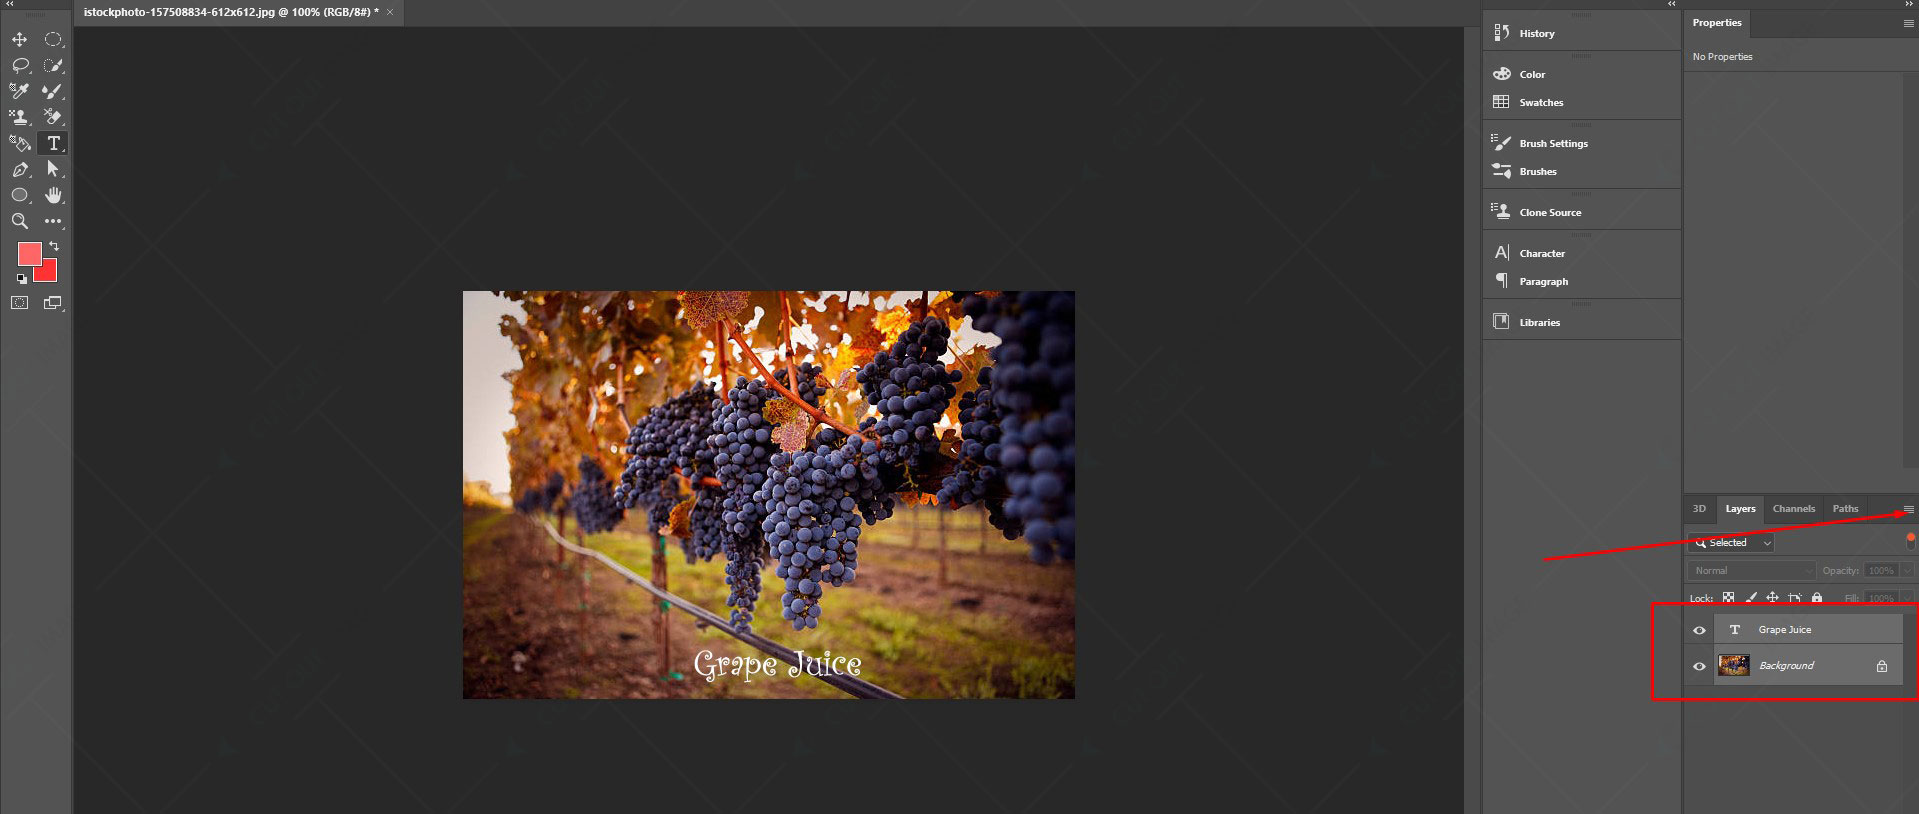
4. Now select the layers and go to the right corner of the layer panel, where you will find the 3line flyout menu.
 This image is for illustrative purposes only. No offense or conflict with any cultural, religious, or social values is intended. All trademarks, logos, & content remain the property of their owners.
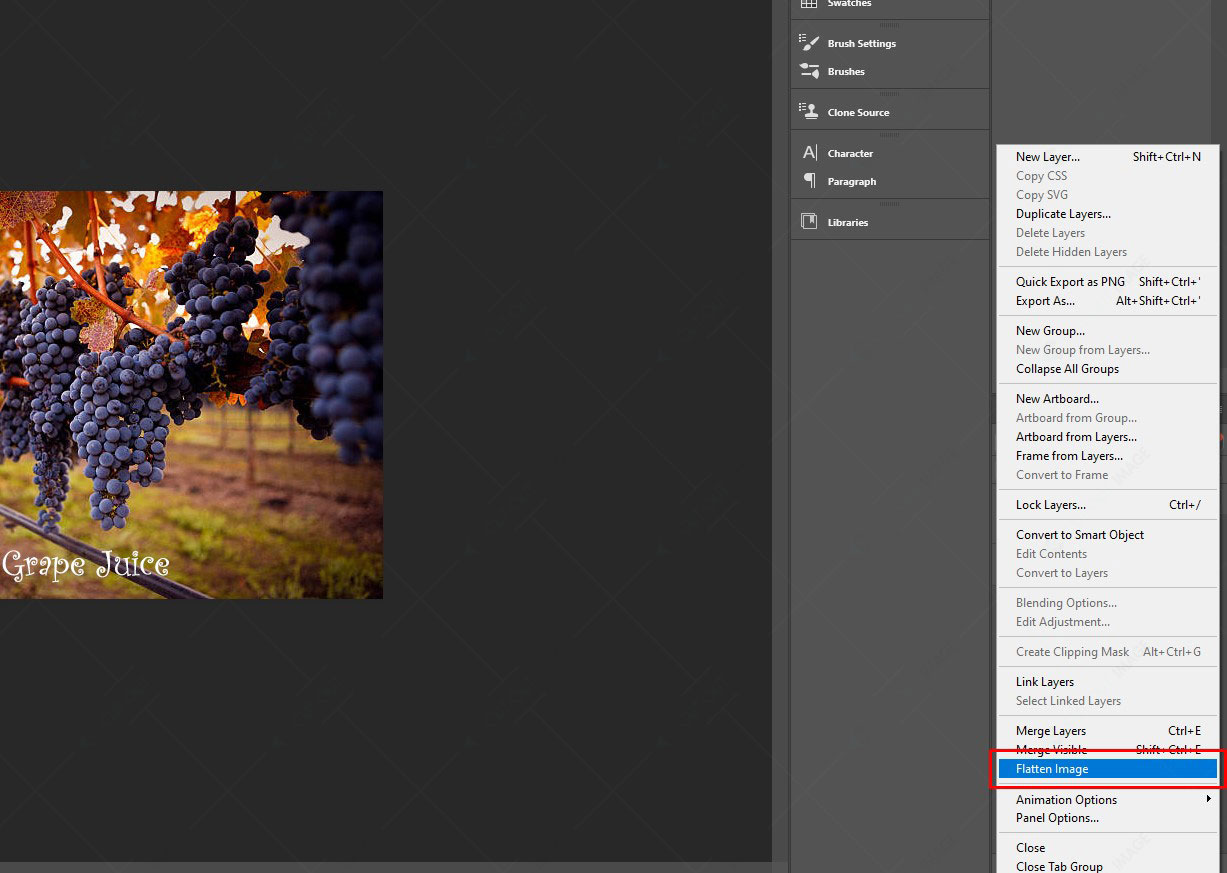
5. Select ‘Flatten Image‘ from the pop-up list to merge the layers. Your product package is ready.
 This image is for illustrative purposes only. No offense or conflict with any cultural, religious, or social values is intended. All trademarks, logos, & content remain the property of their owners.
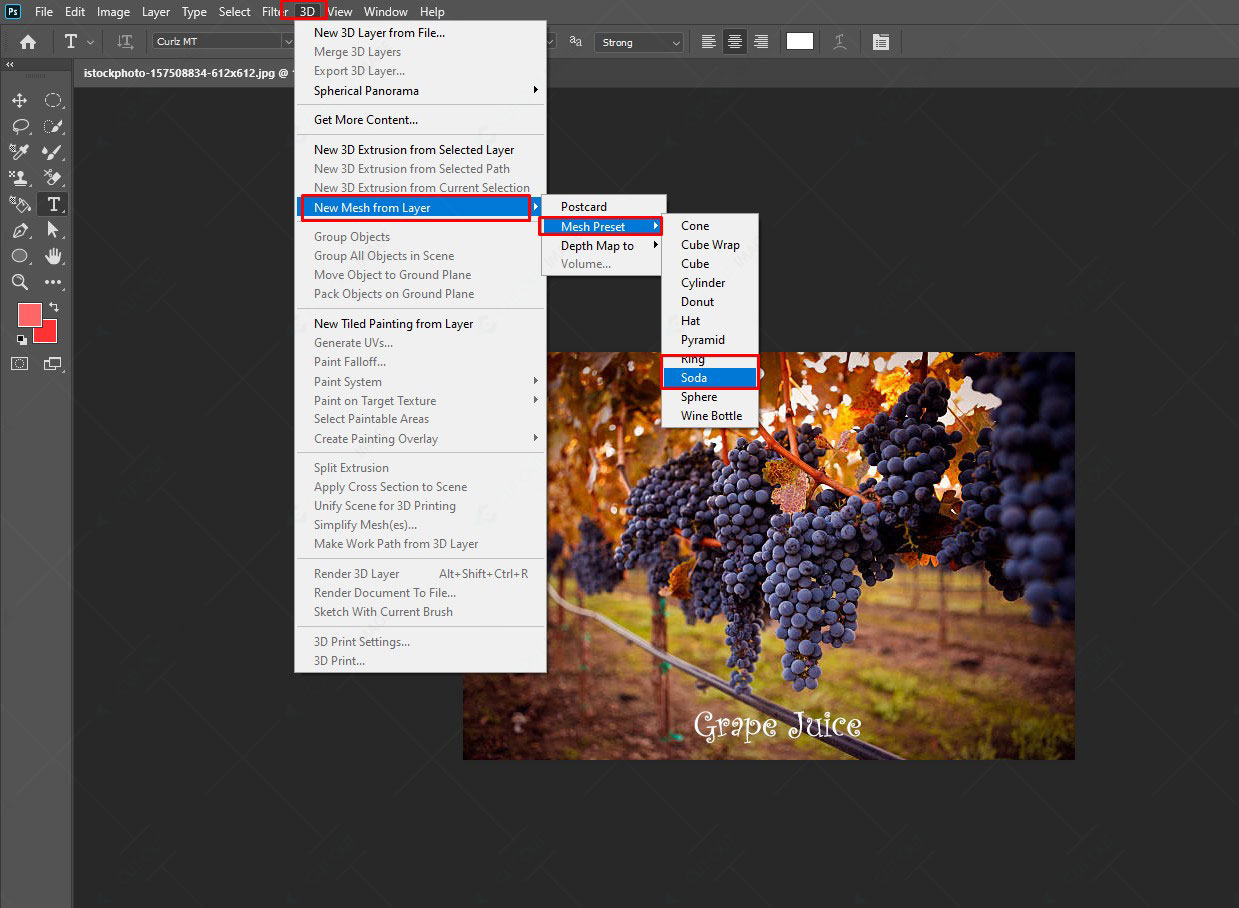
6. Selecting the layer, go to the 3D tab located in the menu bar. From the available list, select New Mesh From Layer > Mesh Preset. From the Mesh preset option, select your product type shape. In this example, I have selected soda.
 This image is for illustrative purposes only. No offense or conflict with any cultural, religious, or social values is intended. All trademarks, logos, & content remain the property of their owners.
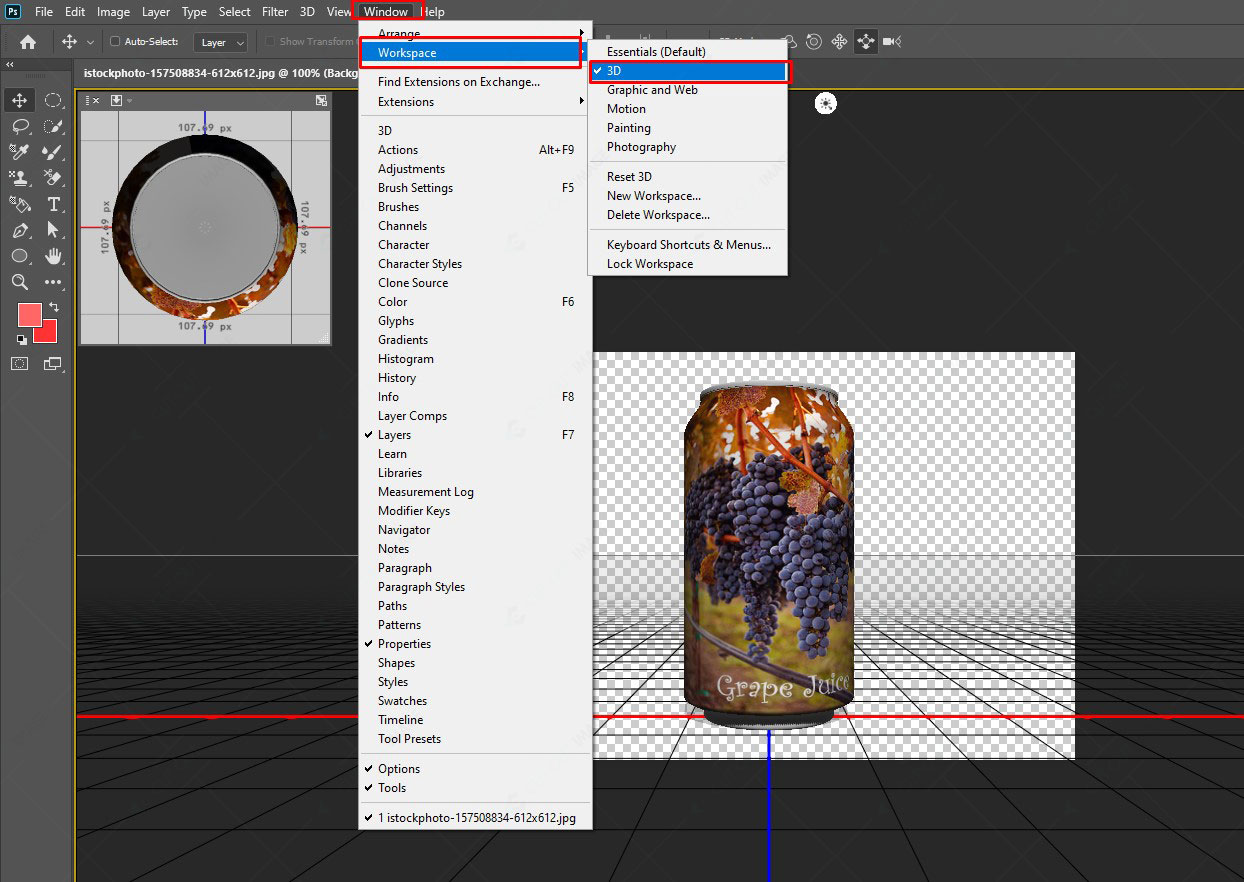
7. Go to Workspace following Window > Workspace > 3D to control the view of the object. Set the current view scene to 3D by going to the 3D option from the window. Drag to adjust the view.
 This image is for illustrative purposes only. No offense or conflict with any cultural, religious, or social values is intended. All trademarks, logos, & content remain the property of their owners.
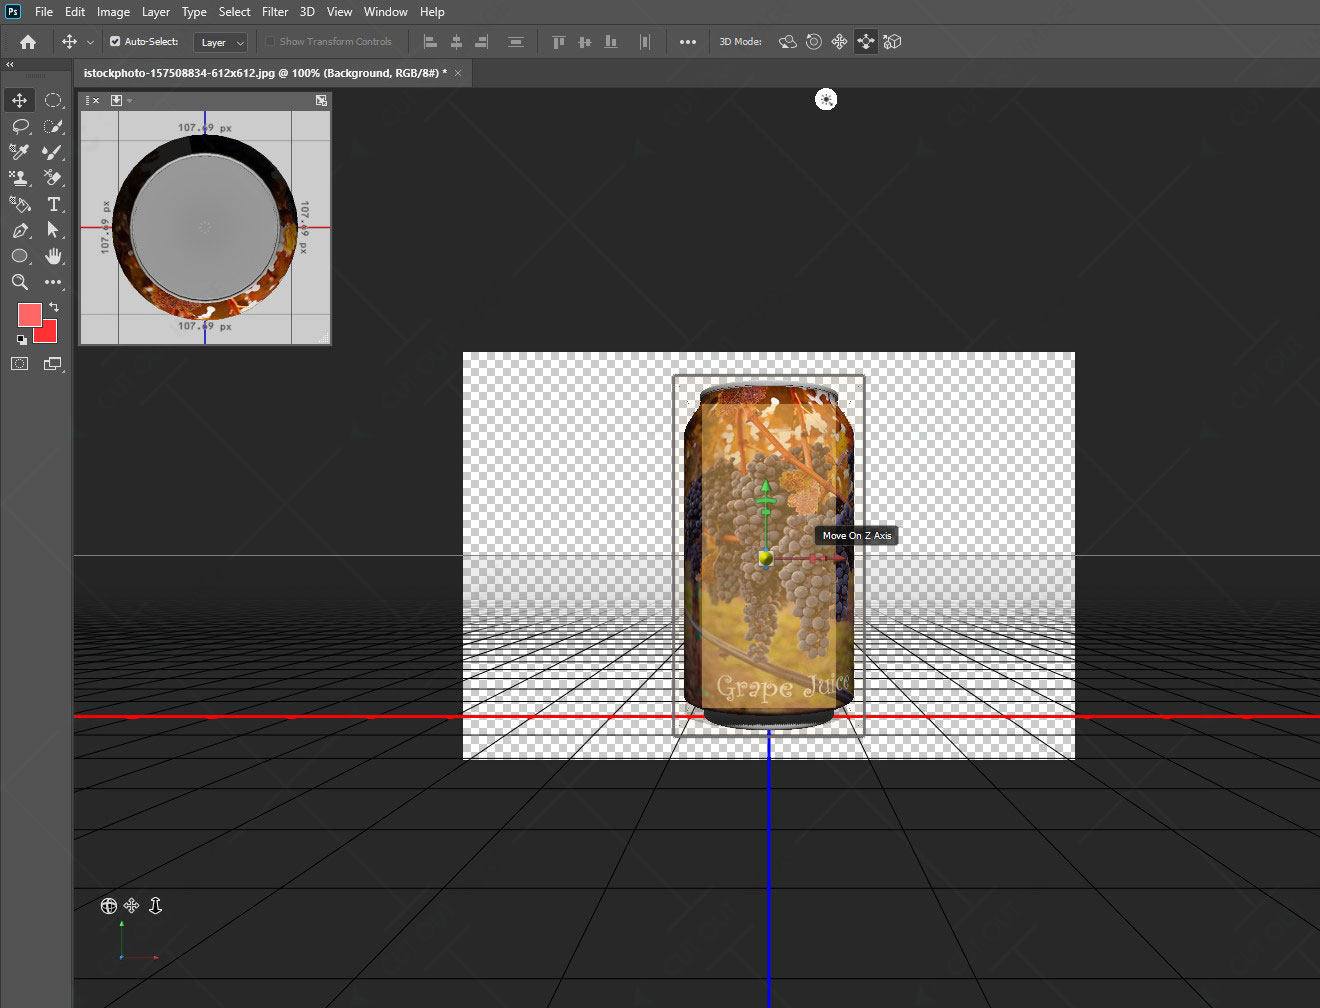
8. Click ‘Show the 3D axis’ to resize the object and drag the center cube up and down to scale up the object as you like. Hover over the red y-axis until the yellow circle arises.
 This image is for illustrative purposes only. No offense or conflict with any cultural, religious, or social values is intended. All trademarks, logos, & content remain the property of their owners.
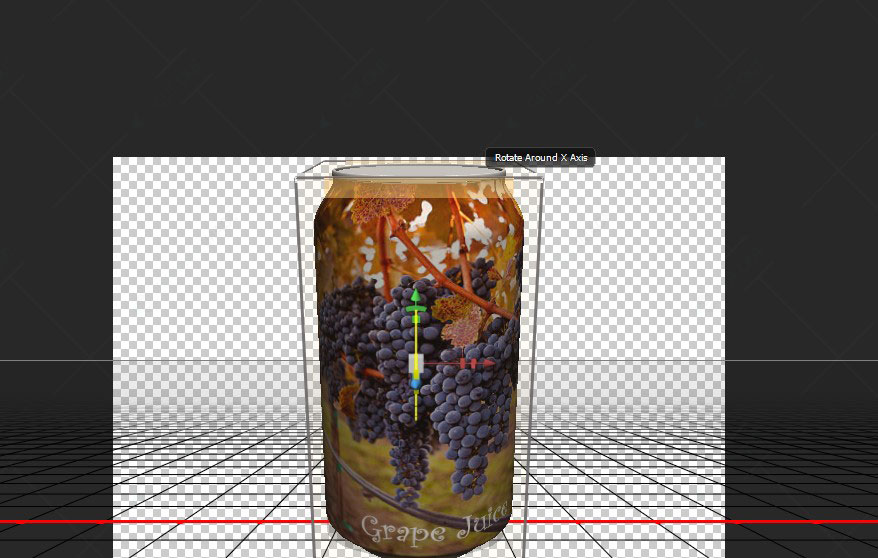
9. Then rotate the object for a better positioning view.
 This image is for illustrative purposes only. No offense or conflict with any cultural, religious, or social values is intended. All trademarks, logos, & content remain the property of their owners.
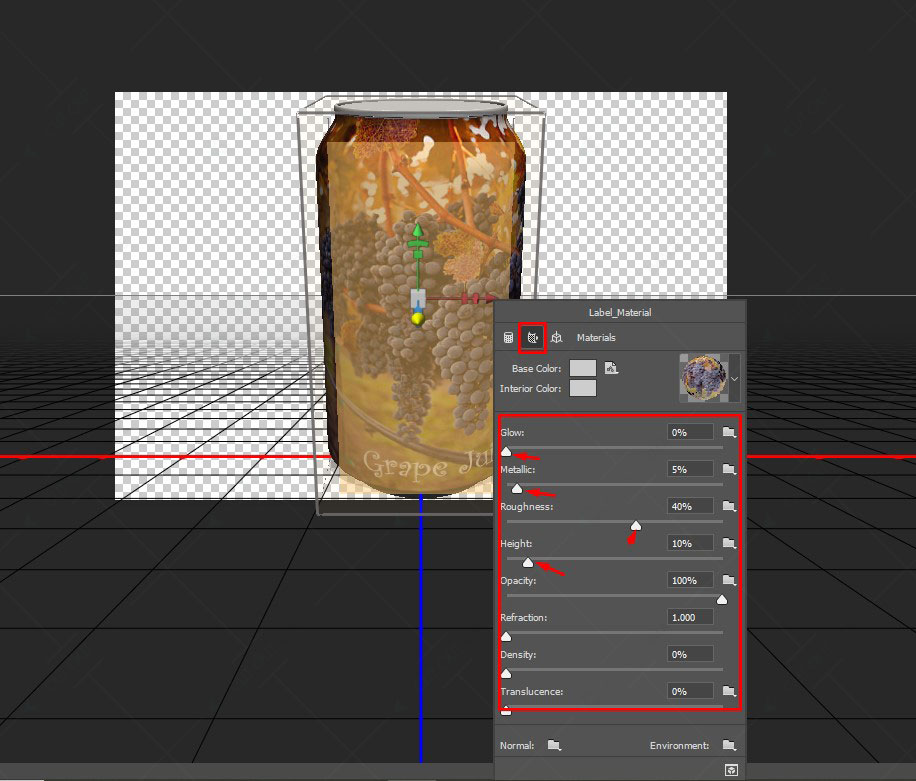
10. Now it’s time to add a realistic view to the object. Right-click on the object and go to the label. Adjust material under the object category. Adjust other available settings, like glow, metallic, color, roughness, etc., by moving the slider or inputting values to make the object realistic.
 This image is for illustrative purposes only. No offense or conflict with any cultural, religious, or social values is intended. All trademarks, logos, & content remain the property of their owners.
11. Once you are satisfied with adjusting the settings, add a background to your object.
 This image is for illustrative purposes only. No offense or conflict with any cultural, religious, or social values is intended. All trademarks, logos, & content remain the property of their owners.
Let’s know about split wrap in Photoshop:
Using the split warp option, we can extend or remove any portion from the picture. To use this feature, do the following:
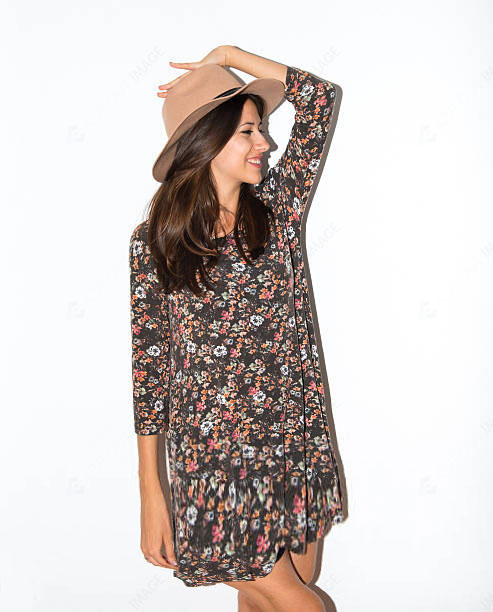
- Upload and duplicate the photo.
- Go to Edit>Transform>Warp.
 This image is for illustrative purposes only. No offense or conflict with any cultural, religious, or social values is intended. All trademarks, logos, & content remain the property of their owners.
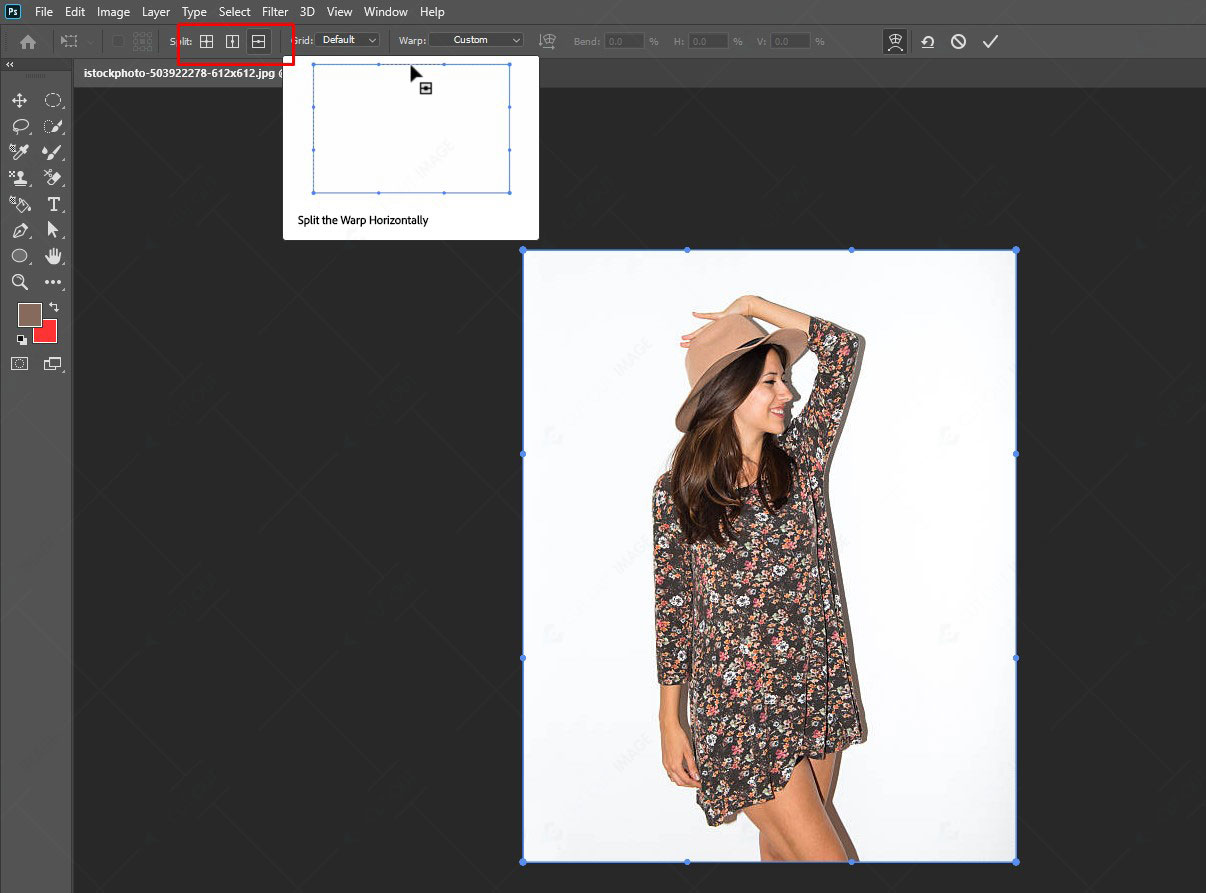
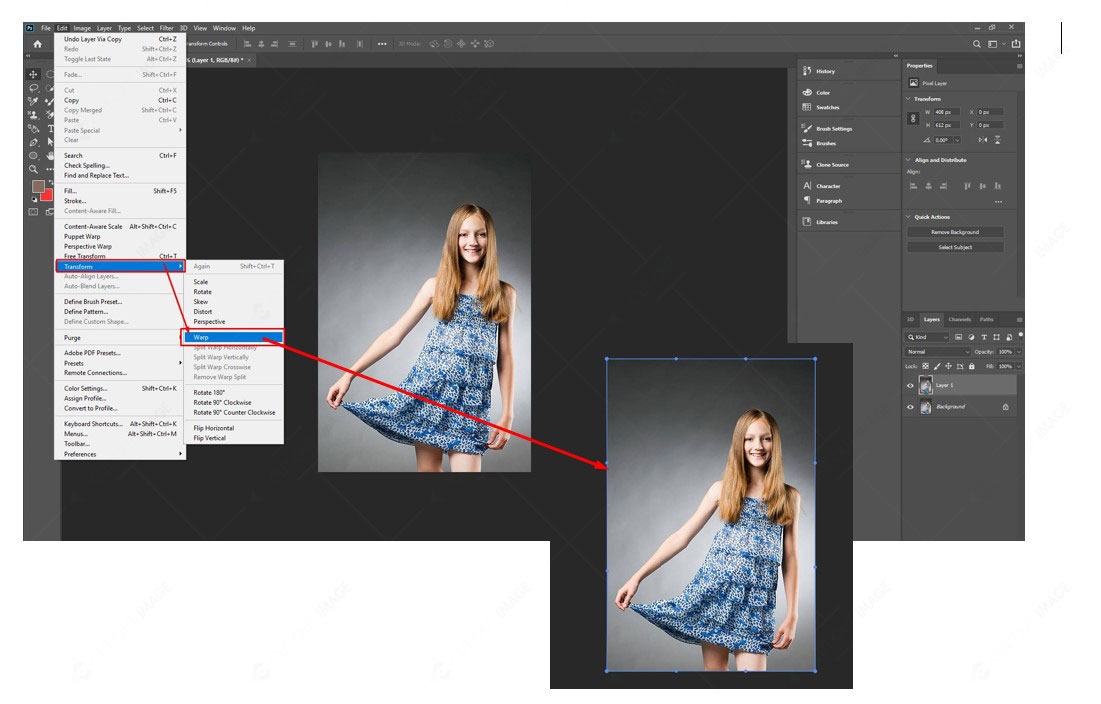
3. In the options bar, you will get the options below: Split Warp Horizontally, Split Warp Vertically, and Split Warp Crosswise.
 This image is for illustrative purposes only. No offense or conflict with any cultural, religious, or social values is intended. All trademarks, logos, & content remain the property of their owners.
4. These options will let you add or remove lines splitting the photo into subsections. You can warp each section with minimal effect on the other subsections.
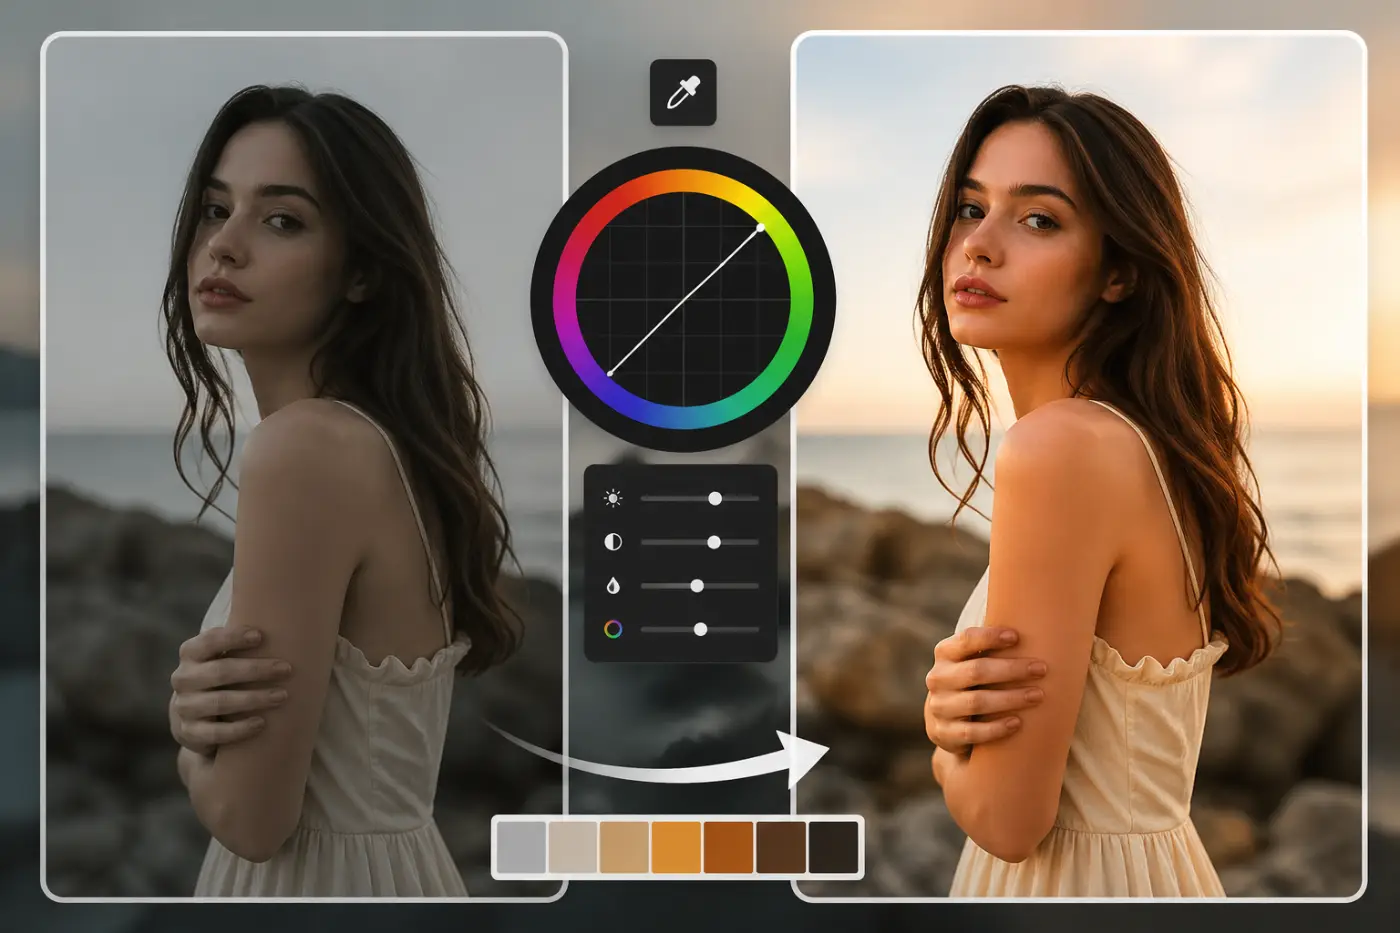
5. Select the split option that you need. For example, in this photo, I have used a split warp horizontally to increase the length of the dress.
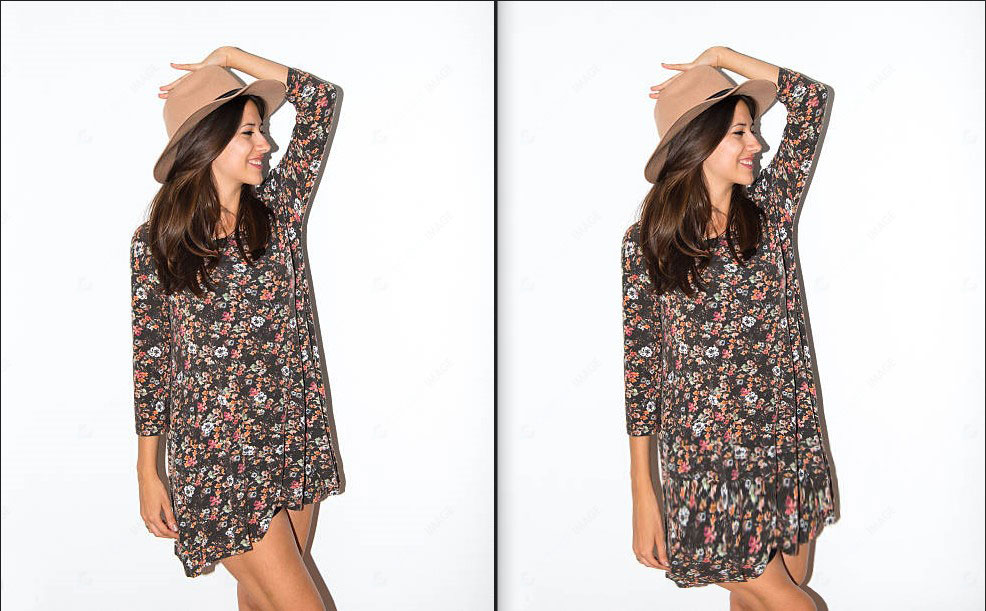
6. Now pull the split point to change the picture element.
 This image is for illustrative purposes only. No offense or conflict with any cultural, religious, or social values is intended. All trademarks, logos, & content remain the property of their owners.
7. Finally, following the steps correctly, you can get the photo with the desired change.
 This image is for illustrative purposes only. No offense or conflict with any cultural, religious, or social values is intended. All trademarks, logos, & content remain the property of their owners.
 This image is for illustrative purposes only. No offense or conflict with any cultural, religious, or social values is intended. All trademarks, logos, & content remain the property of their owners.
Finally, you have learned a few ways of wrapping the image in photoshop. As a beginner, you might not create good results at first, but with time and practice, you can create excellent results. So, keep practicing.
The Contrast Between Warp Tool, Puppet Tool, and Liquify Filter
Though the warp tool, puppet tool, and liquefy filter all execute the wrap functions in Photo Retouching, there are differences among them, and they pose their characteristics.
#1. The Warp Tool:
In Photoshop, the warp tool lets you manipulate fast and warp images through a grid-like technique of control points. In addition, using this tool, you can wrap photos, shapes, and paths.
 This image is used solely for illustrative purposes. We do not intend to offend or conflict with any societal, cultural, religious, or political values. Image Source: 123RF
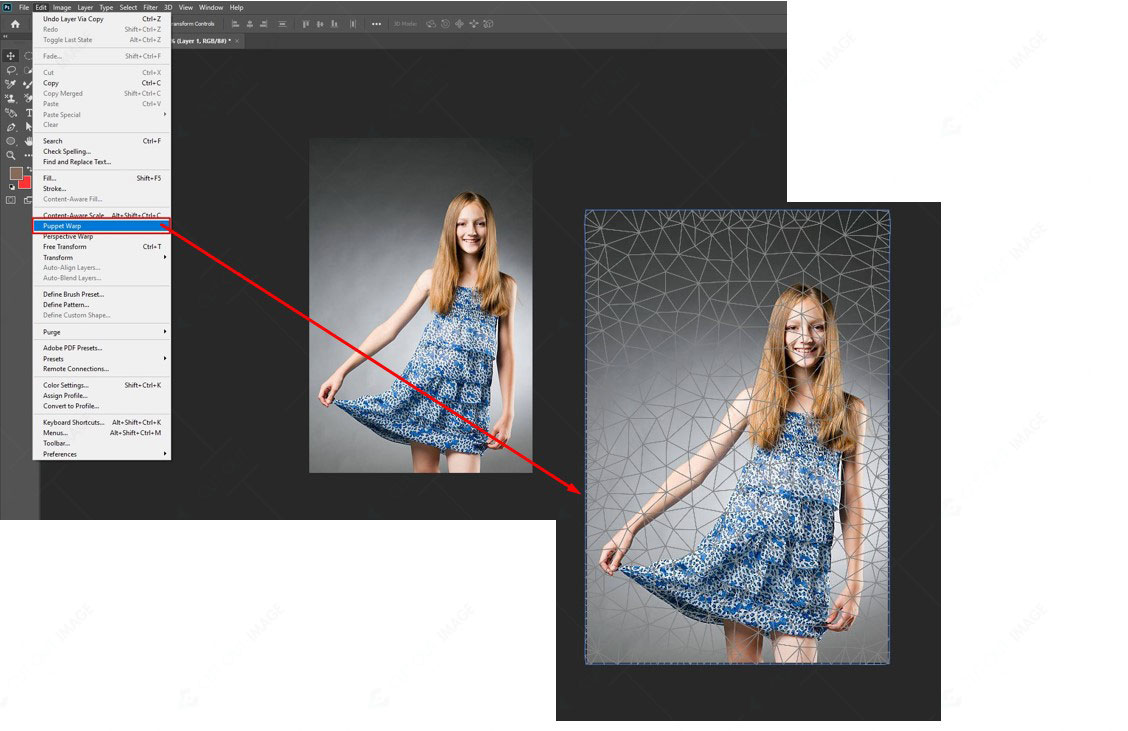
#2. The Puppet Warp Tool:
With this tool, you can place points or pins systematically around a displayed mesh that will create the warping points. Remember, to utilize the tool, you must isolate the subject from the background first. Moreover, you can apply the puppet warp tool to the smart object.
 This image is used solely for illustrative purposes. We do not intend to offend or conflict with any societal, cultural, religious, or political values. Image Source: 123RF
#3. The Liquify Filter:
If you work with an ordinary layer, you can apply the liquified filter. But you can’t use the liquify filter to a smart object if you are working with Photoshop versions up to CS6. However, you can apply the liquify filter on smart objects using Photoshop CC.
![How To Wrap an Image in Photoshop [ Complete Solution ]](https://www.cutoutimage.com/wp-content/uploads/2022/08/Liquify-Warp-Tool.jpg) This image is used solely for illustrative purposes. We do not intend to offend or conflict with any societal, cultural, religious, or political values. Image Source: 123RF
This image is used solely for illustrative purposes. We do not intend to offend or conflict with any societal, cultural, religious, or political values. Image Source: 123RF
The aspect of using the Photoshop Warp Tool?
You might never need the use of the warp tool because the need depends on your photo editing process. However, you can utilize the warp tool if you want to make dramatic changes or slight tweaks to your photo. Let’s check out some cases when we can apply the warp tool in Photoshop:
- Photo Retouching: The warp tool is also perfect for pictures where you want to make minor retouches, like sliming the person in the photo. However, try to use the warp tool marginally to construct a realistic-looking image.
- Text Wrapping: When you need to add text to your photo, the warp tool lets you shape it. You can place it on any surface and blend the layer for a realistic texture.
- Wrapping Image: The Warp command in Photoshop is an excellent feature for covering photos and Logos around a cylindrical objects such as bottles to give them that 3D look. You can take other 3D shapes to wrap the image and make an authentic product photo look. You can add some text there too.
- Add Elements: In some photos, we need to add an element. Then, using the warp tool in Photoshop, we can add the element to the layer and fit it with adjustments.
- Duplicate Element: When you need to duplicate an element in a photo, you can easily apply the warp tool of Photoshop. You can copy the element, place it in the image, or make slight changes.
The warp tool of Photoshop is an excellent feature of Photoshop that you can apply to edit photos of your 30th Birthday Photoshoot Ideas. In addition, you can use it to give a natural look to your photos. Moreover, you can apply this tool to create the product design you are planning to bring to the market. Reading the blog, I believe you have learned the easy process of How To Wrap an Image in Photoshop. Therefore, I hope you will practice the technique to create outstanding pictures.